March 2012 archive
 |
Those two on the right might be innocent, but I don’t know about
that beady-eyed fellow… |
So, a life time ago yesterday I wrote a post about Easter sewing. You can read it here. Since I drafted that post I have been sewing Easter Bunnies and Eggs until my vision has started to blur, and I have a blister on my thumb from cutting out bunnies. This post may be slightly delirious, consider yourself warned ;P
 |
| This lone Bunny lost his way and ended up in Noumea! |
One thing I wonder when reading amazing craft blogs is how do these women find time to craft and look after their kids. I had to sew yesterday and today while Miss 19 Months was awake (normally nap time is sewing time). We compromised. She sat at my feet and covered herself and the floor in a box of facepaints that she found.
 |
| This is before it got too messy |
I mentioned in my previous post that I have had mixed feelings about bunnies. Not any more, I know exactly how I feel about them now. Sure they look cute, but we ain’t best friends.
How did this all come about I hear you ask. Well, I could take you back to Licorice, my pet rabbit who was eaten by a fox when I was 8 years old or the class guinea pigs who traumatised the entire class because they weren’t separated before they had babies. Who knows where it really began, but Bunnies are far from my favourite animal.
 |
| FrankenBunny |
Getting back to the point, the long and the short of it is that I LOVE MY KIDS and when one of them fessed up that he had promised his whole class homemade bunnies and that he was scared of being called a liar if he showed up without them. Well, what could I do? I gave him the expected lecture, “We’d agreed on one for your teacher and one for 6 of your friends. Mummy can’t make 32 Bunnies in the next 12 hours…” At the end of the day my Mr 5.5 has had a tough 12 months. You can read about it here, but we enrolled him in a local French school and it took him most of last year to gain enough French to be able to talk to his classmates and know their names. For the first 4 months or so he would cling to the car door and I would prise his fingers off to deliver him to his teacher, both of us in tears. He has settled in now, and I’d like to minimise the hurdles he has to face, within reason. I may have gone beyond reason this time…
Like I said, what could I do? So, I stayed up until 1.20am and produced 22 Easter Bunnies and 12 Easter Eggs.
 |
| Doesn’t look all that impressive does it? |
Funnily enough I had spoken to Mr 5.5′s teacher yesterday and mentioned that we would subtly be giving a few bunnies to his friends at school pick up, but that I didn’t have one for all the kids in the class. Let’s just say that she was rather gobsmacked when I turned up with a basket of Eggs and Bunnies this morning. She’s a Mum too, she knew that Mr 5.5 had made a promise that he couldn’t keep, she knows the back story. She looked into my bloodshot eyes, saw my half hidden tears and understood. We will do INSANE things for our kids. I LOVE MY KIDS.
 |
A basketcase of Bunnies |
I then spent the better part of today making an additional half a dozen bunnies for the teachers for school pick up.
 |
| Bunny line up. I know it was one of these guys! |
I still have a half dozen or so bunnies to stuff for friends and I’ll probably find myself making a few more. I might get some sleep in before I face them though…
Oh yeah, and Happy Easter. Links to all of the Bunnies and Eggs are in the original Easter Post here.
I’ve jumped on the bandwagon and am sewing Easter gifts. I’m not sure how I feel about this. (After staying up all night sewing Bunnies I know exactly how I feel about this and you can read about my Bunny inspired madness here.) When did Easter turn into another gift giving holiday…? I mean, chocolate eggs sure, but some of the gift lists I’ve heard are akin to Christmas. Anyhow, I’m on board and I’ve been sewing up fabric eggs and a range of bunnies (you can find the links to the tutorials below).
 |
| I added little gift tags on ribbons. |
My first Bunny was a combination of two great tutorials. I took the shape of this Chibi Bunny and did a face inspired by this Easter Bunny.
I was having a lot of fun and even had a little girl in mind as I was stitching on the Bunny’s pink eyes. Then I remembered that pink eyes on bunnies are not a good thing. Where I grew up rabbits were considered a noxious pest and myxomatosis was rampant, slow moving, pink eyed bunnies were on a gruesome death train…
Heck! Where was I? Lovely Easter bunnies should not have pink eyes. Having said that, eggs shouldn’t really be blue or yellow but these look pretty good.
You can find the tutorial for the Fabric Eggs over at Retro Mama. I have to say, I seriously love the look of her blog! I’ll be heading back for a better look around soon  I have also started a Pinterest Board on Seasonal Crafts, so you can always look there for some ideas
In addition to my morbid memories of rabbits and lack of exposure to Easter gift giving, I face another hurdle. My children go to school in Noumea, the French education system has little place for religion. Will I be making a faux pas if I give Easter gifts at school? And if I do decide that it is OK to give the gifts, how do we hand them out? I’m not making one for all 32 classmates of each child (64 fabric bunnies!) so I’ve decided that they can have half a dozen each to give to their friends and one for each of their teachers (remembering that Mr 3.5 has 2 teachers and a teacher’s aides.
Update: I made enough Easter Bunnies and Eggs for all the Mr 5.5′s classmates, all the teachers and teacher’s aides and a few for close friends of Mr 3.5. You can read about my descent into Easter madness here.
But back to sewing. How cute are these fabric Easter Bunnies and eggs? The template and tutorial for the silhoutte style bunny can be found here at Twig and Thistle.
I’m thinking of having an Easter Egg hunt for our toddler playgroup with fabric eggs instead of chocolate ones. Although I’m not sure if I can face making another dozen fabric eggs for a few days at least 
Are you sewing for Easter? How do you handle distributing gifts at school when someone will miss out?
Aren’t these the cutest potholder’s you’ve ever seen? In a total Betty Crocker kind of way
 |
| Potholders or Ovenmits? I can’t decided!! |
I made these last night after spending a good hour trawling Pinterest for some gift ideas. I saw them here, but it doesn’t link to the original. I’m really glad that I decided on oven mitts! They are for a friend who loves to bake with her kids. She works with Mr Husband and she always bakes a cake when it is someone’s birthday. I love baking, but wanted to give her something that would last a little longer. I can’t claim that they are better on the waist because they might produce hundreds of cakes!
This project was a great way for me to practise some free motion quilting. I must say I LOVE the Bernina Stitch Regulator (BSR), BSR 2 is definitely my favourite mode. It is so EASY!
 |
Yes, I know there are rules about not crossing over your stitches,
but it’s early days and I’m really happy with the result
|
I didn’t have any insulbrite which I have read is the preferred wadding for oven mitts so I used 3 layers of cotton batting. I hope they are thick enough to keep the heat off her fingers!
 |
| I quilted the bottom of the mitts to look like a rippled cupcake mould. |
Rest assured that I will definitely be making a pair of these for my kitchen so I’ll know whether three layers is enough
I just endured 24 hours without an internet connection. It was less than pleasant. Mr Husband thought it was hilarious and told me I could spend my time sitting with him on the sofa. In addition to my usual activities I spent my time trying to fix the wifi router and modem. I guess I was a little productive… Look at all these hairclips I made!
I grew up in a rural area, we were on town mains, but some families used generators which were only used during the day for the washing machine, otherwise they were reserved for night use. I kept reminding myself of this and telling myself it was good for me, and an opportunity to get things done. Let’s just say that I am very glad that I am connected once again!
But back to being crafty
These alligator hairclips are SO EASY and quick to make! I made 3 and then I made LOTS!
 |
| Snap, snap! |
What do you think about having a button on them? I’m not convinced…
 |
| Are you sick of seeing this fabric yet? I LOVE it! |
I also decided to do the snap style hairclips a little differently. Now they are secured with beading wire, glue and a little felt back.
Little Miss and I are happily testing out their durability at the moment
Do you think that a pair of clips with a directional print should look like this
or this?
I think a pair should be like the second photo, but my Little Miss has only just enough hair to start using clips so it’s all new to me!
 |
| Leaving chalk dust in her wake… |
So I tempted you recently with my promise for a free pattern and tutorial for comfy toddler genie pants.
 |
| Contemplating life’s great mysteries in her Toddler Genie Pants |
Are you ready? OK, get set, let’s go!
 |
| Ready to take off in her comfy Toddler Genie Pants |
Before you start cutting your fabric, here are a few tips to keep in mind
- These pants are a nice loose fit on my 18 month old. I would guess that they would fit from 12-24 months and maybe longer. I’d love to hear how you find the fit.
- Are you using a directional print? You may need to factor in matching the top back and main back pant pieces.
- A 1/4″ seam allowance is included.
- These pants are very forgiving. You can make a few mistakes and just end up with slimmer pants that are still nice and loose.
- You don’t need an overlocker (serger) for this project. You could just as easily straight stitch and zigzag your seams.
- You can easily add a pocket at the side or back of these pants or a tie rather than elastic at the hem. You could even gather your pants at the hemline and use bias binding. Or you could let them hang loose and hem them by simply folding them up twice.
- edited to add: I have heard of these pants being made of heavier weight fabric with success.
- edited to add: I have heard of the pattern pieces being lengthened by 3″ to give a full length finish and the pattern being scaled up slightly to give a looser fit.
You will need:
- approximately 20″ of 1/4″ elastic.
- enough 3/4″ elastic to encompass your child’s waist.
- a little less than one yard of fabric (I have used a poplin, light weight cotton and quilting weight cotton).
- normal sewing supplies.
- a sewing machine (an overlocker/serger is not necessary but use one if you have one!).
- the pattern pieces, you can find them here.
Print out your pattern pieces and tape them together. Lay your pattern pieces on your fabric. Note the position of the pants in relation to the selvedge.
 |
Let’s just pretend that I follow the rules
and ironed my fabric… |
Cut out your pieces, note, a seam allowance of 1/4″ is included.
Mark the centre of the front crotch and centre of the crotch piece. Lay the front pants piece right side up. With right sides together pin the centre of the crotch piece to the centre of the front pants.
Use lots of pins to ensure that your crotch piece and pants piece line up well. My pins are about 3/4″ apart (I hate pining and had to force myself to do this but it’s worth it).
 |
| See all those pins? They’re about 3/4″ apart. |
Overlock/serge your two pieces together.
 |
| All that pinning paid off! What a lovely seam
|
You now want to gather the main back pant’s piece and join it to the top band. Select your longest stitch length. Staying within your seam allowance sew a straight line across the top of the main back pants piece. Hold one thread and gather the main back pants piece until it is the same width as the top pants piece.
Lay the main back pants piece right side up. Lay the top back band right side down so that the top of the main piece and the bottom of the band are aligned. Pin in place. Note the slight overlap on the pinned edge, this allows your two pieces to line up once they are joined together
Overlock/serge your two pieces together.
Iron the seam up toward the top of the pants and topstitch in place.
Find the middle of the crotch of your back pants piece and pin to the centre of the crotch piece.
Continue pinning from the centre of the crotch to the end of the pants leg (hemline).
 |
| See all those pins? |
Starting at the centre again, pin the other side of the crotch continuing to the hemline.
Overlock/serge your two pieces together.
 |
| See, all that pinning was worth it
|
Now is a good time to stop and fix any little mistakes, overlock/serge the bottom of both legs and waist, and attach a label if you’re using one. You can overlock your waist and legs later, but if you do it now you’re working with an easy straight, flat piece of fabric. These pants are designed to be easy
These pants are very forgiving. This is the second pair I made and I made a few mistakes lining them up, so I just trimmed the waist and hem lines a little to straighten them. They still fit well but are slimmer than the other two pairs I have made. If you need to straighten your hems or waist do it before you finish the edges with your overlocker/serger
Pin both outer leg seams and overlock/serge.
Cut your elastic pieces. You need one piece for each leg and one for the waist. I cut two 9″ lengths of 1/4″ elastic for the legs and one 3/4″ piece of elastic that is 3/4 of my child’s waist measurement. Sew your two leg pieces of elastic into loops.
Mark four equal points. Do this by taking your elastic loop and laying if flat and marking the two outside edges.
Now rotate the loop so that those two marks meet and make another mark on each outside edge.
You will now have four equally spaced marks on your elastic loops.
You also want to mark four evenly spaced points on your hemline using the same technique.
Select a zigzag stitch. Place your elastic on the wrong side of your bottom hem right next to the fabric edge. Sew the elastic to the fabric, make sure you stretch the elastic and fabric so that the 4 marked points on the elastic meet the 4 marked points on the fabric as you go. This will give you an even gather.
Repeat for the second leg hem.
 |
Stand back and admire your nice, even gathering (whilst ignoring
those loose threads…) |
Select a straight stitch. Fold the hem up once, just enough to cover the elastic and no more. I use my 1/4″ foot at this point for a guide. You want your straight stitch to sit comfortably on top of your elastic to hold it in place. Sew your hem in place, stretching out the fabric and elastic as you go to ensure you keep your nice gathering. Repeat for the second leg.
You’ve now finished the pant legs! Hooray!
Now you want to create your waist band. Remember that you want your pants to be bigger in the back than the front. Fold and press the top of your pants back over 1/4″ so that wrong sides meet.
Fold and press the front over 1/2″ (you want lots of bottom space for your toddler).
Fold the waist over again, about 1″, you want your elastic to sit comfortably within the casing.
Sew the casing in place using a straight stitch. Don’t forget to leave an opening of about 2″ for your elastic.
Before you start inserting your elastic it is a good idea to pin the end in place.
Insert your elastic.
Make sure that your elastic is not twisted then secure your ends. I used a triple stitch zigzag. A normal zigzag is fine. I can be a little paranoid
Striaight stitch your gap closed.
Et voila! You’re done!
Remember that I mentioned that these pants are very forgiving? Look at the size difference in these two pairs. The top pair I trimmed the waist to straighten it.
There is still lots of room for getting about!
I hope your toddler enjoys wearing their new Genie Pants and that you had fun making them!
 |
| Searching for Fairies in her Genie Pants |
I get a lot of enjoyment out of sharing my creations with you and I put a lot of work into creating tutorials that I hope you find useful. I ask that you if use my tutorials that you put a link back to my blog if you are sharing your creation online
I would love to see any items that you have made using my tutorials or inspired by something I made. If you are happy to share your images, please send me a link or email so that I can put it up on the gallery for you
Thank you and happy sewing!
This dress was inspired by the cover of Ottobre Kids magazine 1/2008 which I won late last year from Crafty Mamas. If you’re interested in Ottobre she talks about it fairly often on her blog.

Have you sewn any Ottobre patterns? They’re fantastic and a great way of developing your techniques! The pattern sheets are not for the faint hearted…
The dress on the cover is GORGEOUS but too big for my Little Miss and rather than resize their pattern I decided to draft my own. Nothing like feeling a little clever… First I drew up what I had envisaged.
I then took the pattern pieces I had drafted for the Men’s Shirt into Princess Dress and rejigged them slightly so that the bodice encompassed the sleeve holes.
I also wanted to try a little cutout in the neckline while keeping the gathering that I loved from the Otto dress.
I have some gorgeous maroon velvet ribbon that I could have used but I ADORE this butterfly fabric and who can resist making matching buttons? So I made a long band that can be tied in a bow at the back.
My Little Miss likes loose, airy clothing so I gathered the skirt both where it meets the bodice and at the band on the hem line.
The hem can be taken down another 1.5″ so the dress should last a year or so.
What do you think? Do you ever draft your own patterns? This is something I want to learn more about. It is so satisfying! I’d love any tips you have on pattern drafting.
Bon weekend!
I’ve been busy sewing all week and was hoping to put a tutorial up today, but the Doctor and sick kids got in the way… So instead of a tutorial, here’s a teaser! Look what I made this week? In fact I made three of them and am now happy with the pattern and ALMOST ready to share it with you! I just need to put the photos and the instructions together. Ah, if only it were as quick as it sounds
 |
Can you believe I took about 200 photos and
these are the best ones? 5pm is not the time to
get good photos apparently… |
These pants are easy to make, very forgiving (trust me, you can make a lot of mistakes and they’ll still turn out OK), quick and free! Well, you have to supply your own fabric, elastic and thread, but I’ve drawn up the pattern and it will be up on the blog for you to use gratuit!
And on that note; bon weekend!
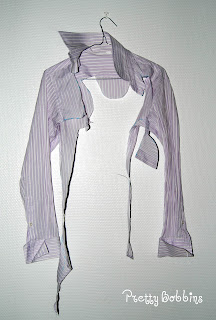
I sew for stress relief. I’ve been sewing a lot this week. Mr Husband has donated a pile of old business shirts to my sewing stash and I’ve been thinking about refashioning (upcycling) them for awhile. Then I bought some tulle. Then I had a bad week. And out of that came the Princess Dress!
What do you think? I’m very proud of myself!!
So, I started with this old shirt.
Not much of it is left now. I’ll keep the sleeves though, there’s still potential there
Scribbled an idea on some graph paper.
 |
My original idea. Funnily enough I don’t think I looked at this
once I started. |
Found some fantastic inspiration on some great blogs here at Girl Inspired, here at Dana Made It and here at tidbits.
Had a lot of fun with some rolls of 6″ tulle.
I used the original placket which I thought was a nice detail but was probably way more fiddly that starting afresh!
Threw it all together and before I knew it (OK, it actually took ALL day) we had a beautiful Princess in our garden!
I decided it needed a fabric brooch as the front is rather simple to compensate for the back Oh, and I love making fabric broochs!
 |
| Cute as a button! |
I’m going out for a girl’s night tonight and I’m taking my Little Miss’s Princess Dress to show off Then I am going to get her to wear it every day until she grows out of it Well, I might wash it occasionally…
 |
| Did you want that back detail again Mummy? |
Yesterday I decided Mr 3.5 was in urgent need of long, loose, comfy, groovy pants. This is what I came up with.

I think he likes them, I couldn’t get him to stop spinning around
 |
| Which way Mummy? This way? |
 |
| I caught a fish and it was THIS BIG! |
I made them extra baggy in the leg and used an extra wide piece of elastic for the waist. I actually prefer a flat front and adjustable elastic, but Mr 3.5 likes “soft pants”, he also demanded asked me politely to provide front pockets. Every boy needs a place to put his goodies, right? I completely understand the need for comfy clothing, so I tried to make them as easy as possible for him to put on and incorporate all of his requests. The cuffs have snaps and can be dropped to lengthen them, but he’ll wear them snapped up at this stage. I also put a snap on the back pocket just because I love my snap machine!
 |
Can you see the snaps? I love pants that
you can lengthen as your child grows! |
We live in the tropics and the grey truck fabric is nice and light, they yellow dots are a quilter’s weight cotton. Sadly this was the last of this grey truck fabric. If you see some about please let me know, I could quite happily make many more things with it!
 |
Photo shoot’s over Mum, I’m off on my
next adventure! |
I won’t bore you with my week, suffice to say it has been hectic and stressful with far too many Doctor’s visits involved. I’ve just organised a simple dinner and am hoping that the second half of the week will calm down somewhat!
What I will share with you is the gorgeous cross-over Kimono I made last night as a gift for a one year old girl. I hope she likes it!
Amy from Habitual….A Creature of Habit created the tutorial and you can get a copy by emailing her (all details are on her blog which is linked here). It is a really straight forward pattern and you don’t even need to print it!!!! The sizing seems spot on too, which is always nice
I hope the Little Miss who received it today likes it. The fabric is a gorgeous soft, Chinese folk fabric that I bought when we lived in China. Technically Kimonos are Japanese, but I just couldn’t resist this combination.
I had actually planned to give the birthday girl a reversible cross over pinny. I found a Little Bird Pattern in my drawer, it looked lovely, their patterns are super simple and it all seemed perfect. Then I googled… Mr Google told me that Little Bird Patterns are on the large size and to go up a size or even 2. So I did… When my Little Miss 18 Months found herself swimming in the pinny I decided it was way too big for a one year old. I still think it’s lovely, but it will find another home
 |
| Sorry for the photo, it rained for two days straight… |
In the end I am happy that I managed to produce two pretty little girl items even with the stress of the week