Archive of ‘Paper Piecing’ category
***August is a month of celebrations for Pretty Bobbins. It is my two year blogiversary and two of my children have birthdays this month. There will be a giveaway for each of these events, you will find the first giveaway at the bottom of this post.***
Back in April I was Queen Bee for Wombat Stew, a paper piecing bee. I struggled with a theme from the beginning, I really wasn’t sure that ‘celebrate’ would work. I put together an inspiration board and by the time my month rolled around I hadn’t thought of anything better so I decided to go for it. I asked the girls to make blocks of any size to fit the theme ‘celebrate’. I planned to make a wall quilt to hang every time we have a family celebration. I also like the challenge of making a quilt from different sized blocks. I asked the girls to stick to fun, bright and relatively gender neutral colours (so pink is OK but not all pink). You can see some progress shots here. Today it’s all about the big reveal! (And if you really like the patterns you should keep reading right to the end *HINT HINT*)

Celebrate – a paper pieced quilt
I LOVE this quilt! My kids love this quilt and August is a month of celebrations so as soon as I buy some dowel it is going on the wall  I quilted the heck out of the quilt and had soooo much fun doing so! You can see the quilting better on the back. It measures 37″ x 37″ and was put together and quilted with Aurifil threads by me on my Bernina 440. Full credit to each of the bee members below <3

Celebrate – quilting details on back
I had my own little party quilting with a rainbow of Aurifil 50 wt threads (really, what’s a party without Aurifil? Alex seems to be everywhere if you follow him on Facebook LOL). I used 2000 on the cream/off white areas and I love how they sparkle. Can you see the word PARTY popping out in Kristy’s party hat blocks (Kristy of Quiet Play designed most of these blocks, isn’t she AMAZING???)?

Party hats by Kristy
Marieka baked me a delicious cake. I was really unsure of how to quilt this block but really happy with how it turned out. My icing is never that neat LOL There is enough cake here for everyone, LOVE!

Tiered cake by Marieka
I had a lot of fun playing with Alyce’s pom poms (and I’m sorry, I had to make that joke LOL). She very cleverly used a flying geese pattern, you can see her tutorial here. I’m still considering adding a few beads to the pom poms but for now I’m sticking to the star in the middle (and yes, more micro-stippling there). Aren’t they fun?!

Pom Poms by Alyce
Jane’s block is immediately apparent to Australian’s but some of my readers may be wondering what it is. This is an absolute classic and staple of children’s birthday parties. Known as “fairy bread” it is sliced white bread, spread with butter and then covered in sprinkles. Jane obviously took a bite out whilst piecing and left her party blower behind as evidence 

Fairybread by Jane
Fiona’s cups (pattern by Ayumi of Pink Penguin fame) had a real retro feel so I quilted the wall paper to enhance this vibe. Possibly better seen from the back, but aren’t they the cutest drinks ever? (There is a fourth block, you can see it in the larger photos)

Paper Pieced cups by Fiona (pattern by Ayumi Mills)

What party would be complete without bunting? The adorable Lara (she is completely adorable, you should check out her instagram – luellabella) made me rainbow bunting. LOVE! I went a little nuts and quilted pebbles with each dot being inside a pebble.

Rainbow bunting by Lara
Whilst the wonderful Ms Midge wasn’t in round one of Wombat Stew she decided to join the party early and brought the candles. Can you believe she tried to tell us she was a novice paper piece-er when we asked her to join us????

Candles by Ms Midge
And whilst we’re on the topic of Ms Midge, she sent me the cutest scrap EVER! I LOVE this fairy and I quilted her in a micro version of the the FMQ design that I used on my daughter’s quilt. I’ve saved the last skerrik of this scrap and plan to make my daughter a cushion with it. Thank you Midge xx

Cutest fairy scrap EVER complete with micro quilting
I totally got my FMQ on and micro-stippled this fantastic cupcake print (did I mention the girls sent the most amazing scraps with their blocks?!).

scrap love from the Wombats
I think every block/print features a different FMQ design. I must admit I went a little crazy quilting around each candle (print in the bottom right of the above photo) this scrap is only 1.5″ x 4.25″. I was so impressed with the affect that I then quilted around the jellybeans and balloons too LOL

Celebrate paper pieced quilt
I added in some three dimensional bunting down the side (left over from another project) and at the suggestion from a friend quilted words underneath (sing, dance, encore, cake, secret, surprise, kiss). The idea being that the birthday person must choose an activity to complete

You gotta dance! (then shout hooray)
Well done if you’ve read this far! Possibly my favourite part of quilting this beast is the words in the border. I used 12wt Aurifil (2250) for top thread and the same colour in 50wt on my bobbin. The stitches are perfect (I suggest going slow and smoothly and dropping your top tension a few notches). Can you believe that I didn’t mark the words first? It was all done free hand and I’m so pleased that it filled the borders perfectly and looks rather neat YAY for machine quilting with Aurifil 12wt. I will be doing this again and again and again <3
FMQ writing in 12wt Aurifil in the border, woohoo!
Did I mention that it was worth reading to the end? Well, the fabulous Kristy of Quiet Play who designed most of these patterns has come to the party with a giveaway of most of the patterns seen in this quilt! Thank you Kristy xx I highly recommend that you give her patterns a go if you’re thinking of trying out paper piecing. I’ve made quite a few of them and they’re always easy to follow and very well designed. You can find her shop here on Craftsy.

Pattern giveaway thanks to Quiet Play
All you have to do to enter is leave me a comment letting me know that you follow both Pretty Bobbins and Quiet Play blogs. (Head over to Quiet Play and follow Kristy here.) You can have an additional entry if you follow me on Instagram, Facebook or Flickr, just leave me a comment letting me know You have a chance to win a bundle of paper pieced patterns by Kristy of Quiet Play as seen in the collage above (bunting, candles, hat and cupcake). The giveaway will close at midnight 18th August Australian Eastern Standard time (google Sydney time).
***This giveaway is closed***
Bravo if you made it to the end. What a mammoth post! I’m taking my celebration to the Paper Piecing Party at Quiet Play and TGIFF at Bedtime Quilting.

My main work in progress this week has been my “Celebrate” quilt made from blocks put together by the wonderful wombat stew girls (Fiona, Midge, Alyce, Kristy, Jane, Lara, Marieka). I was the last Queen in the first round of our paper piecing bee and I really wasn’t sure if my theme would work. I selected “celebrate” and asked the girls to make a block of any size that met this theme. I put together a pinterest board to inspire them and explained that I wanted to turn their blocks into a wall quilt that would hang in our home whenever we had cause to celebrate. The girls outdid themselves! This week I put all of the blocks on the design wall.

Paper Pieced Celebrate blocks on my design wall
I had asked the girls to please send me some scraps of the prints that they used in their blocks. They are such generous friends and they sent me a stack of scrap love including some wonderful novelty prints that were just perfect!
The Rainbow I Spy quilt was my first go at putting together random sized blocks. I’m much better at it now. I’ve learnt to work in sections, building up blocks until the sections match in either width or height and then joining them together

Turning different shaped blocks into sections
I was so excited with the finished top. I LOVE it and my kids do too!

Paper Pieced Celebrate Quilt top
I was having so much fun that I found it really hard to stop and auditioned a range of borders including these great FQs that Jane sent.

Trialing borders
I asked the girls for honest feedback and they told me it was too busy (they were right!) so I auditioned every low value print in my stash to create a scrappy border.

Possible low value border
Thankfully my brain kicked in and I realised that a pale sketch border would be perfect and allow me to have some fun quilting.

Celebrate quilt basted
So now all I have to do is find the time to quilt this beauty. August is birthday month in our house and I really wanted to have it ready to hang for the month. I’m guessing it will be a day or two late
I’m linking up with WIP Wednesday at Freshly Pieced.

Over the weekend I shared some pics on Instagram of a mini I was working on. I had so much fun and I finished it up yesterday. I even hand stitched down the binding which I NEVER do! I used this fantastic tutorial by Very Kerry Berry for single fold binding and I must say I love the result and will use this method again.
I had been contemplating a double wedding ring quilt for awhile and had also been tossing up entering in Pat Bravo’s IG sewing contest and then the two ideas came together. I had so much fun, it turns out I have a lot of Pat’s fabric in my stash, who knew?
I made my own template, once again being thankful for having done Rachel’s curves class. I found this great tutorial for a lazy girl quilt but didn’t follow it. I stuck to 1/4″ seam allowances and I paper/foundation pieced the ring. I made my template using a ribbon and a pencil, then I checked that it was evenly placed using a ruler.
Then I just traced the ring template three times and pieced four quarter rings directly onto the template.
If you’ve never pieced precise curves before I would suggest lots of pins or glue basting. I glue basted the points of the ring in the final stage because I like my piecing to be perfect because the rest of my life is chaos LOL
 |
| Top complete! |
Whilst I was piecing the curves some words popped into my head. I guess I was thinking about how the single girl block is meant to be an easier version of the double wedding ring and yet it is still challenging. Easy my aunt! And there you have it, I knew that I had to somehow quilt “single my aunt” into this quilt. But if you’re paying attention you’ll know that I was thinking of another A word.
I shared my progress on instagram and stayed up late quilting. I got 3/4 of the way through the quilting and doubted myself. Would I offend people? Would it look ok? Should I have used the American or Australian spelling? I even questioned whether single could have a capital S. but then I remembered that I was making art and it didn’t really matter as long as I went with my artistic vision.
 |
| Quilting in progress |
I used Kona Steel on the front and Bella Steel on the back, the kona is much darker and I love how it makes the prints pop. I used a grey Aurifil (2605) in 50wt for piecing and most of the free motion quilting but you know how I love colour and I couldn’t resist adding some vibrant sparks to the negative space (1100, 2452, 2810 and 2692).
 |
| Single Aunt back |
So I ask that you please remind yourself that this quilt is a piece of art. It will not appeal to everyone. I am reminding myself that by putting my work into the public sphere that I am OK with negative feedback Personally, I love it and I think it’s funny. All those voluptuous swirls in the centre, well they remind me of wobbly bottoms and round, jiggly tummies. You can be single or a married mother of three and claim those beauties. The segmented circle inside the pieced circle, that reminds me that our lives are segmented and compartmentalized You don’t need to be single for that either.
I didn’t make this quilt to shock or offend. I made it because I have a sense of humour, I had an itch that needed scratching and an idea bubbled to the surface. And if I’m going to be really honest… Well, I am a bit of a potty mouth and this quilt is for me so it’s a good fit.
 |
| My new mini in my sewing space (how could I edit that Princess out?) |
I hope I haven’t offended you, if I have I remind you that we all have different tastes and I hope you can appreciate the piecing or the quilting or palette if not the play on words Unfortunately all the quilting in the negative space makes the piecing look somewhat messy, next time I’m going to play around with the quilting and see if I can over come this issue.
I seriously had a lot of fun with this mini and it was super speedy, from fabric selection to basting took me a couple of hours. The quilting was done in the evening between the kid’s bedtime and mine, so probably two hours.
This quilt was pieced and quilted by me on my Bernina 440QE using Bella and Kona solids, Art Gallery Fabrics, 100% wool batting and Aurifil threads. It measures just under 20″ x 20″.
Have you ever made a quilt that you weren’t sure how it would be received? Do you see quilts as art?
I’m linking up to Sew Cute Tuesday at Better Off Thread. I have also taken a leap of faith and added this quilt to the NYC MOD quilters Double Wedding Ring Quilt Challenge in the small category.
Last year when Alyce was Queen Bee for Wombat Stew she selected a theme of Japanese Cuisine. At the time I was using Quilt Assistant and drew up a paper pieced block of my favourite Japanese dish, Gyoza (dumplings).
 |
| Available for purchase here on Craftsy |
Alyce put her blocks together this month and produced this beautiful mini, Itadakimasu! She has entered it into The Blogger’s Quilt Festival, you can find it here if you’re thinking of voting
 |
| Photo with permission courtesy of Blossom Heart Quilts. |
To celebrate Alyce’s awesome quilt I redrew my original block in EQ7 and have listed it for sale on Craftsy. It looks tricky and it is a little fiddly, but it is pieced in such a way as to avoid scary Y seams I’d love to hear from you if you make it!
Now I’m off to hunt down some dumplings in Nouméa
I seem to work well under pressure. Well, that’s my excuse for leaving my BOM and Bee blocks until the last day of the month AGAIN! I didn’t manage to sneak in my Lucky Stars BOM but I have printed the patern and selected the pritns (about two weeks ago!) so it will be done shortly
I did get my And Sew On BOM block done today. To be honest I wasn’t all that excited about it but I’m so pleased with how it has turned out!!
Until now I had been using a cohesive colour palette for this BOM but I decided to be radical today and change it up. I have decided that I’m not going with my original plan of making a wall hanging with the blocks, but to turn them into SUPER COOL sewing related gifts for my quilty pals This block is going to become a little pouch for carrying scissors and rotary cutter to quilt group. How cool will that be?
I also squeezed in my QCA Bee 1 (we need a better name, right?) block today. Marieka chose the Garden Fence block by Hyacinth Quilt Designs. Again, I was not super excited about this block. But it is AWESOME! So easy to put together and so fun!! If we weren’t in the same Bee I would be choosing this block too LOL
 |
| Wonky photography not block
|
Keep your eyes peeled for my birthday giveaway that I will be posting in about 15 minutes Trying to squeeze in all the April essentials
I’m linking up with the April Sew On BOM Linky at Quiet Play.
I seem to be making more minis and fewer large quilts recently, but they’re all fun, so on with the show and tell
Earlier in the week I finished a fun retro TV cushion for the boys. I used my own pattern for the centre block and it is now available to purchase on craftsy. I had previously made a 10″ version of this block but I wanted to have fun fussy cutting a print for the TV screen so I went with a 15″ block this time. The cushion requires a 26″ insert but our cushion are rather deflated from pillow fights, but you get the idea I plan to make a few more large cushion covers for the children to play pillow fights with have in their playroom.
It’s a week of birthday celebrations for us, I turn 35 tomorrow (keep an eye out for a celebratory giveaway over the next few days.) and Mr Husband had a birthday earlier in the week. We have a few bought presents coming but I made this mini for Mr Husband.
In my mind my FMQ writing was much neater *sigh* but this probably accurately reflects my messy scribble The words reflect significant points in our life together (my first memory is of him holding the bus door open, I thought he was such a gentleman! I was obviously easily impressed as a 21 year old LOL.)
I selected a red thread (Aurifil 50wt 2250) for the writing to jump out and a pale cream (Aurifil 50 wt 2000) for the rest of the FMQ to blend in. Usually when quilting I have a plan. Before I jump in I generally sketch out my design or run my finger over the fabric to work out the size and shape or any obstacles I might encounter. This time it was made up as I went. I threw a couple of feathers in because Angela Walters says they’re her favourite and she will always fall back on them.
I love harsh geometric shapes and I played off the sharp edges of the numbers and symbols balanced with lots of swirls and organic shapes for interest. At one point I stitched a leaf and decided it was perfect for an apple. We fell in love in a village that grew apples so there you go, there’s an apple
 |
The apple looks a little strange as I wrote the name of the village.
But hey, the recipient gets it
|
We lived in Beijing for awhile so I stitched out The Great Wall and then underlined it with the highrise skyline of Beijing.
 |
| The Ls got chopped off when I trimmed the mini. This is where planning would have been helpful! |
I decided this location theme was fun and added in some bicycles. We used to go on lots of family bike rides in Australia. Generally with kids on the back of the bikes but I thought I would end up with a mess if I started to draw a kid’s seat attachment LOL
As you may know, we currently live in the South Pacific so I added in a little scene of the Pacific, some waves, a traditional hut, a coconut palm and the brilliant sun.
There are lots of love hearts hidden in the FMQ and the whole thing is a bit of whimsy, possibly over the top, but Mr Husband is very supportive so I’m sure that he’ll love it when I give it to him tonight
The mini measure up at 13″ x 15″ and I used some scrap cotton wadding. I used a fun orange print (Soul Garden) for the binding and some favourite prints for the paper pieced equation. I’m hoping the equation makes sense, but it’s meant to represent that 1 (him) plus 1 (me) became 5 when we had our three wonderful children. (Well, mostly wonderful, Miss 2 has spent the last hour refusing to put on leggings and is wearing a dress I made her a year ago which barely covers her bum. Keeping it real, people, keeping it real. LOL)
Once I’ve finished wrestling with the software I will offer the 1 + 1 = 5 pattern for free on both Craftsy and within my Paper Piecing Tutorial.
I’m linking up with TGIFF over at What a Hoot and once I’ve managed to get these pattern pieces into a PDF I will be celebrating TGIFF!!! In the meantime I’ll check out the other linkys and enjoy the quilt candy
More Paper Piecing? Really? Yes, really (Although if you follow me on Instagram – I’m PrettyBobbins – you’ll be sick of this project LOL)
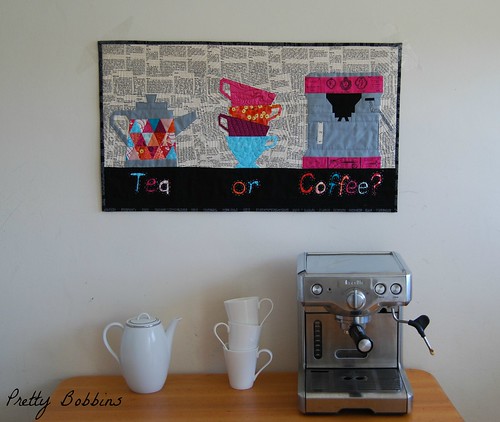
Last week I was super excited to share my Tea or Coffee mini and announce the release of my very first patterns
This week I’m working on my next pattern for release and because I just can’t do things by halves I had to turn the block into something pretty
I first designed the block for Fiona as part of our Paper Piecing Bee, she selected a “mid century modern furniture” theme.
 |
| Paper Pieced retro TV block 10″ for Fiona. |
I’ve keep the design the same, just tweaking it a little (mostly making it more user friendly). For the cushion cover I actually scaled it up to 15″ square and I had so much fun with it that I’m thinking I might include pattern pieces for both a 10″ and 15″ block. The 15″ block just gives you a little more versatility for the TV screen I chose dueling Pirates as my monkeys boys often break into a wrestling match whilst watching TV.
When I originally made this block I left the vase empty with the thought that Fiona could chose to embroider her own flowers or not. This time I went a little nuts. I’ve never tried thread painting before and to be honest I’ve been dreaming of making an art quilt so I got out my BSR foot and and had some fun. I’m thinking of putting a tutorial together showing how I did these flowers. Would anyone be interested in that?
I think my favourite part of the entire cushion cover is that droopy flower and the fallen petal LOL
We will move into our new house early next year, we will have lots more space (yay!) including a rumpus room The bedrooms are quite a modest size so the rumpus room will be a big playroom with either an old bed set up as a day bed or an old sofa (because I’m dreaming of replacing ours). With that in mind I went for bright, kid-friendly colours and plan to make a few more cushion covers and decorations with a rainbow theme. You might want to squint, that back is insanely bright LOL
 |
My children are bilingual Francophone/Anglophones so I just couldn’t resist the number
print as Mr 6 is learning to read. |
I added log cabin style borders and had a whole lot of fun with quilt as you go. To be honest, it probably made the whole process a lot longer, but it did mean that I could secure my ends by going back and forth rather than burying all those threads. It’s hard to see but I quilted each section differently, mostly FMQ but a little SLQ thrown in. Of course I used my favourite thread, Aurifil, in 50wt (colours 2000, 1128, 2605, 2250, 2235, 1100, 5006, 2884 and possibly my favourite 2810, a brilliant, glowing aqua).
 |
| I trimmed the cushion cover front down to 25″ x 25″ and actually considered turning it into a mini at this stage. |
The back of the cushion front actually shows the quilting better (and you know that I can’t resist a good back!).
Whilst this cushion insert definitely needs replacing (I figured out it is 6 years old and it has seen A LOT of pillow fights!) I like the look of the binding and it will be a lot plumper once I replace it with an actual 26″ insert and not a terribly deflated one.
For the first time I’m linking up with Sew Cute Tuesday over at Better Off Thread. If you haven’t checked it out, you should. Janice is one of my favourite bloggers
Have you fit any sewing in yet this week?
You may have noticed that I have a thing for Paper Piecing Yesterday was a big day for me, I launched my first Paper Pieced Patterns, exciting!
Today I’m sharing a tutorial (and free pattern for the teapot block – you can download it from the second last page of the tutorial) for anyone new to this technique. I hope that you find this tutorial useful and that you enjoy the new format that I am using for my tutorials.
simplebooklet.com
I would be absolutely delight to hear from you if you do make something with one of my patterns. Please feel free to add images of your creations using my patterns to my Flickr group
Do you have a favourite piecing or quilting technique?
It’s awhile since I’ve linked up with TGIFF but I definitely have that TGIFF feeling today! I’m also linking up with Finish It Up Friday over at Crazy Mom Quilts.
Recently I’ve been working hard to produce a number of paper pieced patterns. It’s fun and creative but there is also a lot of tedious computer work involved in creating a simple downloadable pattern to share on Craftsy. Today I’ve finally achieved that and I’m super happy! You can find my very first pattern here.
I originally designed this pattern for Lara as part of our paper piecing bee, Wombat Stew, so I’ve made this block twice now The second time around I decided to design two more blocks and turn them all into a mini.
Never one to be overly ambitious I also decided I needed a tutorial to refer back to. So I put together a Paper Piecing tutorial for beginners (I’ll share it here tomorrow) using the teapot block. And because I’d been talking about this block for so long I decided to make it available for free on craftsy
But I’ve also been talking about opening an etsy shop for like, FOREVER! So I’ve listed it over there too. I’ve almost finished the teacup and coffee machine patterns and they’ll be there soon too *Phew* What a day!! Definitely got that TGIFF feeling!!
 |
| Coffee machine pattern is now available here. |
 |
| Teacup Pattern is now available here. |
But back to the actual quilt LOL
This mini measure up at 30″ x 17″ and was machine quilted by me using Aurifil 2000, 2065, 2692, 2245, 5006 and 1100 in 50wt. I also had some fun hand quilting around the reverse applique in a lovely verigated pink (4660) 12wt Aurifil thread.
It feels like forever since I got my quilt on and I think my soul was crying out for some quilt time so I densely echoed the teapot, cups and coffee machine.
I don’t think I can produce a quilt without getting my FMQ on so I played around with the teacups and the teapot. I didn’t want to overdo it and tried to work with the various prints.
The teacup block is really easy and I have to thank Kristy for coaching me through the process. Her patterns are fantastic and I was trying to channel my inner Kristy while designing this one The coffee machine is actually my coffee machine LOL
I even tried tried to get all trendy and do some styling
I added hanging corners to all four corners as I think a piece of dowel running along the bottom will help this mini hang flat.
I’m super happy with this mini but I don’t know if I’ll keep it or sell it. I’m not really one to decorate in the kitchen (you should see my old French kitchen – paint peeling off the walls, not old rustic – it does not inspire spending time in it other than to cook) but I have used some favourite prints here. Plus now I’ve finally got that etsy shop with one listing I should add a few more items LOL
I’m linking up with TGIFF over at Sew at Home Mummy for the first time in awhile and holy moly, I am happy it is Friday and that my patterns are published and my quilt is done!
Have you had a big crafty week? Do you set yourself deadlines? I’d love to hear if you make any of these patterns
The last week or two I have been spending more time on the computer and less sewing. But it’s all for a good reason Yesterday I shared my tutorial for replacing a patch or block and I’ve been drawing up lots of patterns with EQ7. I’m hoping to have three patterns ready to download this Friday along with a Paper Piecing tutorial for beginners and a mini. Ambitious?
I’ve finished my teapot and coffee machine blocks and just need to turn them into something:
Today I am working on a stack of teacups and hopefully by Friday I will have turned all three blocks into a mini
***Update: You can now find all three patterns available here and a paper piecing tutorial here.***
I am still very slowly working on Mr 6′s Rainbow I Spy quilt. Next time I will FMQ the writing
I just ordered a heap of Aurifil from Quilt Jane in preparation for three upcoming quilts. (Again, ambitious?) So far I only have pretty stacks of fabric but after all this computer work I am busting to roll around in piece some pretty fabric.
I still need to get onto my BOM and Bee blocks for this month (I’m queen bee for Wombat Stew and the girls are producing some amazing blocks! Party/celebrate is my theme and you can see my inspiration board here.). I’m really loving the Lucky Stars BOM and have ordered some more of the architexures print that I have been using for these blocks as I have decided to turn them all into a quilt Here are my blocks so far:
For April I’m thinking of one of these two bundles.
I’m trying to stick with my original pinks, oranges and teal but last month I brought in some purple. Either way, I hope to work on this block before the end of the week.
I’m linking up with Work In Progress Wednesday over at Freshly Pieced. Have you been getting stitchy this week?