Yay for Thursday! That means it’s almost Friday  And it’s time to link up your quilting process, woohoo! Last week I opened up a conversation about threads and invited you to join me this week to talk about thread issues. If you have any tips, tricks or “WARNING! Don’t go there” advice I’d love to hear it! I’m going to talk all about my quilting threads and related tips and tricks. Of course you are welcome to join the party even if you aren’t discussing thread issues, just make sure you post contains some discussion of your quilting process <3

Last week you blew my mind when 30 quilters linked up!!!! I’m feeling the love here I’ve also been receiving lots of emails asking for advice on quilting issues or how to get started. I certainly don’t feel like an expert, I’m just head over heals in love with quilting <3 But thank you and please keep those questions coming, I try to answer people directly but I will also use some of these as themes for my I Quilt posts If I don’t get back to you please don’t hesitate to ask me again. We are in the midst of packing up for an international move and I have many competing priorities at the moment and some things fall through the cracks…

Last week Jo linked up a fantastic post on using stencils. Seriously, that girl has quilting T.A.L.E.N.T! If you haven’t had a chance to pop by her blog please do. I may be a little biased as we discovered that we own the same machine (Bernina 440QE) but I am in awe of her work! Her post last week was all about using quilting stencils which is something that I have absolutely no experience with and found really fascinating. Pop by and check it out when you have some time I hope to feature a quilter each week and I’d love it if you could pop by and say hi to support them and learn from their posts <3

So last week I shared my dirty secret of thread tension issues in my son’s Rainbow I Spy Quilt. I can live with it but that quilt would come under some scrutiny at a Quilty show and tell I’m sure  This week I’m going to give you some of my tips on how to avoid thread issues. Sure, the obvious tip is practice and get better LOL But no one wants to have the first dozen quilts they make sporting thread issues

For perspective the sashing is 1″ wide here
The first large amount of free motion quilting I did was on my middle child’s quilt (you can read about it here). I don’t remember really thinking about the quilting too much but I went with stippling and I remember finding Elizabeth Hartman’s blog very useful. I followed her tips for quilting direction and I kept my stippling at about the size she recommends. I don’t think I’ve stippled since, but when I have a good hard look at that quilt there are no thread issues. So I vote one for stippling as a good introductory design for newby quilters to avoid thread issues. I find anything with sharp turns, points or corners can create little knots of thread and stippling pretty much avoids that

If you squint you can see the micro-stippling around the cupcakes. To give perspective the cupcakes are about 1.25″ tall
Micro quilting is something that I am a bit enamored of at the moment and as much as I love it I would advise that you get a little practice under your belt before you set your heart on it. It isn’t tricky (it does require a LOT of concentration) and it does give a fantastic look, but I find that changing directions so frequently can cause thread issues. The key is to keep your movements smooth, that can be tricky when your neck is spasming and your eyes are crossed because you changed directions every 1/4″! It’s totally possible, don’t be scared off, just keep you’re fabric moving smoothly

I’ve mentioned before that I really believe in using the best equipment that you can. My first quilting gloves (above) were bought from a quilt shop. They wouldn’t let me try them on or touch them (for hygiene reasons) and I must say I wondered for about six months why everyone loves quilting gloves. Ah, my gloves were not so awesome… So I purchased some machingers (I read some quilting guru saying they are the bees knees so I did what I was told and bought some online) and they ROCK!

Why do machingers gloves rock? They are really elasticy so they fit nicely on your hands and they breath well. The grip is on both sides of the fingertips – kind of like they were dipped in grippy stuff) which is better than it sounds. Be honest, how often do you pick up your gloves and put them on the wrong hand? With machingers it doesn’t matter because they’re double sided, which is great for someone as absent minded as me. (And just so you know I’m not affiliated with machingers in anyway and I paid for my own gloves, but if they wanted to come to the party….)
There’s lots of talk about needles and I know some people SWEAR by applique needles or embroidery needles. I exclusively use Schmetz brand quilting needles. They’re good for piecing too (I know because I’m absent minded and forget to change needles other than when I change weights of fabric) and for some reason I really like the little green spot of paint on them (I don’t think it actually does anything). Clever marketing Schmetz (And again, no affiliation, I pay my way but I’ll always tell you what I love and what works for me.)

You’re probably sick of me telling you how much I love Aurifil, but I really do. I do think quality thread makes a HUGE difference. I actually prefer to use my spools on a spool stand (I originally bought it for the large cones that I use but it’s fine for any sized spool). I think it improves tension and I rarely use my machine spool stands anymore. I just raise the small spools so that the metal pin is inside the spool and there is no chance of the thread catching on it.

Speaking of spools, don’t forget your bobbins! One of the best sewing and quilting tips I can give you is to wind your bobbins on the SLOWEST SPEED possible (I made that big in case you’re skim reading – DON’T MISS THIS TIP). When you wind your bobbin on the slowest speed possible it winds looser so your bobbin will feel a tad springy or spongey or squishey. Try it and I promise you it will change your life (OK, don’t hold me to that, it will not change your life but it will enhance your sewing and quilting experience). Loose bobbins reduce tension issues (let’s see how much dirty spam I get from that sentence LOL). If you are getting lots of birds nests at the back of your fabric this may help (it helped me)

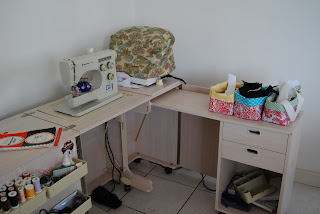
Another helpful tip is to support your quilt and make your quilting setup as ergonomic as possible. I was lucky enough to find a sewing cabinet second hand and I quilt with my machine dropped down into the cabinet and an ironing board behind for support. The weight of your quilt can play all sorts of havoc by causing you to accidentally move your quilt or giving your fabric a kind of pulled look because of the pressure that was on the fabric as you were quilting.

Do you remember that last week I talked about using different colours for top and bottom threads? Since my crazy go at using a stark white top thread and dark grey in the bobbin I have avoided huge contrast and it’s helped. I’ve added the numbers of the thread to the photo above for reference, but really this is just to give you an idea of different coloured threads that I have used together successfully in the top and bottom threads (they are lined up in pairs as I have used them). All are 50wt Aurifil threads.

quilted 241 tote
Another option is to use really busy fabric to hide your quilting booboos (did you know that we use the word booboo in French for when we hurt ourselves a little? I think that’s a funny linguistic crossover!). The above photo is of my 241 tote where I’ve used Architextures and it really hides the details of my quilting. I was actually just going for textures and colours that I liked, but it can be useful to use a busy print on the back of a quilt so you aren’t so worried about your booboos showing

Single Aunt mini
I love to let my stitching show, even if it is just a slightly different hue but it does mean you need to not worry about your booboos or be confident that you won’t make any biggies I suggest you try some quilting designs that have nice smooth curves to them like the design above, it’s repetitive but the lines are intentionally wobbly so if you go off them it isn’t really noticeable.

My current wip, I’ve used threads that both blend in and contrast for a fun effect.
So now it’s your turn! Link up your post, please remember that this linky is about quilting process Visit two or three other linkers and add my linky button to your post or sidebar (you can find the html code in the top left side bar or right at the bottom of the page if you’re on a mobile device). Yay for quilting and yay for Thursday! I’m ready to end the week!!
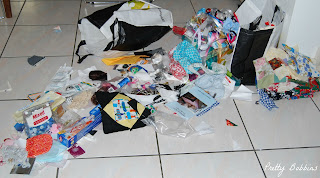
I was hoping to have a few finishes to share with you this week, but it turns out that tidying my sewing space took a lot longer than expected… In my opinion it totally warrants that TGIFF feeling For the last few months I had been able to excuse the mess by claiming I would tidy in January. Then I got sick. Then I got sick of the mess and started to tidy, but then I got tired. For about two weeks the floor was literally covered with fabric and notions. This week I bit the bullet and managed to finish it off
 |
| I love the yellow painting, in my mind she is thinking about block placement and colour play
|
I’m thinking I might rearrange my stash into rainbow order. I mean, now it’s tidy it seems easy to organise it further I changed around the fabric a bit this time. I packed away my Chinese fabrics as I never use them and they were taking up a lot of space. I sorted everything by colour, whereas previously I had a pile of “cutesy”, “boys” and “projects” (as in bought for a specific project).
 |
| Yes, this is as tidy as it gets folks! |
I managed to reclaim my cutting space which had moved to the table. The sideboard is a few inches taller than the table, so cutting there is much easier.
I also rearranged my sewing cabinet. Aurifil threads are at the ready as are the notions I use most often. The bag making hardware has been moved to another area as I don’t use it so regularly these days. Although the cabinet folds up I tend to leave it open, notice the pretty machine cover that Marieka made me?
I did manage to get a little sewing in this week. I completed the January block for the “And Sew On” BOM over at Quiet Play.
 |
| I’m using favourite fabrics as I want to make these blocks into a something for me
|
I changed the pattern slightly as I wanted to use a twill measuring tape. I’m really happy with how it turned out.
 |
The red arrows mark where I changed the sewing lines. I did this so that my twill
measuring tape sits flush with the prints. |
I have only managed to finish one of the three Curves Class projects this week, the Scallop bunting.
I have selected fabrics for the second project and have printed out templates for the third. Considering the crazy week I’ve had, I think some sewing time is in order this weekend I’m really happy with how the Scallop Bunting has turned out and even though I photographed it in my sewing area Miss 2 has claimed it.
In my mind I sewed so much more this week
I am so happy to have a tidy sewing space again though. Hopefully I can keep it tidy this time!
Have you got that TGIFF feeling? I’m so happy it’s the weekend! And on that note I’m off to collapse into bed. Bonne weekend xx
I’m linking up with TGIFF over at Celtic Thistle Stitches this week.
I love scraps. I keep them all. You might even call me a hoarder. If it’s too small to sew or applique I keep it for the kids to paste onto things. A little while ago I bought “Scrap Republic”. Ever since I have been dreaming about the scrappy quilts that I could make. However, my scraps were in a huge mess. Today I decided to follow step one in the book; sort out my scraps.

I began with two shopping bags recently gifted from my friend the lovely Ms Midge and two large bags of my own scraps that I’d shoved into a cupboard.
 |
| Sorry for the dodgy iPad pic, the camera was charging |
The book suggests that you sort your scraps into colours. The author sorted her scraps into white, pink red, orange, yellow, green, blue, purple, black/brown, and other before storing them in plastic tubs.
 |
| Halfway there. |
I sorted my scraps into red, orange, yellow, green, blue, purple, white, pink, brown, cream, black/grey, multi-coloured and selvedges. We have enough plastic tubs to sink a ship with none to spare and I don’t fancy any more, so I used zip lock bags. How tidy is that???
I ended up with a pile of “other” fabric. This is the knit, cord, stretch, denim, upholstry weight fabrics. It’s still in this pile on the edge of the sofa. In fact I can see it right now. I don’t want to shove it back into a grocery bag but I really can’t be bothered doing anything else with it…
 |
Gah! Other fabrics, and a blanket and some DMC floss
and a felt helicopter… |
I also ended up with a big pile of UFOs, random blocks (some of these inherited by the lovely Ms Midge and some of my own making), a heap of ribbons and trims that were hiding in the bags because I am really bad at storing them, self covering buttons accessories, felt balls, alligator clips, gift bags, quilt kit instructions. Well, a mess really…
 |
| Double gah! |
This mess is also still where I left it. Way too much work there for 8.30pm, so it might just have to go back into a grocery bag…
So, part of me is dreaming of making a scrappy quilt from Scrap Republic and part of me is ignoring the mess on the floor (I did my sorting on the floor because my sewing table is a mess I had more space there). Part of me is living in fear that no matter how much I tidy my sewing area it will always be a chaotic mess and I will never be able to find the white snaps or catepillar ribbon when I need them. Part of me is pleased at what I achieved. Part of me is overwhelmed by how much I still have to sort, store and tidy.
I would LOVE your tips on how to organise those last little bits of stuff. The bits that always get shoved in a drawer or bag no matter how many times you move or organise or rearrange. Considering we’ve only been in this house 18 months and will move again in another 18 months I fear that I will never be truly organised, but a girl can dream. How do you keep your craft space and supplies tidy?
Have I mentioned my Bernina 440 before? I’ve been trying to give her a bit of a workout, trying different fabrics and stitches. It is a learning process and I’m enjoying it. Today I made this strap-on pincushion. I’ve seen a few machine pincushions before, but they all have elastic, I wanted to be able to remove it in a hurry if Little Miss decides she can’t resist, so I made straps with velcro at the back.
Before you look too closely, yes, there are imperfections. In fact I nearly ditched it and started again as the small zigzag stitch made the applique a bit messy. But I decided that this is part of the learning and creative processes and it will do me good to have an imperfection close by. These are scraps of some of my favourite scraps (you might recognise some of them from my scrappy coasters) and I love how bright and sunny it is.
After I had done the C and the R I remembered reading that you need to thread the bobbin thread through a little hole on the bobbin when doing buttonholes to improve the tension.
I did it and voila! The rest of the zigzag has noticeably better tension.
 |
| Notice how messy the C and R are compared to the rest? |
Next on my list is a pincushion to sharpen my needles, but I need to gather some supplies first.
So, what have I learnt about Delilah recently? She didn’t come with an invisible zipper foot. I was able to insert an invisible zipper using the open toed embroidery foot, but I think it would be much easier with the right foot as I had to feed the zipper under the foot and it was very fiddly.
 |
| Bernina 440 open toed embroidery foot |
I knew that the Bernina 440 comes with an automatic button foot and had tried it out on scraps. Beautiful, just beautiful! Then I tried to do one on a pinafore. Hmm. The automatic buttonhole foot has a little scanner thingy that reads the threads/weave of the fabric.
 |
| Bernina 440 automatic buttonhole foot |
So if you’re fabric ain’t perfectly flat, or if your buttonhole is on an edge it won’t work. So I had to do manual buttonholes but they were still lovely. Again, Delilah didn’t come with the manual buttonhole foot but I was able to use the open toed embroidery foot quite easily.
 |
| The manual buttonhole after a few wash and wears. |
 |
| The pretty pinafore on Little Miss |
One thing I have come to appreciate VERY quickly is the amount of foot pressure that Delilah has. FANTASTIC!
Well, technically it should be called, the dining room, but hey, needs must!
As you know Santa brought me a new Bernina 440QE for Christmas. I LOVE her and have tidied up my sewing space as she is just too beautiful to be sitting amongst all the stuff that was strewn around. I think she has a name now… Delilah!
Anyway, I wanted to share my sewing space with you
A big improvement but don’t look too closely! And here is the sewing corner all tidied up and ready for the room to be used as a dining space
Please don’t comment on the hideous lamps. They come with the house and whilst I would love to banish them to the basement, they actually provide really good light in the evenings.
Mr Husband is ecstatic that this space is now clean and tidy. Let’s see how long it stays that way…
Well, after spending far too much time on practical sewing (post coming) I have been focusing on pretty little things the last few days! OK, pretty and practical…
Unfortunately Little Miss is not sleeping well so both sewing and the blogs are not getting my full attention, but I have made a couple of lovely little pillowcase dresses which I’ll photograph over the weekend to share with you. In the meantime here is a rather cute reversible stroller liner which I made recently.
I also made these fabric baskets recently with some oilcloth that I bought only, um, 2 years ago….
I entered both the stroller liner and fabric boxes in an online sewing challenge run by Sew Wat Blog. I didn’t win, but both were a challenge which was fun I used to avoid button holes and the stroller liner uses buttonholes for strap holes.
The challenge of the fabric boxes was actually using the oilcloth. I just hadn’t got around to doing anything with it and the more you read about oilcloth the scarier it seems. In the end it was very easy and the boxes have transformed my sewing space! I use them for 1) scraps big enough to reuse, 2) scraps to go in the bin, and 3) items for current project(s). Look how tidy my sewing space is now!
 |
| Yes, I have plans for that big white wall
|
And the sewing table (formally known as the dining room table!) is also transformed!
And they’re even used while I’m sewing!