Archive of ‘Techniques’ category
It’s Thursday and it’s time to get your quilt on! Quite literally, it’s FREEZING here in Canberra!!

Thank you to those of you who noticed that I’ve been quiet. I have a thyroid anti-immune disease and it is playing up at the moment. Whilst I’m mostly fine, the last couple of weeks I had a good day followed by a bad day. Thankfully the fatigue and general unwellness that my mean old thyroid brings, seems to be on the way out  I’m off to a Guild meeting tonight (yay!) unlike last Thursday when I was half comatose on the sofa and the FABULOUS Ms Midge offered to step in at the last minute and host I Quilt for me. Yay for awesome, quilty friends!! Thank you Midge xxx

This week I’m featuring another fabulous quilty lady, Karen of Karen’s Quilts, Crows and Cardinals.
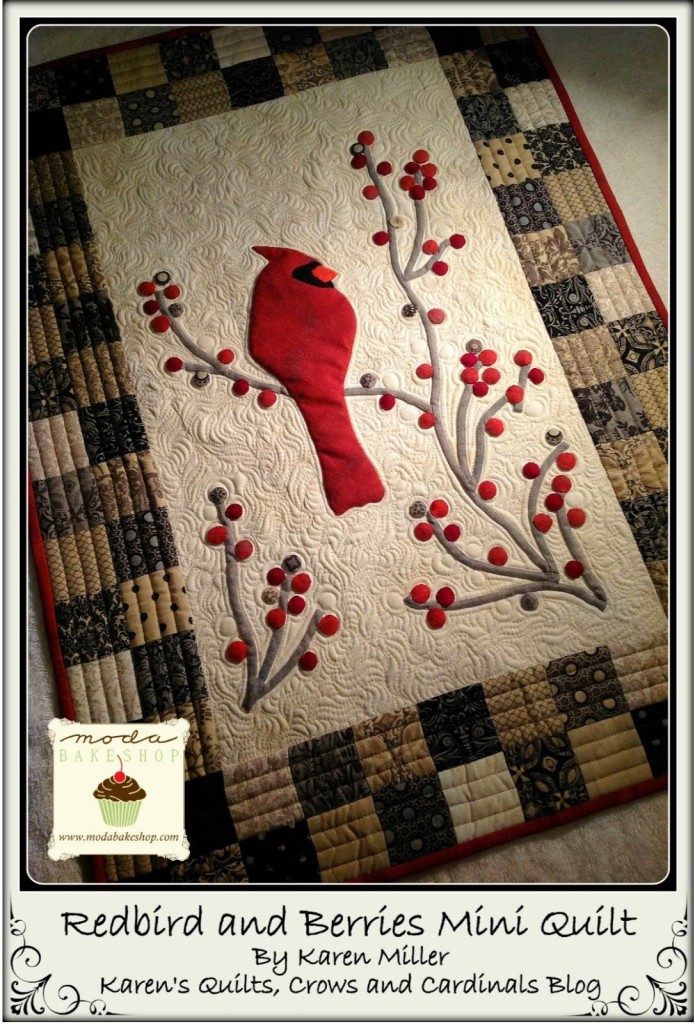
Image used with permission by Karen’s Quilts, Crows and Cardinals
Karen wrote the most marvelous post last week full of FANTASTIC quilting tips! She quilts on a Janome Horizon with Aurifil thread and has some advice specific to her machine as well as some really good, general quilting advice. Karen doesn’t drop her feed-dogs, rather she covers them, she also uses a bobbin genie and supreme slider. With my Bernina I feel the extension table is smooth enough for quilting but I’ve heard great things about supreme sliders. Karen also uses Machinger gloves which I find to be excellent for quilting on the domestic machine. Thanks for the tips Karen!!
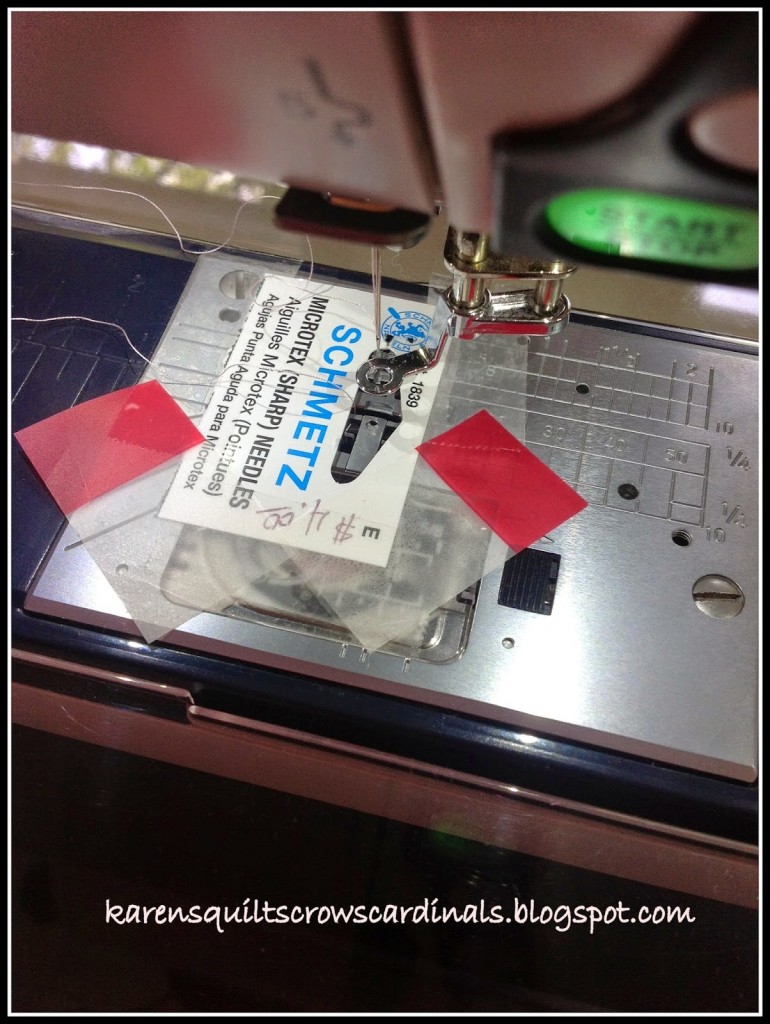
Image used with permission by Karen’s Quilts, Crows and Cardinals
While you’re over there make sure you check out her work, she is a really talented quilter and I love that she shared her top tips with us last week. That’s what I wanted I Quilt to be all about; sharing the process so that we can all improve our quilting <3
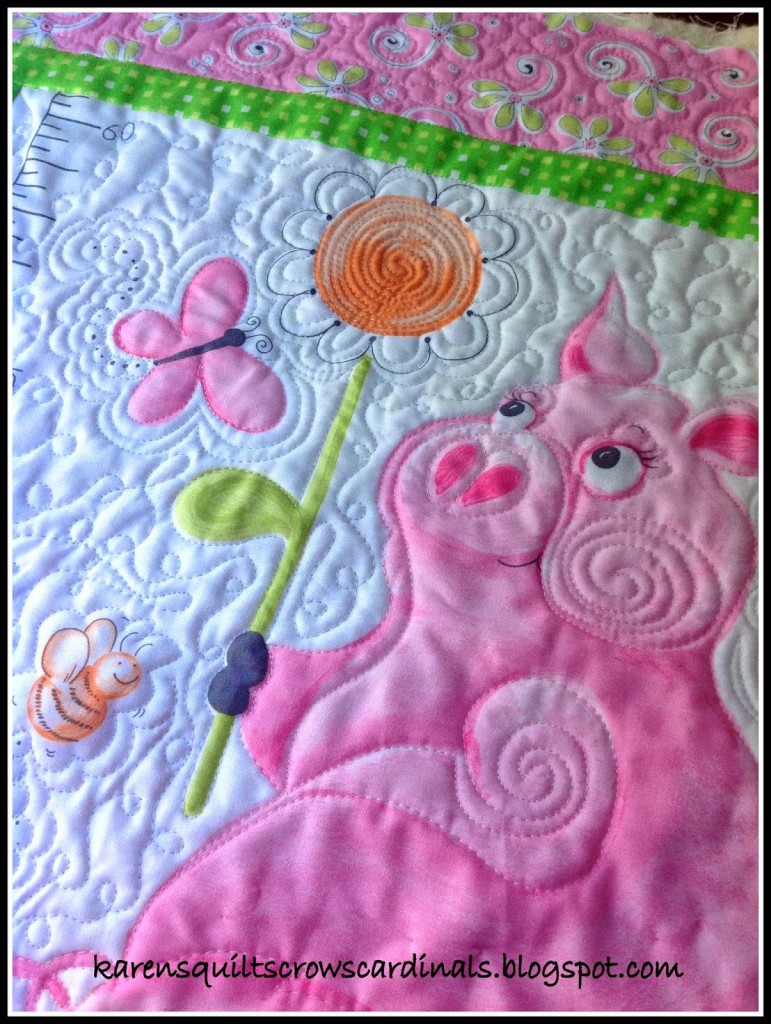
Image used with permission from Karen’s Quilts, Crows and Cardinals
Speaking of sharing the quilty love, this evening on Instagram I happened across an awesome hashtag: #machinequiltingtips

This advice is aimed at longarmers and there is some FANTASTIC advice there!!! Check it out if you’re a longarm quilter, please share your tips and support the wonderful online community that we have <3 My top tip for both longarm and domestic quilting is to relax and not worry about perfection. Closely followed by my second top tip which is to never sew/quilt when tired! 

Speaking of this online community… I reached a big milestone on Instagram this week and will be celebrating with a giveaway over the next few days. If you’re not on Instagram, head on over, if you are, keep your eyes peeled The giveaway will be limited to Instagram (don’t worry, I’ll have an awesome August giveaway here on the blog) because it’s all about celebrating the great IG community I’ve pulled out some fabric and I’m thinking of doing a stripy, binding bundle <3 As much as we all love fat quarter bundles, I was thinking of some WoF stripey prints that can be used for binding. Sound good?
Now it’s your turn to get quilty! Link up your quilting process, visit three other linkers and share the quilt love <3
An InLinkz Link-up
Hanging Organizer Tutorial fit for a wee princess!
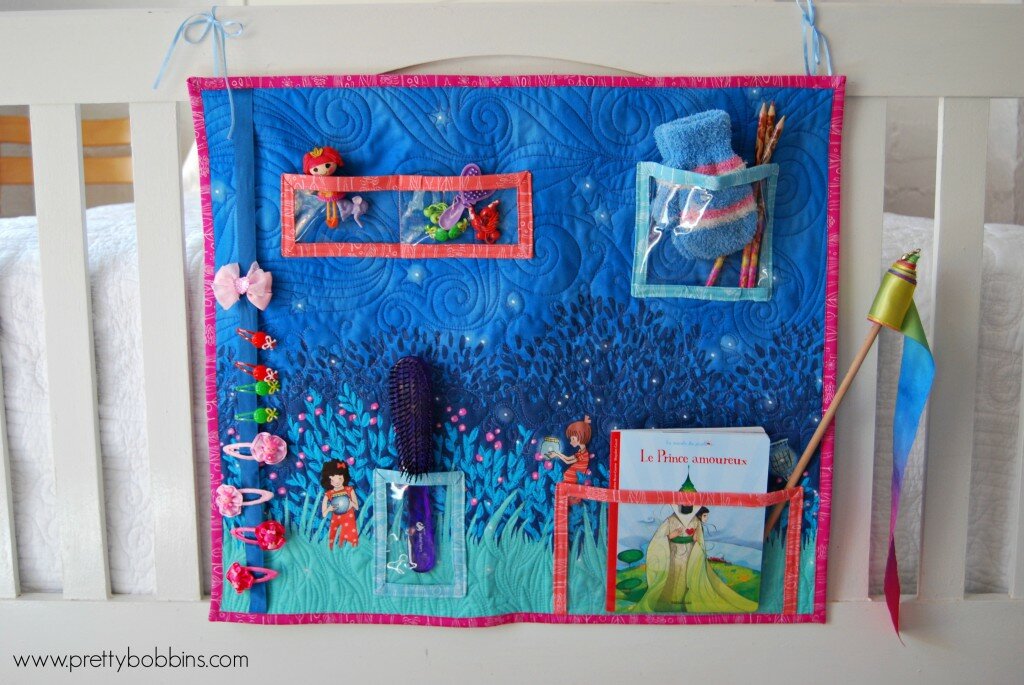
When the super talented Sarah Jane put the call out for blogger to work with her new line, Wee Wander, I couldn’t help but put my hand up!

Today I’m sharing a tutorial for a Hanging Organizer. I have a lovely three year old daughter who certainly could do with a little help organizing her important and precious belongings and she just LOVES her pretty new organizer <3
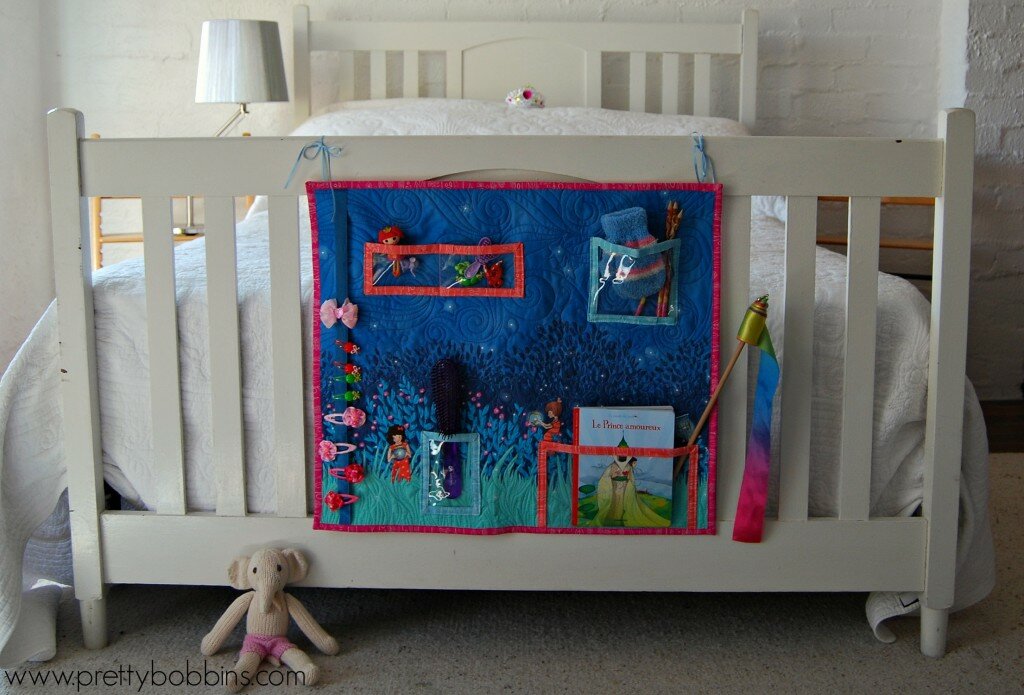
Fit for a princess!
Let’s get started! You will need…
Supplies:
- 1 panel Wee Wander
- Backing fabric (32″ W x 29″ H)
- Wadding (28″ x 25″)
- Hanging sleeve (5′ x 23″)
- 1 piece clear vinyl 11″ x 15″ (I repurposed one of those clear zip bags that pillows and linen come in)
- 12″ x WOF (width of fabric) for binding OR purchase aprox 250″ premade double bias binding (you will have lots left over!)
- 60″ ribbon for clip strip and hanging
- 24″ long piece of dowel rod for hanging
- usual quilting supplies
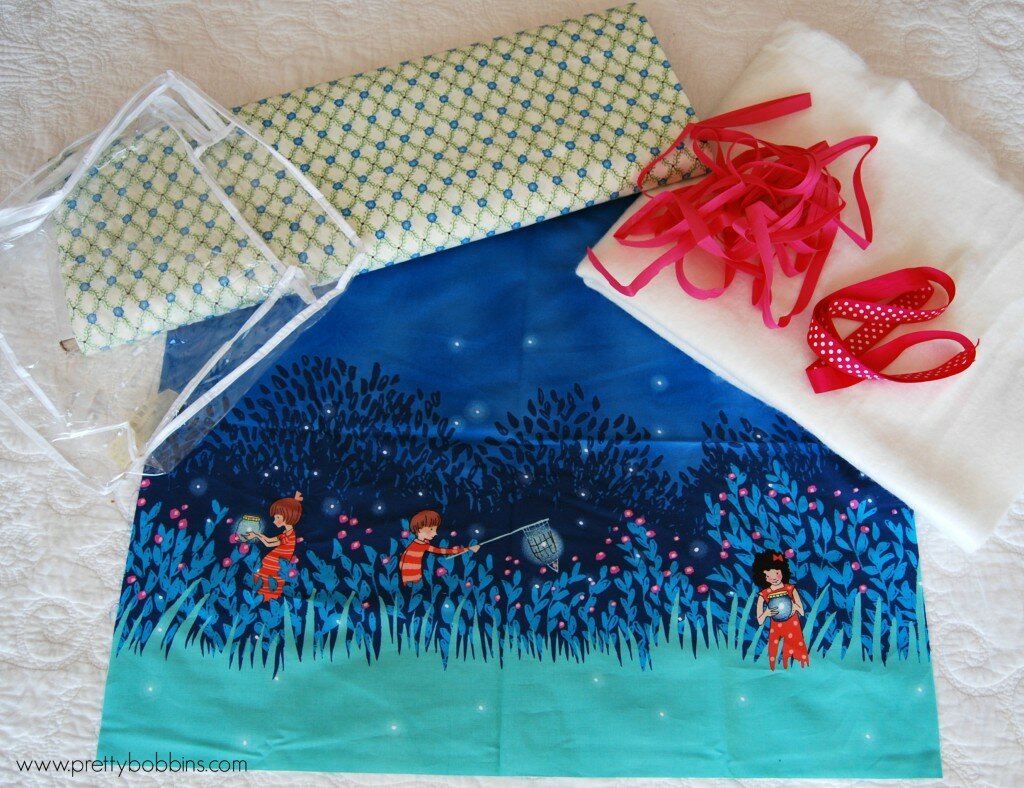
Gather your supplies
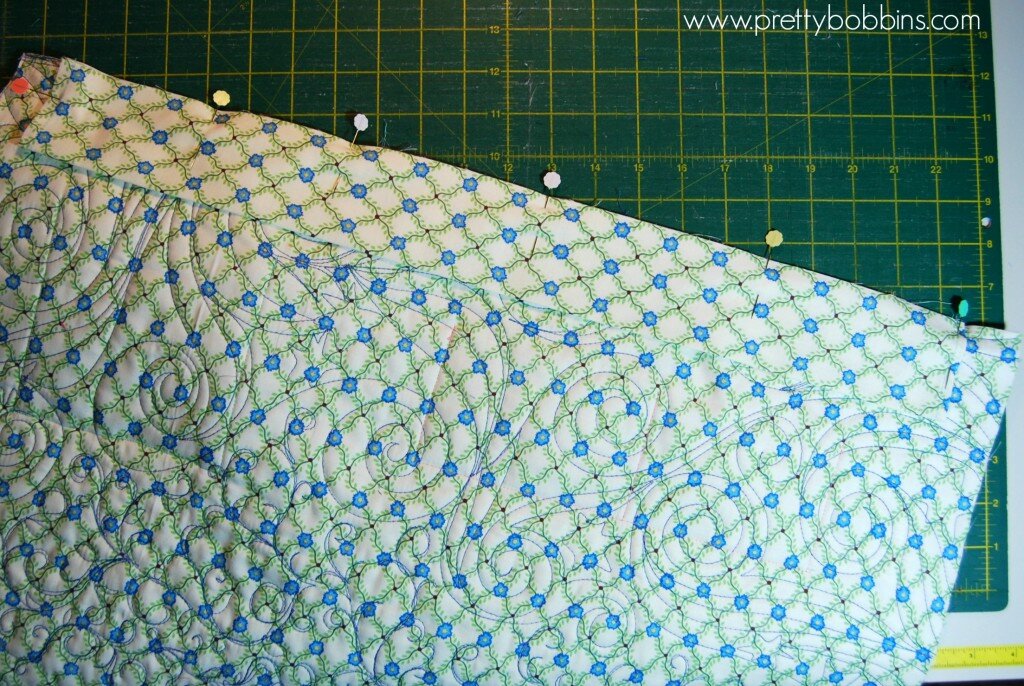
Prepare and quilt you Wee Wander panel for quilting. I cut backing to 32″ x 29″, wadding 28″ x 25″ and the panel to 21″ x 24″. I changed threads a few times and let Sara Jane’s whimsicle design dictate my quilting. TIP: I always find it best to quilt wall hangings quite densely so they sit nice and flat.
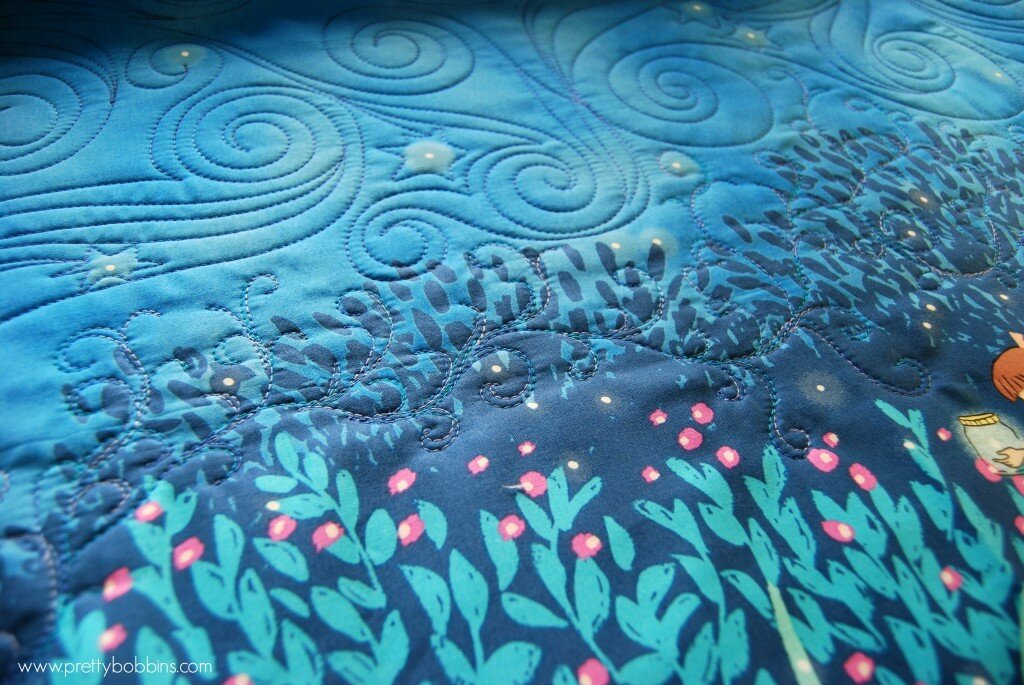
Quilt to your heart’s content!
Once you have finished quilting your panel, trim it so it is nice and square, then set it aside.
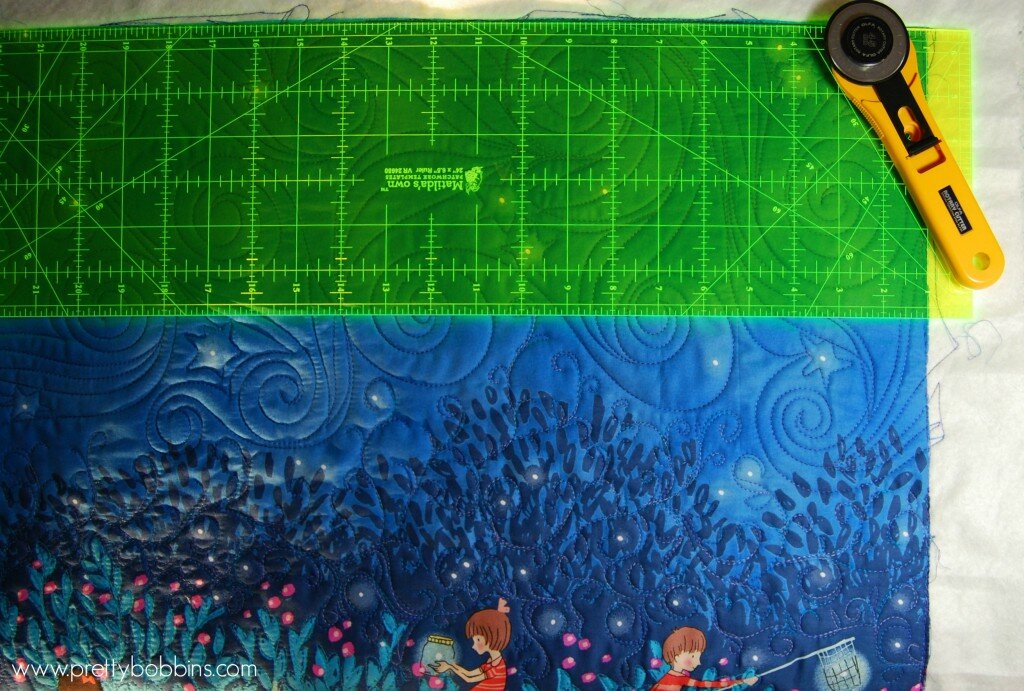
Trim your quilted panel
Prepare your binding. I wanted to feature a number of Sara Jane’s prints for the binding, but you can use pre-made double bias binding or make your own. You will need 105″ binding for the outside of the organiser and four smaller pieces for the plastic pockets:
- Pocket A 37″ of double fold binding
- Pocket B 36″ of double fold binding
- Pocket C 29″ of double fold binding
- Pocket D 43″ of double fold binding
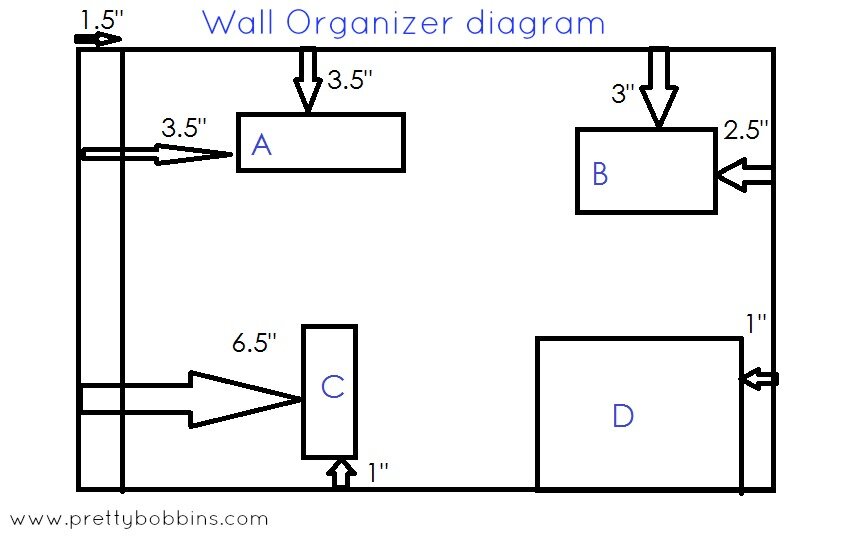
Prepared your clear plastic/vinyl pockets. Cut one each of:
- Pocket A 3″ x 9.5″
- Pocket B 5″ x 7″
- Pocket C 5″ x 3.5″
- Pocket D 9.5″ x 6″
Bind all four sides of A, B and C. Bind three sides of D (leave one of the long sides raw).

Binding tips
Cut a 23″ length of ribbon for your clip strip. My ribbon is .75″ wide.
Place your pockets where you would like them. DO NOT PIN THEM!! I decided to fold the bottom two corners of pocket B in a little so that the pocket sits out and can take bigger objects. TIP: make sure that you don’t place your pockets directly over the parts of the panel that you would like to feature.
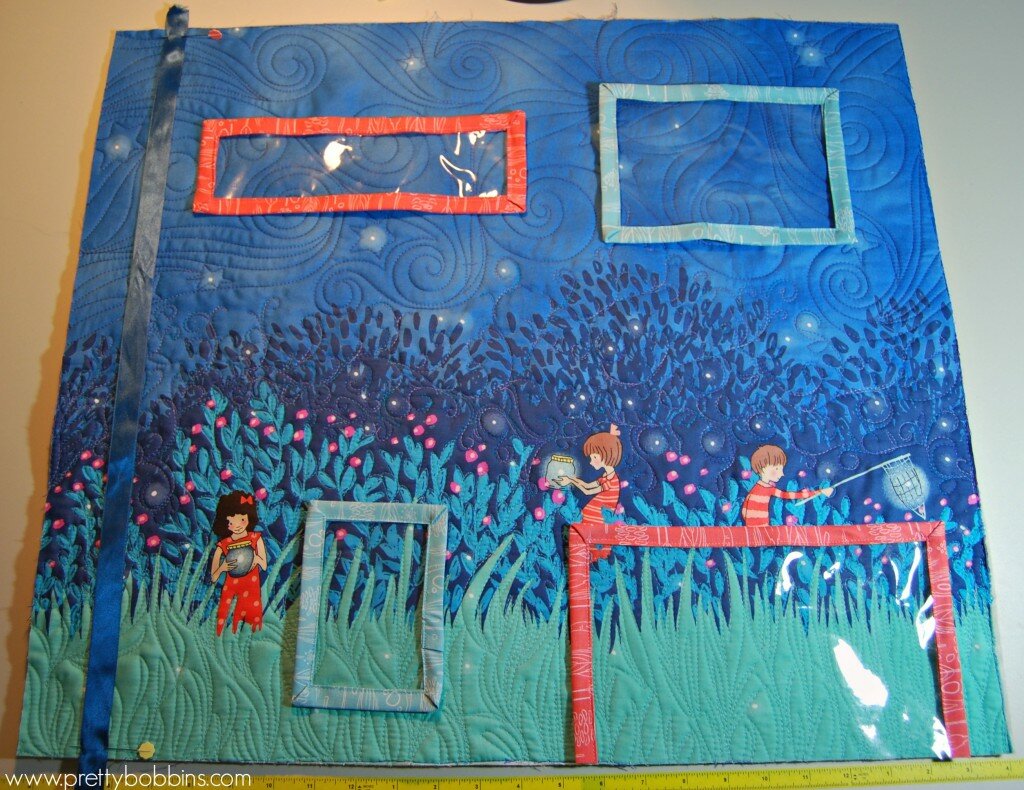
lay out pockets
Once you are happy with the placement of your ribbon and pockets you can pin them carefully within the found section. The pins will leave holes in the vinyl so please be careful
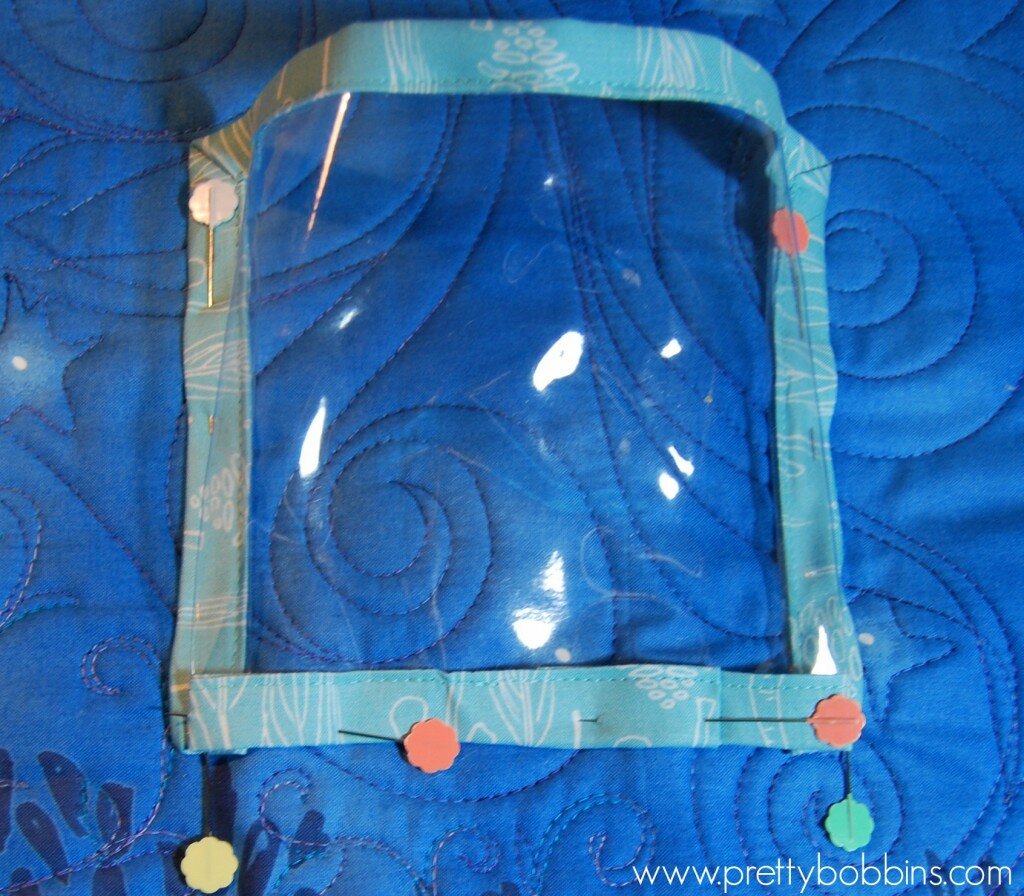
Pin your pockets on the binding so that you don’t mark the vinyl.
Sew your pockets in place. I used a walking foot as the bound vinyl is somewhat bulky.
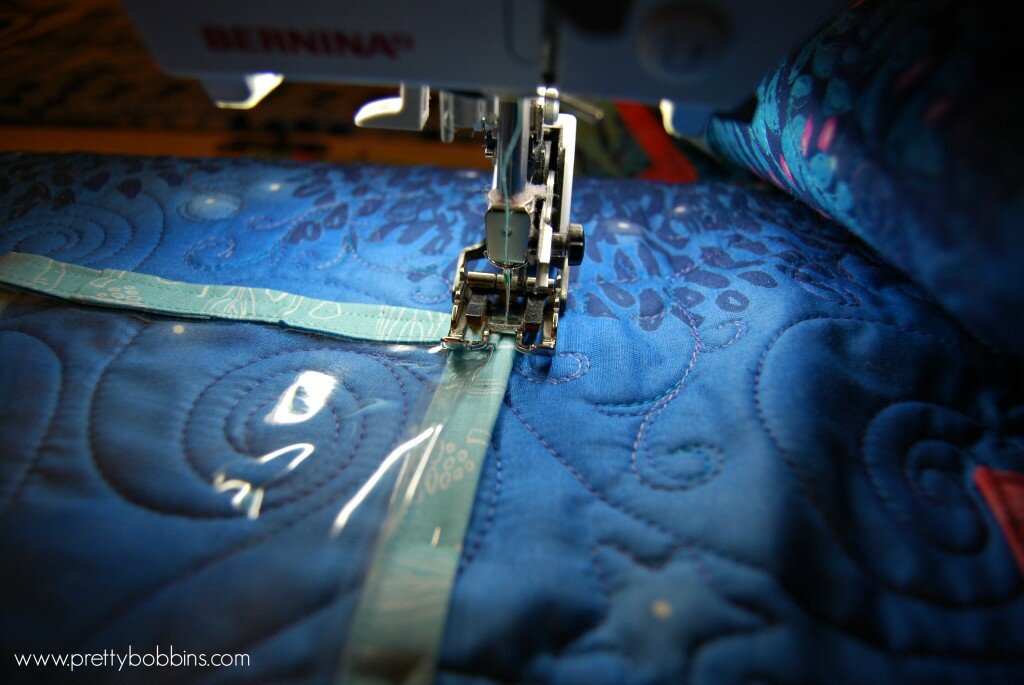
Sew pockets in place
Prepare your hanging sleeve. Take your 5″ x 23″ strip of fabric and fold both short ends in by 1/4″ and again by 1/4″ to conceal the raw edges. Sew in place, fold in half with wrong sides together and press. Center your hanging sleeve on the top back edge of your organiser (raw edges togethre) and sew in place within the 1/4″ seam allowance.
Apply binding. I applied my binding to the back and then machine stitched it down to the front. This is a quick,easy and neat way of binding. Crazy Mom Quilts has a great tutorial here.
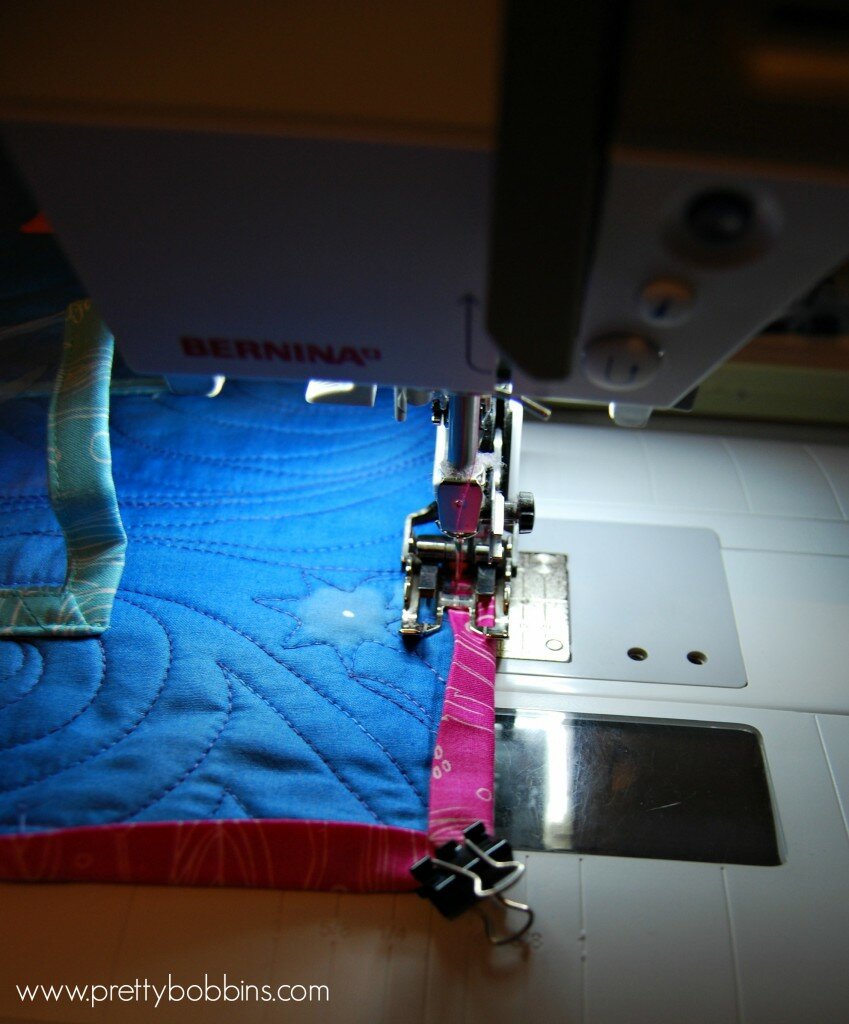
I applied my binding to the back and then machine stitched it in place on the front
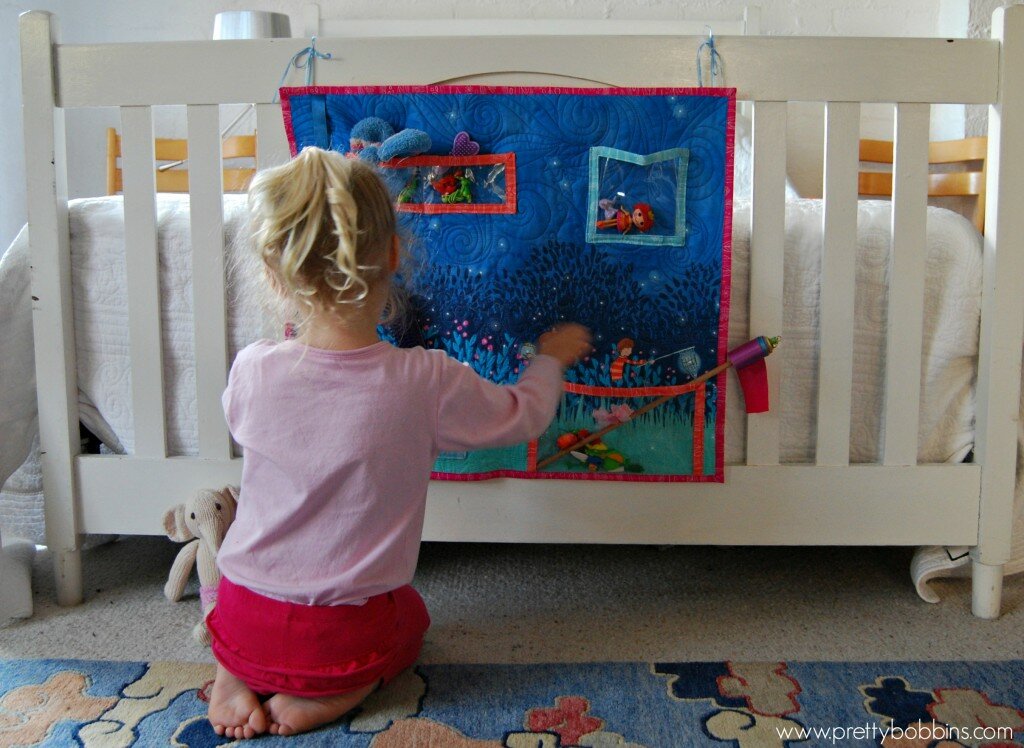
Use your remaining ribbon and dowel to hang your organiser in place. Fill with all your precious items <3

A place for everything and everything in it’s place <3
Then let your wee one re-organize to their heart’s content!
Thanks for stopping by and a big thank you to Sarah Jane for always producing such beautiful illustrations and for turning them into fabric that we can use and love! I’ve loved being part of this blog tour <3 You can find out more about Wee Wander here <3
In a few weeks I will be teaching the first of a few quilt classes featuring my pattern, Starry Skies, at HobbySew Beclonnen. It’s a fun quilt that is originally lap sized but can easily be enlarged. Read on for details and quilt candy <3
April was such a whirlwind of activity that I haven’t had a chance to blog about all the quilts I finished! Today I’d like to share Starry Skies (#2) with you (and subtly mention an upcoming class that I’m teaching ). I also want to apologise that I didn’t post I Quilt last week, I spent Thursday night in ER with my son (he is OK, just a little glue holding his scalp together!)

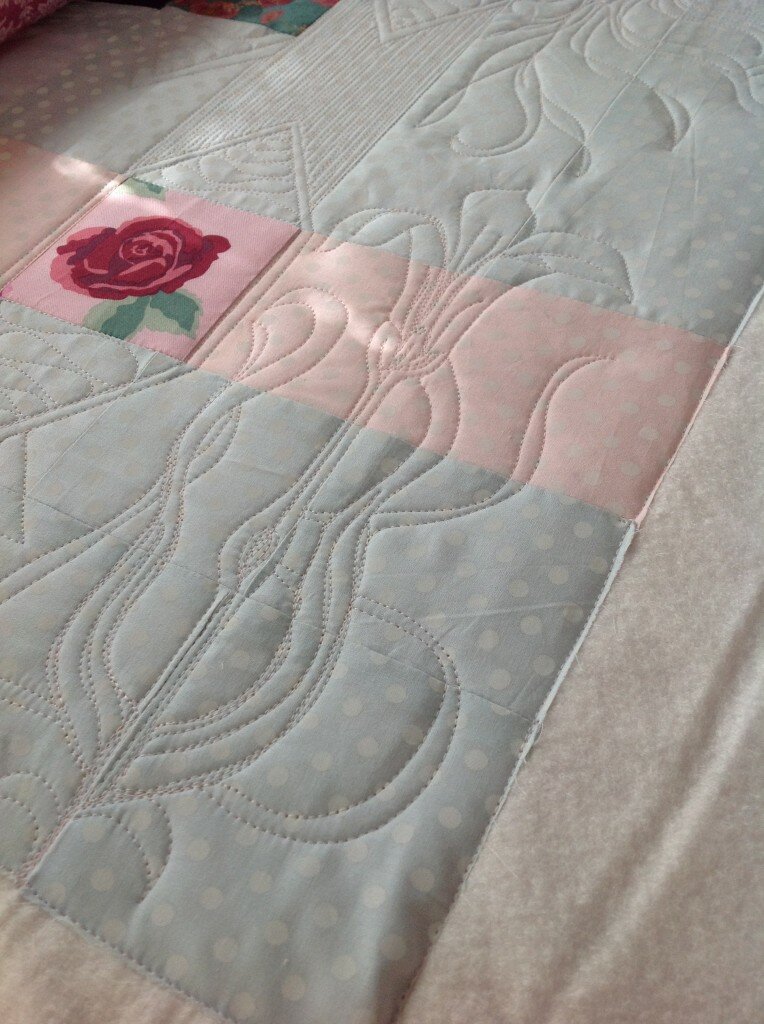
I first made this quilt a year or so ago in a very different palette for a Kate Spain blog hop. I love the pink with the grey, but this time I wanted higher contrast.

Starry Skies #1
This quilt is great for imaginative quilting! You can really go anywhere. FIrst time around I mixed in some hand quilting and kind of did a shooting stars theme. This time I went for movement again, but more swirls and bubbles. It’s also a great one for using up scraps and gaining confidence with improv techniques. I’m going to talk a lot about colour play in the class as I feel this is an area where we can all always learn more

The texture is really quite fabulous (if I do say so myself…)

As pretty as this quilt looks in our house it is on display at HobbySew Belconnen tempting quilters to sign up to a one day workshop with me on the 24th of May. I’d love you to come along and spend the day piecing with me! You can call the lovely ladies at HobbySew on and book in It’s $60 for the day and you get cutting instructions to take home and get busy in advance of the class so we get the most out of the day.

If you’d like to find out about other upcoming classes you can see them here.
Welcome to I Quilt linky party! This week I’ve been brave and got my improv quilting on If you’re new, please feel free to join in the fun and link up your quilty process. Don’t forget to visit three other linkers and add a link to my blog or button to your sidebar or post
This week I am featuring the lovely Serena from Sew Giving. I’m not sure when I first ‘met’ Serena, but I love following her quilting and sewing adventures. She sews the cutest items for her two little girls and seriously looks like she is having fun being a crafty gal, Mummy and farmer. Her deer cushion with the 3D pinwheel has to be about the cutest thing I’ve ever seen!!

Image used with permission from Sew Giving
Last week Serena shared her first foray into free motion quilting. I love a quilty gal who shares! Such an awesome effort, the flowers in the border look perfect, I’m pretty certain that my first attempts at FMQ were nowhere near that neat!! You have to check out her post for the dancing elephants on the binding! Seriously good planning to get those buddies to line up LOL

Image used with permission from Sew Giving
This week Serena has shared her experience straight line quilting on her new machine compared to her old machine. Serena, I’m guessing that the walking foot on your old machine was not up to scratch. I also find that I get the best results SLQ if I consistently start and stop on the same sides, rather than going in one direction and then back in the other. If you go back and forwards it can increase the drag and give that kind of pulled/tugged look on the quilting. Not that you need any advice now, your most recent SLQ is PERFECT!! Well done xx

Image used with permission from Sew Giving
This week I have been working up a frenzy. I have so many commitments that need to be met over the next ten days that I am really having to work super hard and yet not burn out. I’ve been stitching til midnight most nights and this morning I woke at 5am because I realised that my domain name was set to expire and despite months of warnings I still hadn’t sorted it out! I ran down to the studio and was super relieved to find that I had set it all to auto renew so I still own my blog LOL *phew* Could have done with another hour or two of sleep though…

Of course in the midst of all the deadlines I figured that I deserved a treat so I pulled out an old WIP and decided to get stuck into it. This WIP is almost a year old. It is a really introspective piece and kind of a self portrait in an abstract kind of way (too arty? LOL) I guess I had been thinking about it in the back of my mind but I was a little hesitant as it was half quilted and I of course wanted to finish it on the longarm.

This is where I got up to in May 2013 on the Bernina and where I started this week on the longarm.
Anyway, I decided to forget about the rules and I loaded it onto the longarm half quilted and pin basted. I removed the pins closes to the top edge and thread basted it in place and then did the same for the sides. I only removed the pins as I moved onto each section. I think if I had removed the pins earlier I would have ended up with an uneven mess. Funnily enough I backed this quilted with an unused IKEA sheet. Man, quilting sheets is a right pain. I’ve done it many times and I don’t recommend it. I totally killed the needle on the longarm quilting this beast, but it was certainly much easier than I’ve found machine quilting sheets on the domestic machine.

The grey essex linen blend is quilted with 50wt Aurifil on my longarm. The white with 40wt Aurifil on the domestic Bernina.
I felt like a total kick-butt rebel quilting this baby. Breakin’ the rules man and going nuts! ;) But seriously, it was fun to quilt and it was a good experiment to see not only how to take a partially quilted piece and finish it on the longarm, but to see my growth as a quilter. Pretty much all of the grey area was quilted on the longarm and a small section of the white area. I’m hoping to enter this into a few shows and I really look forward to people’s reactions. I think it’s OK to break the rules as long as you’ve mastered the techniques. I wonder how other’s will feel about me breaking the rules… I hope the quilt police are kind

I had so much fun creating texture and I really had no plan of what I was doing or where I was going. I kept kind of thinking “over fertilised”, it felt like an alien jungle with too much growth and very organic and unplanned.

I plan to bind it in the next few weeks and take proper photos, but the above picture gives you a good idea of how I have grown as a quilter in the past year. The white was done on the Bernina after I’d been free motion quilting for about a year. The grey is done after about two years quilting and three months on the longarm. I must say, I’m pretty happy with how well the longarming is going

So that’s it from me for this week. Tomorrow night I will be with the Queanbeyan Quilters for the launch of their exhibition, so if you’re local and at the event, please say hi! I hope to pop back to the exhibition again over the weekend, but it will depend on other commitments. You can find all the details here. There are two amazing raffle quilts, so pop in and buy some tickets if you can
So that’s it quilty folks. Be brave and break some quilty rules, you never know where you’ll end up and it might just be awesome! Thanks for linking up and please remember to visit three of your fellow linkers, we all love comments <3
An InLinkz Link-up
It’s Thursday, it’s time, I Quilt and I’m guessing you do too So come link up your quilting process! This week I’m talking about quilting for a cause which is something that I think many of us have done. I was completely inspired by this week’s feature quilter, Kathy from Kayak Quilting.

Used with permission from Kayak Quilting
Kathy made a stunning grey house quilt. I love the mix of straight wavy line quilting and swirls. It really is a fantastic quilt, high in contrast and full of clean, sharp lines. But what I loved most about Kathy’s post last week was this: “A few hours each week my husband and I get to tutor children who have experienced homelessness…suffice it to say it is a gift to us that we have the opportunity to play a small part in these kids’ lives.”

Used with permission from Kayak Quilting
Kathy thank you for reminding us that we can use our quilting for others. Kathy’s lovely house quilt is going to be part of a silent auction for a Housing Families’ upcoming Gala. I don’t want to get all “holier than thou” on you, but I do want to give a virtual high five to all you special quilters out there who are using this wonderful art of ours to do good. Giddy up to you!! Please take a moment to go check out Kathy’s work at Kayak Quilting, thanks for sharing with us Kathy xx

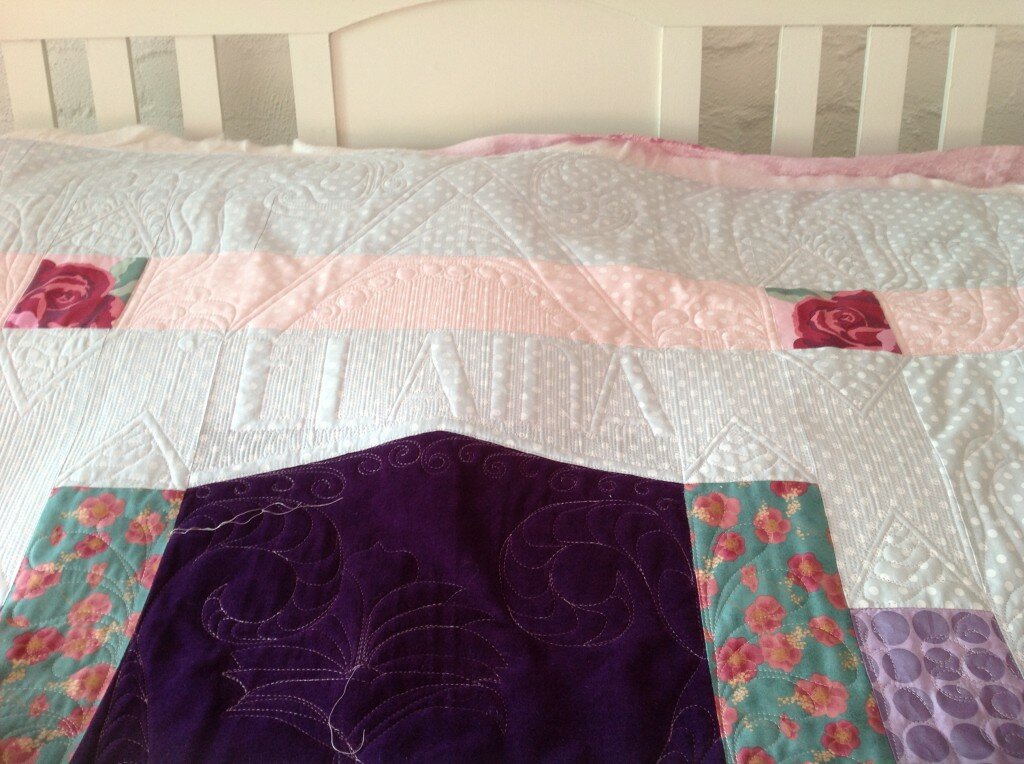
Must quilt names into quilts at every opportunity! Hint: do not try this at night! Ask me how I know…
The past few days I have been quilting a lovely memory quilt (which is awfully hard to photograph without sharing all of the customer’s personal photos). There is a definitely travel theme going on and I love all of the cute prints.

Tres cool Paris and London prints <3
Last week I shared my binding tips and some of you shared your favourite tips back. I found these methods super useful, thanks to Quilt Paradigm and Mel of We Shall Sew:
Reversible Binding tutorial
Reversible Binding tutorial #2
Susie’s Magic Binding
So that’s it from me. Please remember to add a link back to my blog and/or the linky button to your post or sidebar. Please visit three other linkers. We all love visitors!
Happy quilting!!
Welcome to I Quilt linky party at Pretty Bobbins I’m claiming a win as it is still Thursday in some parts of the world…. So come link up and be merry!
I haven’t gotten myself organised to feature anyone this week but I’ll get back on top of that next week I myself was featured by my local modern quilt guild this week and will be sharing a post with them on what’s inspiring me soon. Once I write it… It’s a bit like that at present! But there is lots of exciting stuff on! Teaching schedules are being published by Addicted to Fabric and Hobby Sew Belconnen at the moment and I’ll add a page with info on the blog in the next week or so. I have some BEAUTIFUL Sarah Jane and Jennifer Sampou fabric here that I’m about to get busy with for some upcoming blog hops on the 13th and 30th of April. I also had a super exciting surprise email from Mark Lipinski and will be on his radio show on the 30th of April. I have just finished a magical quilt for the lovely Alyce of Blossom Heart Quilts. That one sure was difficult to post…

Piecing by Alyce Blythe, machine quilting by me
This week I wanted to talk about binding. Binding is definitely my LEAST favourite part of quilting and until I learnt how to machine bind I had a stack of quilts that were looking like never getting finished. There are a few different methods out there, but my favourite is by Red Pepper Quilts. Rita’s example is absolutely PERFECT. You know that I NEVER aim for perfection but enjoy the process It took me a few attempts to achieve binding that was caught on the back the whole way around and now I find it quite easy.

My biggest tip for machine binding is to iron the heck out of your binding after you have sewn it to the front. I use very small bulldog clips on each of the corners of the quilt (if it’s looking like the mitered corners are a bit tight I also use a dab of my sewline glue pen to hold them down) and no pins. I keep a quilting glove on my left hand to support the quilt and make sure that the weight of the quilt is not pulling it out of place. I use my (gloveless) right hand to keep the binding firmly in place as it approaches the machine needle. I find it best to bind a quilt in a single sitting whilst the binding is nicely pressed.

The above quilt, Colour Therapy, is only the second or third quilt that I machine bound and as you can see the binding is quite neat. If you fear machine binding or you’ve tried Red Pepper Quilt’s method and find it a bit tricky, another popular (and slightly easier) method is by Crazy Mom Quilts. She attaches her binding to the back, folds it over and then machine stitches it down, so you can actually see the binding and easily catch it rather than doing it by touch. I have used this method once (below photo) and found it to be very neat and easy.

This week I actually applied binding on the longarm for the first time! It was surprisingly easy and super fast! I just made sure that I basted the sides of the quilt very straight and then followed the outside edge of the hopping foot (as a 1/4″ guide). If you have a longarm and you haven’t tried applying binding on the frame I urge you to give it a go. You will be surprised at how easy it is and its a great time saver!

Please let me know if you have any binding tips or favourite methods so I can share them next week. Binding really is my least favourite yet undeniably essential part of quilting!
So that’s me for this week! Now to collect the children from school and face the weekend. YAY for weekends I say
Please remember to visit three other linkers (we all love comments!) and add a link and/or button to your post or sidebar. Remember that this linky is all about the quilty process be it sketching quilting designs, coming up with quilting ideas for a new quilt top, quilting techniques or any other related techniques, tips and lessons learnt. I love learning from you all each week and I hope you’re enjoying linking up too! Mwah, mwah! (That’s two French kisses in case you were wondering.) Happy linking xx
An InLinkz Link-up
Welcome to I Quilt, a weekly linky party all about quilting, here at Pretty Bobbins. I have to say, I am still in shock by all the amazing linkers last week! Thirtynine fabulous quilters linked up and yes, once again I am still getting through all the blog posts… I hope y’all visiting a few other linkers too, there’s nothing like quilty comment love <3 Don’t forget to add a link to my blog or the linky button to your post or sidebar

Image used with permission by katyquilts
This week I’m featuring the very talented Katy of KatyQuilts. Katy shared a practice piece that she was working on. Katy, I love you for sharing this! All too often we see the polished, perfect, errorless final product. But this linky is about process and we all experience tension issues, design imperfections and quilters block at some point! Thanks so much for sharing Katy! I think your feathers are beautiful, but if they’re your practice piece then I can’t wait to see where you end up! Oh! I’ve just checked out Katy’s post this week, make sure you pop over! Great stuff!

Image used with permission from katyquilts
Katy’s post got me thinking about how it’s important to look at the entire quilt, not just elements of the quilting design in isolation.
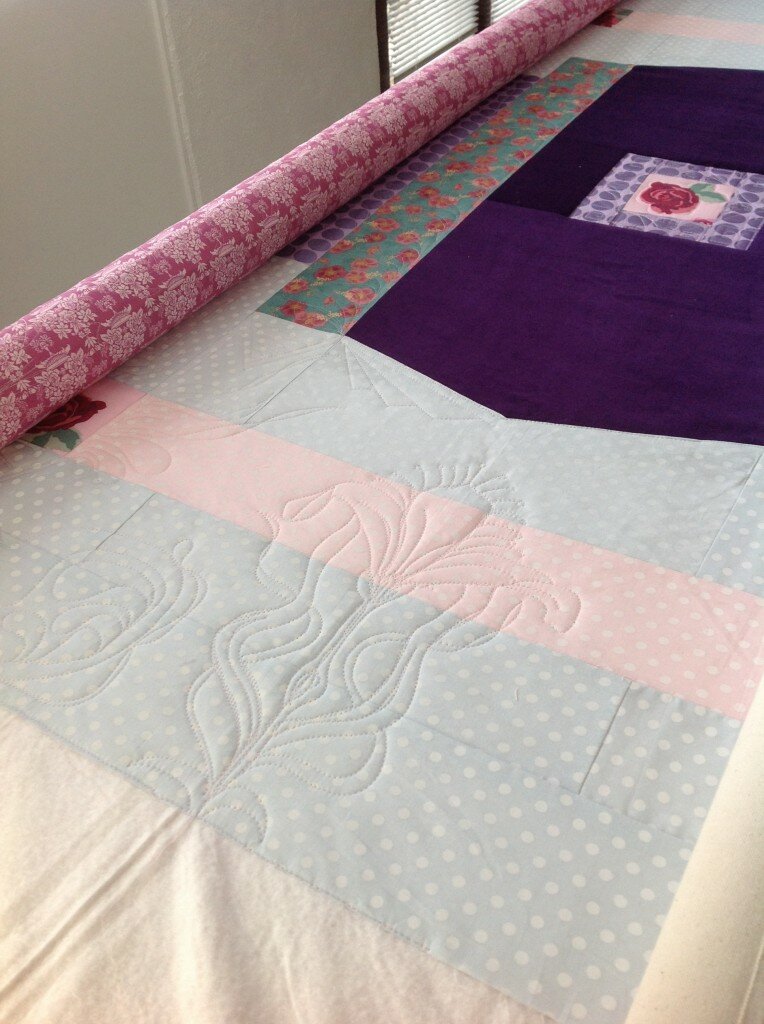
This week I’ve been working on my very first customer quilt and I’ve been super critical of myself and spent ages working out the design. As always I just jumped in and I didn’t mark anything other than the points. I did use my straight ruler and whilst I still need a lot of practice, I’m happy with where I’m at.
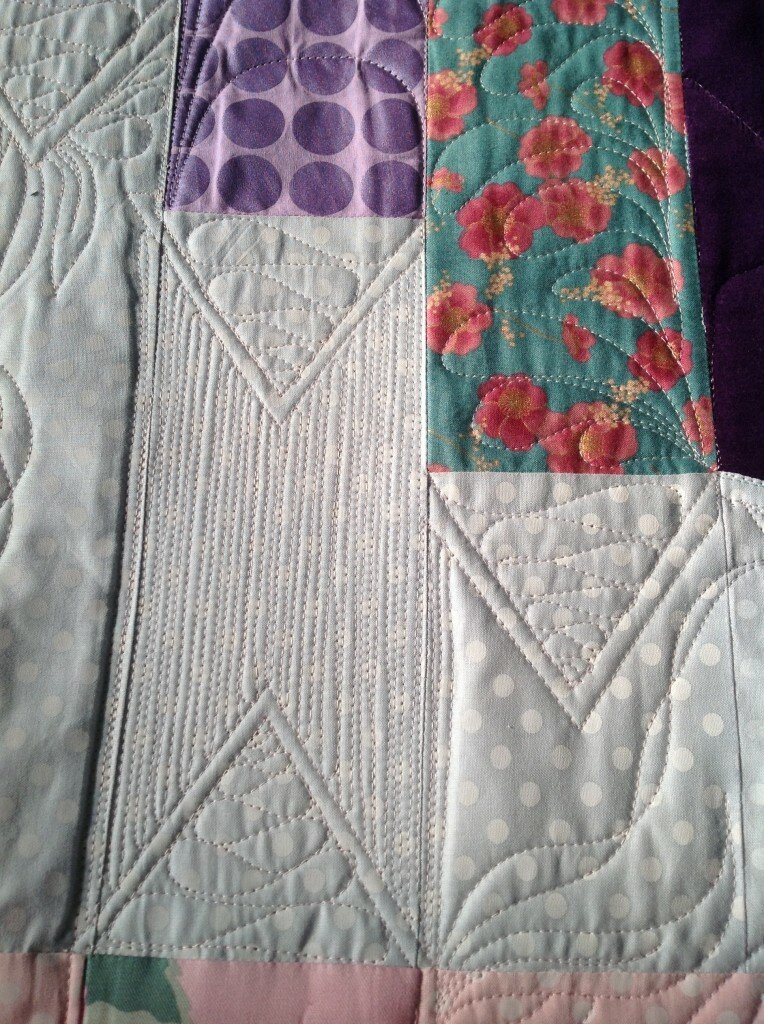
My customer asked me to incorporate the art deco style arum lily so I went to town creating art deco designs for the whole quilt. I also incorporated the recipient’s name and I LOVE how it turned out (I did mark the letters first)!
Quilting the lillies was kind of death by nerves. I started with the bottom two leaves, then the stem, then the petals, back down to the bottom and then the curly bits up the sides. I honestly was not a fan but once I’d finished the first lilly and stood back and looked at it in context, rather than isolation, I actually loved it and am really proud of my efforts.
I’ve said before, and I will continue to say, please don’t worry about achieving perfect quilting. If you aim for perfect, every little error will erode your confidence and you won’t be able to appreciate the big picture. Whenever I quilt I work on an area or specific aspect of the design and then I stand back, re-evaluate the quilt and only then do I come up with the design for the next stage of quilting. I try not to worry about the little errors, rather, I focus on the whole design, how the next stage of quilting will improve on what I just did.
I love to quilt and I firmly believe it should be a fun, enjoyable experience. Sure, quilting my first customer quilt was terrifying, but once I forgot the nerves I had a great time!
So here’s to imperfect quilting, to having fun and to not worrying about every single mistake!
Happy quilting
P.S. I have to apologise about image quality and tardiness of this post. My laptop is officially dead and I’m working on my husband’s itty bitty 10″ laptop.

Welcome to Pretty Bobbins! I’m stop number two on the Cushion for Christmas bloghop and today I’m sharing a QAYG cushion tutorial. The lovely Ms Midge came up with the great idea to feature cushions that can be made in a day – the ideal Christmas gift! Speaking of Ms Midge, I’m pretty sure she is freaking out right about now as my modem died over night and I have been offline for over 24 hours leading up to my stop on the hop… Amazing how long the battery lasts on my iPad when there is no wifi in the house

I am sharing a cushion that I made yesterday morning. I didn’t time myself but I started after breakfast and finished before lunch, so it is definitely do-able in a day I am familiar with the techniques though, so it might take a beginner a bit longer I find the key to the Quilt As You Go (QAYG) method is to be organised. I set up my machine, ironing station, cutting mat and fabrics (in order) within reaching distance. I used a 16″ cushion insert. I pieced together cotton wadding and cut backing both at 18″ square.

Now my QAYG cushion is technically not QAYG as I didn’t quilt the sections other than to sew them in place. Usually with QAYG you will sew your strip down as I describe below, flip it right side up, then quilt it in place. I have done this and it does look rather lovely but I find it to be an unreasonably time consuming and thread hungry method. So I cheat a little Below you can see a lovely QAYG iPad pouch I made last year. I keep meaning to FMQ over a cushion that I’ve made using my cheats QAYG method but I always love the end result too much to add any extra quilting The choice is yours


I started with a reasonable sized scrap off center and then added a piece that covered the width and over hang 1/4″ each side. I cut all my pieces 1.5″ wide and worked out the length as I went along. The key being to ensure that each piece overhangs by 1/4″ at both ends.

I used my walking foot which has 1/4″ marked on it and I secured my stitches by going back and forth a few times at each end. I didn’t use any pins, I just lay my wadding on my backing and they stayed in place while I was working. After sewing each strip in place I trimmed back any overhang from the previous piece to the 1/4″ seam allowance. After trimming I ironed the most recent piece flat. Ironing after adding each strip will give you the best outcome.

I was trying to be clever with colour and laid all of my prints out in order and then checked as I went along. I didn’t quite get the affect that I was aiming for but I’m still really happy with the cushion.

After finishing the teals I laid out the purples. So pretty

I found it easiest to use my ruler to measure the required size of the next strip. You need to ensure that you strip has 1/4″ seam allowance from any raw edges.

In the above example the strip would need to be 7.25″ x 1.5″
I started to fall in love with this cushion when I was about half way through adding the purples

There’s something about pink that I love. In hindsight I should have gone teal, pink then purple but in the end I added the pinks starting from light to dark (both purple and teal were added lightest to darkest).

I realised after adding a few pinks that I didn’t have enough to continue with only 1.5″ strips so I laid out my remaining pieces to finalised the placement. I started with an 18″ square piece with the intention of a finished 15″ cushion cover.

After adding all of my pins I trimmed back my mini to 16″ (width) x 17″ (height) and cut a backing piece the same size.

I decided on a zipper closure in the bottom seam and I always like to add an extra inch for this purpose. I don’t have access to my overlocker/serger at the moment so I used a flatlock stitch on my sewing machine along the bottom edge (17″ edge – important if your prints are directional).
Lay both your backing fabric and mini right sides together and stitch 1/2″ in from the edge. This will be where you insert your zipper. You want approximately 1.5″ at both ends in your normal stitch length and the area in between in the longest stitch length possible. You can sew these three areas separately, but I’m lazy and just secure my stitches and adjust my stitch length without trimming

After timming your threads press the seam open. Because we’re making a cushion cover that involves quilting I always fuss with the pressing. You want a nice straight and flat seam

Select a zipper longer that the width of your cushion (I think I used a 21″ zipper) and pin in place so that the teeth are ligned up to where the front and backing meet. I use pins to remind me where my basting stitches begin/end. Grab your zipper foot and sew your zipper in place. Don’t forget to make sure that the tab is within the sewn area. I cross over the zipper just outside of the basting stitches and sew back and forth a few times.

Trim your zipper ends and secure with a few stitches. Next you want to grab your seam ripper and carefully rip out those basting stitches. I usually use tweezer to grab the tiny threads left afterwards.

Then you want to sew your cushion cover together. Make sure you leave the zipper open so that you can turn it right side out. I like to use a 1/4″ seam allowance, first with a straight stitch and then with the serger or a zigzag stitch to prevent fraying.
Et voila! You have a brand new cushion ready for Christmas!

I used a lovely Kate Spain fat quarter (from her line Good Fortune) for the back. LOVE.

I hope you have found my tutorial helpful. For me, as always, this was an exercise in colour play as much as it was in quilting and whilst I didn’t end up with exactly the affect I was after, I do love it In case you’re wondering, yes, it will be a Christmas present for a very special friend
Don’t forget to head over to Ms Midge on the 14th of December to link up your cushions. You can find all of the details here and links to the other fabulous bloggers below. I can’t wait to see what everyone has been up to!
Sunday 1st December – Ms Midge
Tuesday 3rd December – Kristy at Quiet Play
& Ms Midge
Wednesday 4th December – Joshua at Molli Sparkles
Thursday 5th December -Rachel at Little White Dove
Friday 6th December – Fiona at Finding Fifth
Saturday 7th December – Abby at Things For Boys
Sunday 8th December – Lauren at Molly & Mama Makes
Monday 9th December – Jodi at Tickle & Hide
Tuesday 10th December – Adrianne at On The Windy Side
& Ms Midge
Wednesday 11th December – Alyce at Blossom Heart Quilts
Thursday 12th December – Gina at Party of Eight
Friday 13th December – Jane at Quilt Jane
Saturday 14th December – Round up of Blog Hop and link up YOUR projects at Ms Midge!
Wednesday 18th December – Winners Announced at Ms Midge!
 |
| Patterns Only - $20 Voucher |
 |
| The Oz Material Girls - $20 Voucher |
 |
| Fat Quarter Shop - $50 Voucher! |
 |
| Polka Dot Tea - Fabric Bundle! |
 |
| Intrepid Thread - $25 Voucher! |
 |
| Blossom Heart Quilts - Ornamental Quilt Pattern! |
 |
| Quiet Play - Winner’s choice of 3 Paper Piecing Patterns! |
Let the cushion madness begin!
I’ve just sent my little monsters off Trick or Treating and the house is in chaos (removalists arrive in four days) but it’s time to link up for I Quilt Thursdays here at Pretty Bobbins! Thank you to all of the lovely linkers who joined in last week! I am really enjoying reading all of your posts. I’m sorry that I haven’t replied to all the comments on my blog yet, I am struggling with blogging time at the moment with moving preparations in full swing. Nonetheless, this week I am going to share some of my troubleshooting quilting tips!

photo with permission from Dasha of Patching Pixies
First up I would like to share Dasha’s work with you. Dasha is such a sweetie and has such a big heart. She makes quilts and laundry bags for Aussie Hero Quilts (I think that is like Quilts of Valor for my American readers) and last week she shared her quilting on a BEAUTIFUL quilt for her friend Verna. We first corresponded back in January when she wrote to me about bobbin tension and she claimed in last weeks post that she doesn’t love machine quilting. Dasha, you might not love it, but you are have the goodies girl! I LOVE the quilting in the below photo. Now that is skill! She is seriously accurate! I’d love you to pop by and check out Dasha’s blog. She is a new blogger and a great quilter Thanks so much for linking up Dasha and for being my featured quilter this week <3

Photo with permission from Dasha of Patching Pixies
This week I want to share a few of my trouble shooting tips with you. Alyce of Blossom Heart Quilts was having a frustrating time FMQing recently and whether she wanted it or not I gave her a heap of advice that I thought worth sharing here too For interests sake I will share some photos of my current quilting project, a bee quilt that I will give to my good friend here in Nouméa as a farewell gift. I can’t blog without photos

First up, when you thread your machine make sure that the thread is coming off your spool in the right direction. Check your manual to find out which direction this should be for you. I actually use a separate spool stand as I find it gives me the best results.

When you are threading your machine make sure the foot is up and hold the thread taught where it comes off the spool by doing these two things you will ensure that the thread passes correctly through the tension disks. (I won’t tell you that I ALWAYS used to thread my machine with the foot down!)

I used the star on the back of the quilt as the guide for my quilting design. Yes, that was rather tiresome removing pins from behind whilst quilting!!!
Support your quilt! The weight of your quilt can cause all sorts of problems. I sit my machine in a sewing cabinet and put the ironing board behind it to carry the weight of the quilt. If I’m working on a large quilt I will support it using my arms and shoulders and focus on only small areas at a time, then move the beast to rearrange the way I am supporting it. If you don’t have a drop down table I would suggest that you build a support structure. Even a temporary structure made of phone books or shoeboxes is going to be better than letting the quilt drag against the needle in every direction.

You’ve probably heard me say before, buy the best quality products that you can. It really does make a difference. My current quilt in progress is made up of bee blocks and of all of those various blocks, one little 2″ x 5″ strip (below photo – it’s the yellow with the flowers printed on it) saw me unpick five times! Based on touch alone it is not great quality. I don’t expect my bees to spend lots of money on fabric for my blocks but next time I get a block with poor quality threads I will leave it out. I think using quilt store quality fabric is a safe bet. The quilting in that area had the same backing fabric, same wadding and no more seams than anywhere else and my machine was dropping stitches (which it NEVER does) and the bobbin thread was pulling through to the top. Good quality thread, fabric and wadding will all help improve your quilting experience. You wouldn’t do your plumbing with ancient leaky pipes, give your quilts the same love <3

Troublesome quilting
And that’s it from me for this week. It’s almost 9pm (sorry I’m late with the linky!) and I have to sit down with a glass of wine and prepare to face more packing tomorrow! What have you been quilting this week? I’d love you to link up below. I ask that you visit at least two other linkers and either link to me in your post and/or add my button to your sidebar/post. You can find the button html code near the top right of my blog or at the bottom if you’re on a mobile device. Remember that this linky is all about quilting process, I’d love to hear all about your process!

Once again I am participating in the Blogger’s Quilt Festival which is very generously organised and hosted by Amy’s Creative Side. This time I am entering two quilts. South Pacific Dreaming in the Wall Hanging category and “Celebrate” quilt #1 in the bee category. If you’re new to Pretty Bobbins, welcome! I am all about free motion quilting, it’s my passion and I host a weekly linky party on quilting process I’m soon to become a longarm quilter, but for now I work on a Bernina 440QE. I’m currently based in Nouméa, a French territory in the South Pacific but am about to return to live in Australia.

Back in June some very good friends of ours left Nouméa. They had lived here on their catamaran for many years and are one of the happiest, nicest family’s that I know (can you tell that I miss them?). They commissioned me to make a set of three wall quilts (above) for their family as a souvenir of their time in Nouméa. Honestly, the pressure was on. I don’t know if you know many “boaties” but they tend not to have a huge amount of belongings (because they need to fit them all onto a boat). These three quilts were to be a key souvenir of their time not only living in Nouméa, but sailing around the world and the South Pacific. (I’m tearing up writing this LOL). I spent a lot of time talking to them and they gave me some special photos for inspiration.

They are kite surfers – go girl!!
I made three quilts for them but the one I’d like to enter into the festival is South Pacific Dreaming (also the title of the set).

I used a lot of techniques in this quilt that I have learnt in the last year or so. The improv curve piecing was based on the class I did with Rachel of Stitched in Color.

The family portrait outline style thingy (very technical!) was self taught and involved merging two photos, tracing, some freezer paper and some free motion quilting. I’m planning a tutorial at some point but I’m sure you can figure it out yourself I merged two photos, in the original photo the Father and son were sitting in a hammock and I tried to keep the texture of the hammock to give the idea of my friend sitting with his baby on his knee (seriously cute baby!). The second photo was taken years later and my friend was leaning in perfectly toward her now four year old. Pairing the two photos to create a family portrait was a lot of fun and I love the outcome.
You can see the family silhouette better from the back.

The detail in the quilting is momentarily lost when you glance at this quilt. I didn’t want the family portrait to be overly obvious and it took me a few days to work out how to quilt it. Whilst I’m usually up for all sorts of fancy free motion quilting, this quilt called for lots of straight lines to really give the picture that I was after. You can see that I went with the beach scene quilting a palm frond in the top corner.

A photo taken on a joint family vacation. See those palm fronds everywhere? :)
The white section is quilted to show the iconic shape of the Catana Catamaran windows.

My friend’s catamaran moored at The Isle of Pines. Can you believe this? Stunning!
To me this quilt really felt like a night scene in the South Pacific but I took the colour palate for all three quilts from the Mahi Mahi fish. My friends gave me a great photo of a freshly caught (by them) Mahi Mahi and it took my breath away.

Photo courtesy of my friends
Whilst I am only entering the South Pacific Dreaming quilt in the Blogger’s Quilt Festival, it is a set of three and I’d like to briefly share the other two with you because they are deep with meaning. ”She Travels” was for my girlfriend (the wife/mom of the family) and the pink symbolizes her sailing around the world. I included some prints with French text to represent the French culture in which we live (and remind them of me – one has a sewing machine!).

For the quilting I followed the path that my friends took from Florida, to the Caribbean onto the Galapagos, Tahiti, The Cook Islands, New Zealand, New Caledonia and Australia (with many stops in between!). I then echoed this route in ever expanding lines to give the idea of a map of the sea bed or currents. The three circles come from details of the catamaran and I added the phrase, ”Know your dream, find a route” just above these circles.

The third quilt is called “Elements” as to me it represents the elements of the wind, water and land as well as kiting, a clear passion of my friends. This quilt excites me. I really pushed myself by pairing a busy pieced section with an expanse of white which I then quilted in bold colours. Absolutely no room for error!

I took the shape of the island from the photo below, the lighter blue of the wake behind the board shifting into the darker blue. The colours represent the turtles that laze about in the seagrass bed and the unsuspecting kiters that have to dodge them. The flaming C represents the kites that my friends have used during recent years.
I have no idea of winds and waters but I absolutely love these photos of my friends kiting. I can see how much they love it and I can feel the excitement. These things zoom and on a good day there are dozens of them weaving around each other. Pouring over these photos I could almost imagine the wind and I did my best to capture this in my quilting.

My friends now live in Floriada and are sorely missed. You know the kind of friends that you can pick up with at a moment’s notice? The ones that you randomly think about and imagine what they might be doing? We will leave Nouméa in two months and I hope to make something similar as a souvenir for my family.

South Pacific Dreaming (set of three wall quilts)
Usually when I share a quilt I talk about the materials used, these quilts used more than just materials, there were memories and emotions and dreams involved. It was a privilege and a pleasure to work on these pieces and I miss my friends dearly. They sent me a photo last week showing me the quilts on the walls of their new home and I want to share their words with you, “…we hung your quilts today and I am feeling so much better. I wanted to get a photo for you with/before the sunset… Anyway, they have very much lifted our spirits – thank you so much again. They have just so much meaning in every stitch and really look amazing in their spots.”
Details:
Pieced and Quilted: by me on my Bernina 440Qe
Size: approximately 30″ x 20″ (from memory!)
Thread: Aurifil threads (2000, 1135, 5005, 5006,1128, 2810 in 50 wt and 2024 in 40 wt)
Fabric: Bella solids (the white is snow) and lots of favourite prints from my stash. If you would like the details of a specific print, please let me know and I’ll try and help you, but I suspect I used around 40 different prints so I’ll skip trying to list them all
Wadding: 100% cotton
South Pacific Dreaming – my entry into the Wall Quilt Category
Thanks for stopping by and I encourage you to participate in the Blogger’s Quilt Festival by either visiting and/or entering the festival. This is my third time entering and it’s a great quilty and bloggy event. Thanks for all your work Amy!

