Archive of ‘Minis’ category
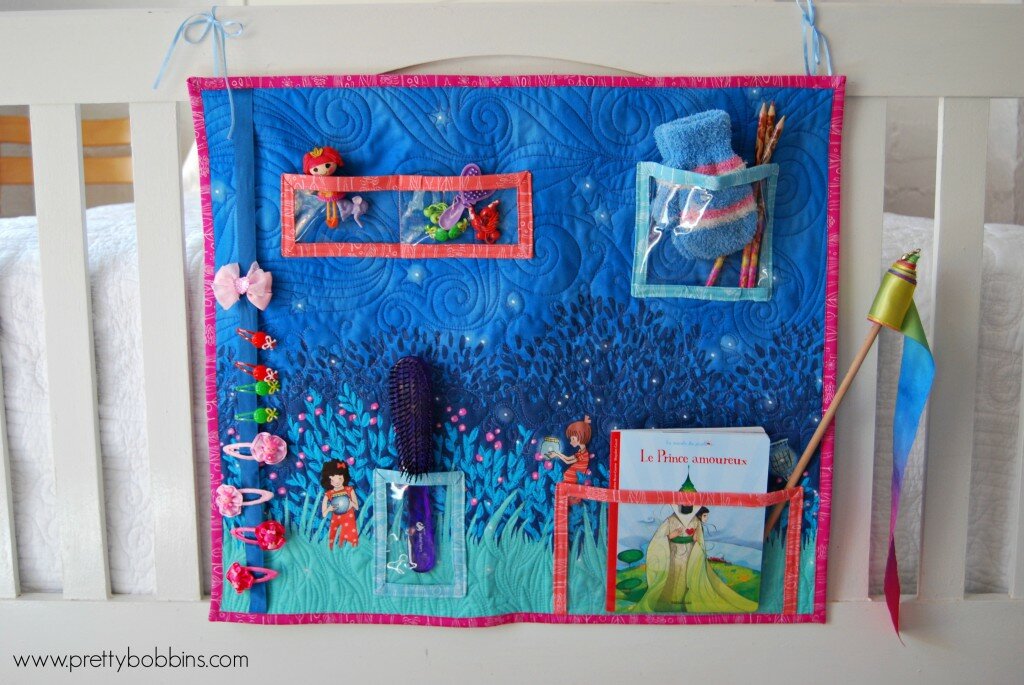
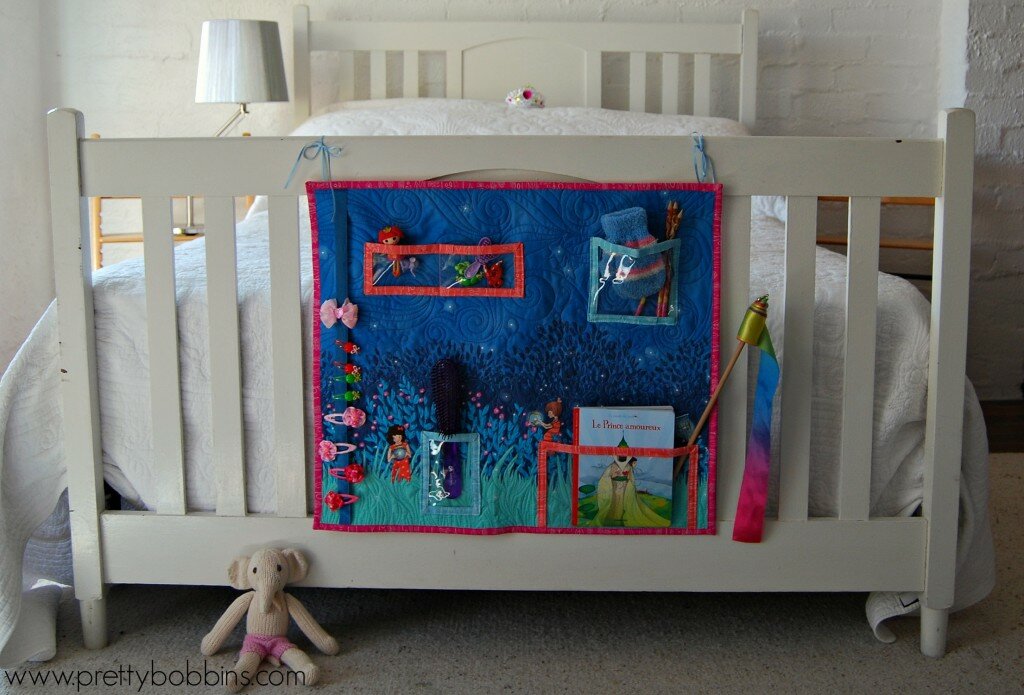
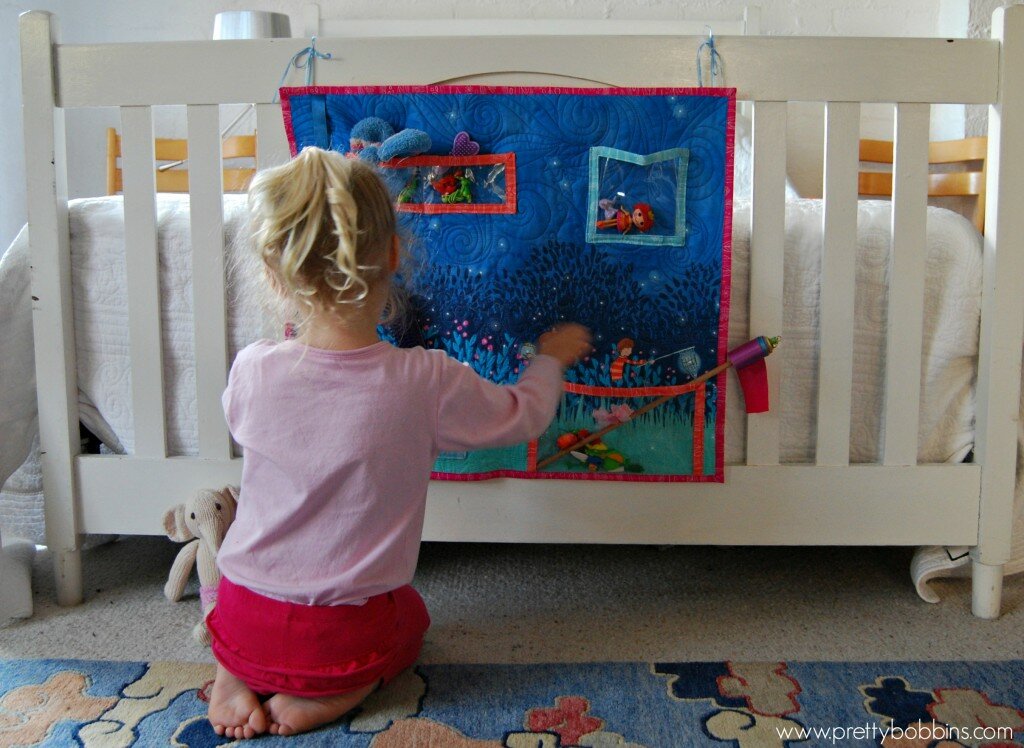
Hanging Organizer Tutorial fit for a wee princess!
When the super talented Sarah Jane put the call out for blogger to work with her new line, Wee Wander, I couldn’t help but put my hand up!

Today I’m sharing a tutorial for a Hanging Organizer. I have a lovely three year old daughter who certainly could do with a little help organizing her important and precious belongings and she just LOVES her pretty new organizer <3
Fit for a princess!
Let’s get started! You will need…
Supplies:
- 1 panel Wee Wander
- Backing fabric (32″ W x 29″ H)
- Wadding (28″ x 25″)
- Hanging sleeve (5′ x 23″)
- 1 piece clear vinyl 11″ x 15″ (I repurposed one of those clear zip bags that pillows and linen come in)
- 12″ x WOF (width of fabric) for binding OR purchase aprox 250″ premade double bias binding (you will have lots left over!)
- 60″ ribbon for clip strip and hanging
- 24″ long piece of dowel rod for hanging
- usual quilting supplies
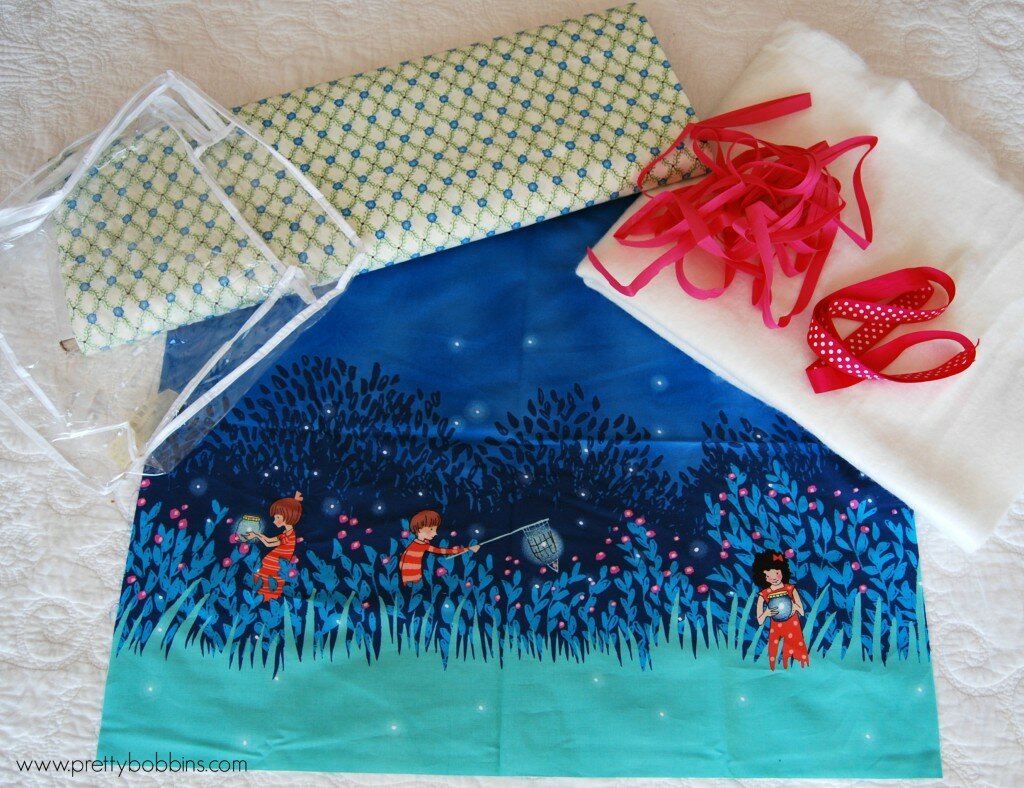
Gather your supplies
Prepare and quilt you Wee Wander panel for quilting. I cut backing to 32″ x 29″, wadding 28″ x 25″ and the panel to 21″ x 24″. I changed threads a few times and let Sara Jane’s whimsicle design dictate my quilting. TIP: I always find it best to quilt wall hangings quite densely so they sit nice and flat.
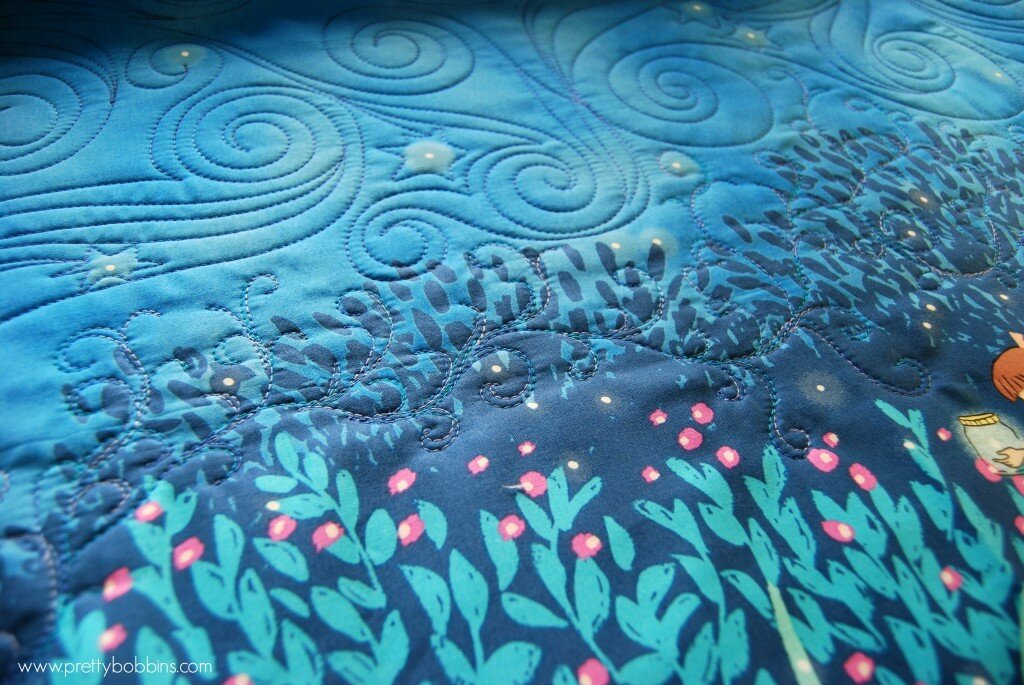
Quilt to your heart’s content!
Once you have finished quilting your panel, trim it so it is nice and square, then set it aside.
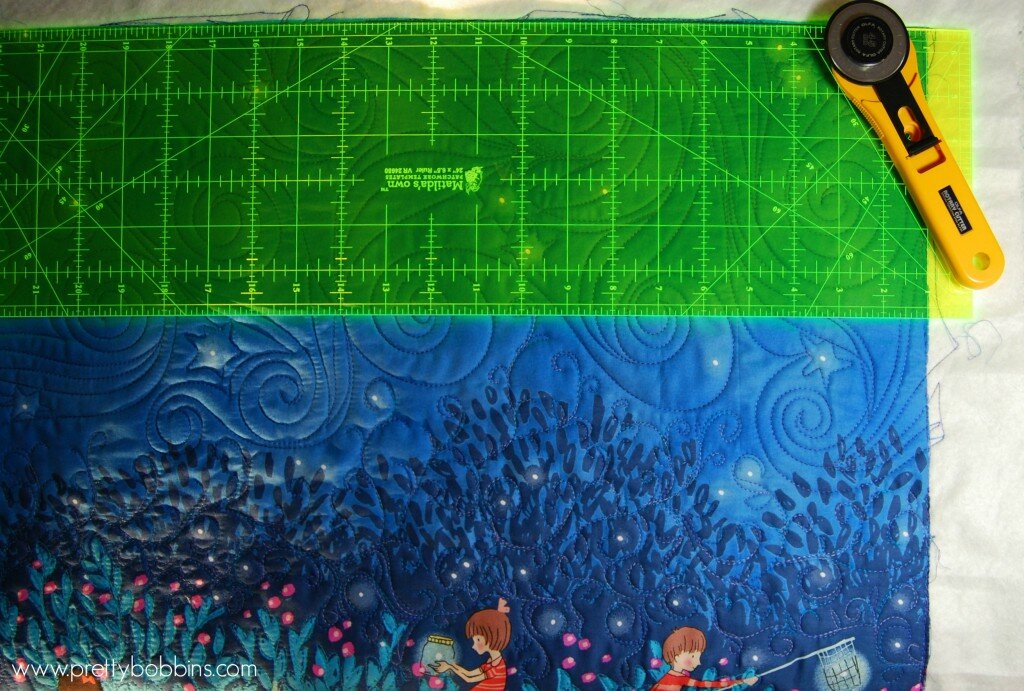
Trim your quilted panel
Prepare your binding. I wanted to feature a number of Sara Jane’s prints for the binding, but you can use pre-made double bias binding or make your own. You will need 105″ binding for the outside of the organiser and four smaller pieces for the plastic pockets:
- Pocket A 37″ of double fold binding
- Pocket B 36″ of double fold binding
- Pocket C 29″ of double fold binding
- Pocket D 43″ of double fold binding
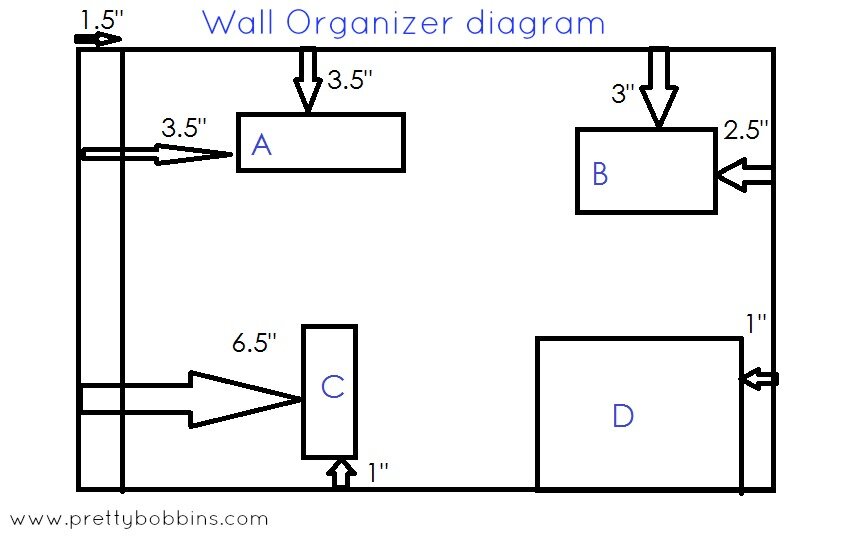
Prepared your clear plastic/vinyl pockets. Cut one each of:
- Pocket A 3″ x 9.5″
- Pocket B 5″ x 7″
- Pocket C 5″ x 3.5″
- Pocket D 9.5″ x 6″
Bind all four sides of A, B and C. Bind three sides of D (leave one of the long sides raw).

Binding tips
Cut a 23″ length of ribbon for your clip strip. My ribbon is .75″ wide.
Place your pockets where you would like them. DO NOT PIN THEM!! I decided to fold the bottom two corners of pocket B in a little so that the pocket sits out and can take bigger objects. TIP: make sure that you don’t place your pockets directly over the parts of the panel that you would like to feature.
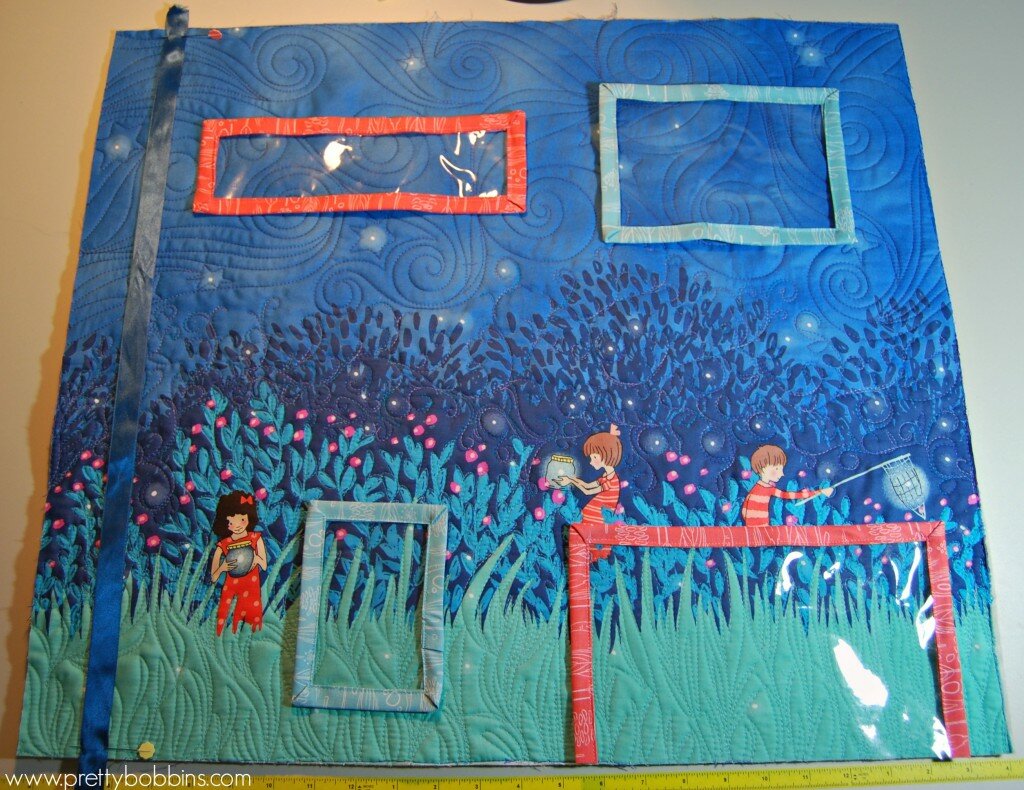
lay out pockets
Once you are happy with the placement of your ribbon and pockets you can pin them carefully within the found section. The pins will leave holes in the vinyl so please be careful 
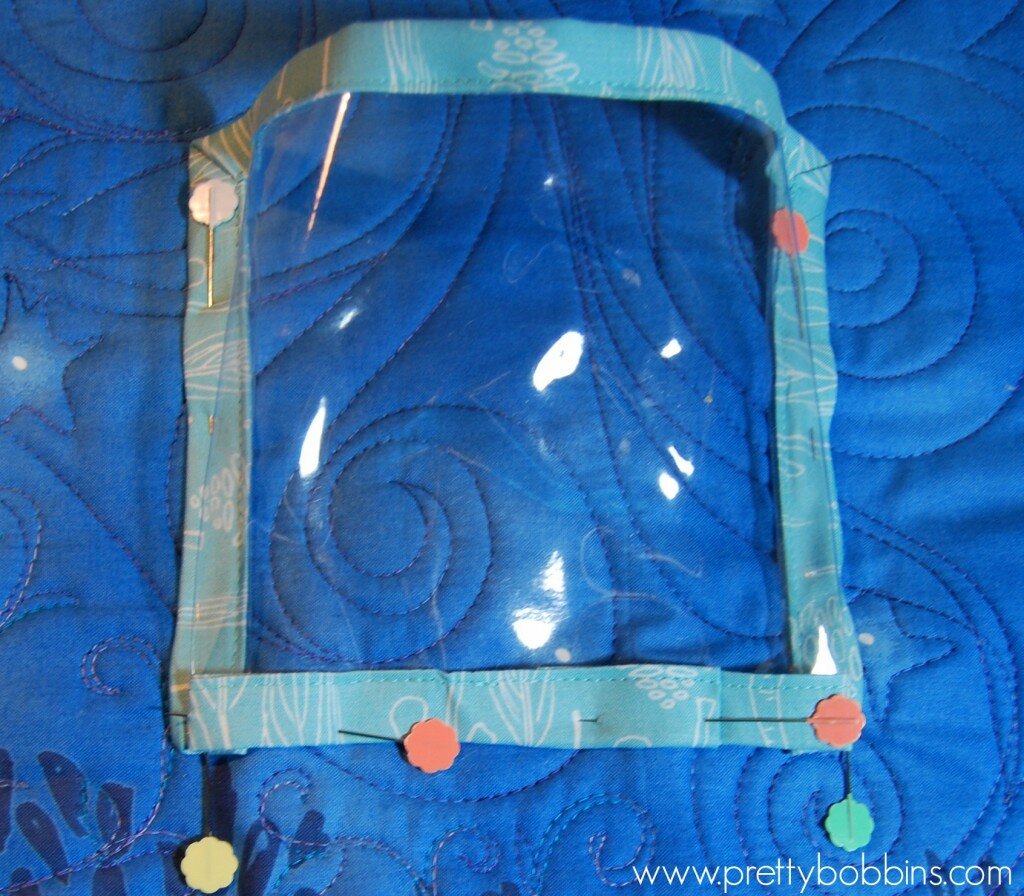
Pin your pockets on the binding so that you don’t mark the vinyl.
Sew your pockets in place. I used a walking foot as the bound vinyl is somewhat bulky.
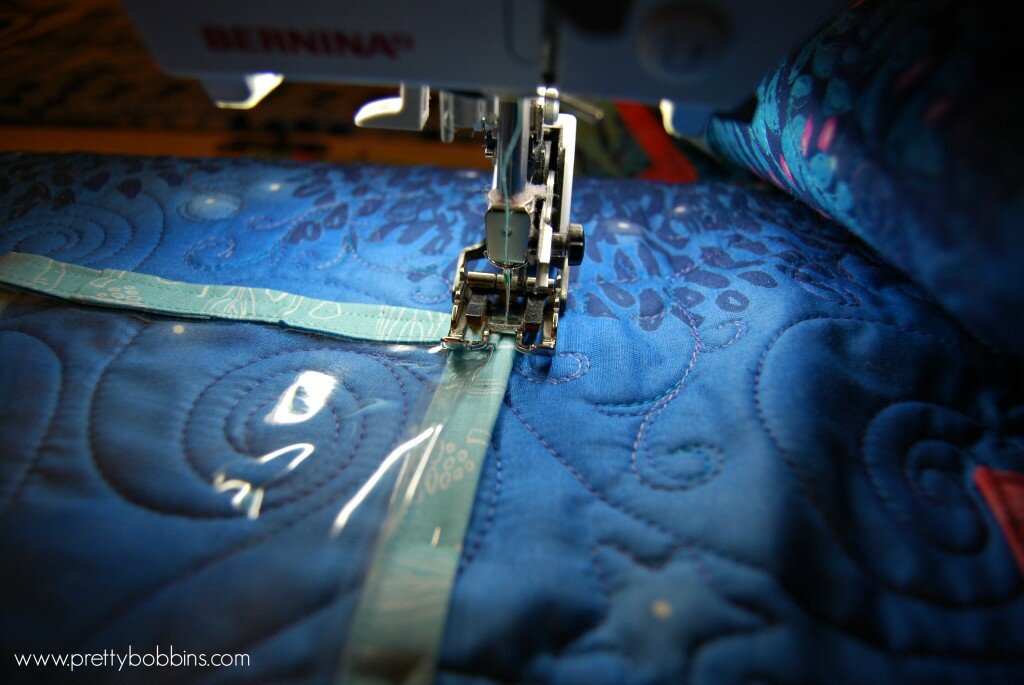
Sew pockets in place
Prepare your hanging sleeve. Take your 5″ x 23″ strip of fabric and fold both short ends in by 1/4″ and again by 1/4″ to conceal the raw edges. Sew in place, fold in half with wrong sides together and press. Center your hanging sleeve on the top back edge of your organiser (raw edges togethre) and sew in place within the 1/4″ seam allowance.
Apply binding. I applied my binding to the back and then machine stitched it down to the front. This is a quick,easy and neat way of binding. Crazy Mom Quilts has a great tutorial here.
I applied my binding to the back and then machine stitched it in place on the front
Use your remaining ribbon and dowel to hang your organiser in place. Fill with all your precious items <3

A place for everything and everything in it’s place <3
Then let your wee one re-organize to their heart’s content!
Thanks for stopping by and a big thank you to Sarah Jane for always producing such beautiful illustrations and for turning them into fabric that we can use and love! I’ve loved being part of this blog tour <3 You can find out more about Wee Wander here <3
Welcome to I Quilt linky party at Pretty Bobbins, it’s Thursday (in Nouméa) and time to link up your quilting process. Please link up, visit a few other linkers and grab my button (code at top right or down the bottom if you’re on a mobile device) and link back in your post. Let’s spread the quilty love <3 We had some seriously impressive linkers last week and as I was visiting all of the blogs I started thinking about quilting with confidence as quite a few people mentioned this. Last week a Facebook friend shared a quote that said something like, “don’t compare your middle to someone else’s high point”. It really struck a cord with me (as did the response that we should never compare our middles  ).
).

The online quilting community is great, blogs are great, craftsy and flickr and instagram are great. But every now and then I catch myself comparing my work rather than being inspired. Don’t get me wrong, 95% of the time I am surfing the web I am being inspired but there is a small part of me that every now and then thinks, “I’m not that good.” rather than “I look forward to being that good” or “I’m going to try that”. Of course there are better quilters than me, there always will be! And that’s great, it gives me something to aspire to. But my point is, compare yourself to yourself. To how far you’ve come, to what you achieved during your quilting time today, to the skills that come easily now compared to that first lesson when EVERYTHING was a challenge. (I remember being totally perplexed by how to use a rotary cutter and ruler and cutting all my blocks .5″ wrong!). I used to sometimes feel like blogland was too happy and no one ever said anything real or negative. But I have come to understand that the encouragement that we give each other is far more important than saying, “it would have looked better if you….” or “those really aren’t my colours…” I read every comment I get and whilst I can’t always respond, those comments all build my confidence and that makes me a braver and better quilter. Share the love people!

Photo used with permission from Marelize @ Stitch by Stitch
This week I am featuring the lovely Marelize from Stitch by Stitch. I think I originally “met” Marelize on Instagram and I just LOVE LOVE LOVE seeing her work. She also quilts on a Bernina and is super amazing at free motion quilting. Seriously, check her out if you love quilting candy! Last week she linked up the most BEAUTIFUL quilt in progress and was talking about how it just wasn’t how she imagined. Marelize, the rest of us can see how stunning that quilt is, your work is divine! The back really shows the detail. AMAZING!

Photo used with permission by Marelize @ Stitch by Stitch
I’m actually in the same head space as Marelize at the moment. I love the quilting I did on my “Dream” mini (below) but it isn’t quite there, it’s not how I imagined it would be. I need to add a bit and I think by attaching the binding next I will be inspired to stitch on those words like I envisaged and decide whether or not to outline the word “dream” or leave it subtle.

As often is the case, the back is the show stealer here…

My other current quandry is the table runner I am making as a thank you/farewell gift for Mr 7′s teacher. (Thank you for all the useful suggestions and kind thoughts yesterday. Apparently he was improved this morning but lost focus this afternoon. That in itself is a HUGE improvement. Funny that my son is stubborn… ) After so much dense SLQ on the Dream mini I just couldn’t do it again even though it was my first thought for the table runner (this girl needs curves!).

Triangle table runner in progress
I LOVED this baby during the piecing and felt oh so clever how I’d used all teal and placed it from dark to light with the bold pink thrown in. I actually really thought this one needed some harsh geometric quilting but I didn’t want to quilt over the triangles. I pondered it for a day and then decided to just jump in.

Stuck in a rut!
I kind of got stuck on the same pattern. Does that ever happen to you? Completely not loving it I gave up the idea of something I would love and decided to throw in some half swirls spewing out into pebbles. I like it a lot more now, but it looks really beachy to me and that wasn’t at all what I was going for…. Ah! I need to think less and have more confidence in giving hand made gifts!! Do you give handmade gifts confidently? It’s that real conundrum, do you give handmade and put in lots of effort and then maybe it ends up at goodwill or in the rubbish… Or is it only me that is lacking in confidence on the handmade gift front? Spill the beans people!

Adding swirls and pebbles for interest
Now it’s your turn. I’d love you to link up below. Please remember that this is a quilting process linky. We all want to hear about your process, we want to learn and be inspired and share your quilty journey <3 Please remember to visit a few other linkers and add my button to your post or sidebar. Happy quilting!!
As the title suggests, I’m just hanging in there. I’ll spare you the grim details of post-packing fallout, suffice to say that Mr 7′s teacher pulled me aside today and told me that he is going to fail his final evaluations because he has mentally shutdown following the packing up of our house. If anyone has any suggestions on motivating, building confidence and managing change when it comes to children… I’m all ears! In the absence of good parenting I have promised Mr 7 the Nintendo DS (game thingy) that he desperately wants if he works hard like he did before last Monday. I have been saying all year that it is too expensive and not possible but I hope the lure of the DS is enough to get him working again. I have informed his teacher of this incentive and asked that she remind him if possible when he is head down refusing to work. Terrible parenting but I’m desperate. It is heartbreaking to watch your child shutdown and risk repeating a year of school because they are not coping with the thought of leaving their friends and the only home they remember. Sorry, I meant to spare you the details…

‘Dream’ mini in progress – made with scraps from Rainbow Plus quilt top. Aprox 15″ x 30″
Usually I keep my works in progress to a minimum. At the moment I’m suffering a lack of clarity when it comes to quilting designs but I’m pushing on and then procrastinating when I feel that the design I’ve gone with is not right. I was thinking the word “dream” in the above mini was too obvious but when I shared it on IG the clever peeps there suggested outlining it in black. I’m still procrastinating…

I use my ‘tri recs’ ruler when piecing triangles :)
I’ve started a table runner for Mr 7′s teacher as a thank you/farewell gift. I loved it during the piecing stage. I’m worried I messed it up whilst quilting. I’ve probably quilted a 1/4 of it but didn’t grab a photo before the light went (and can’t find the charger for my DSLR, sorry for the ipad pics!) so here it is pieced.

Aprox 15″ by 60″
The other main piece I am working on is a custom order, a Butterfly quilt based on a cot sized one I made a few weeks back. My wadding arrived today so I hope to baste it tonight (although crying into my wine is more tempting!).

Butterfly quilt in progress aprox 2m x 1.9m
I’m using fusible adhesive and raw edged appliqué and I love all the pink on the grey. Quilts like this make having a large stash a lot of fun. My customer had a great time going through all of the pinks and putting together her picks
I’m linking up to Work in Progress Wednesday at Freshly Pieced. I’d love you to pop back tomorrow and link up to my Quilting Process linky <3

First up, thank you for all the kind words and support on my post yesterday. You reminded me once again that when I put myself out there I get it back ten fold. Thank you xx Today has been chaotic (I got all ready for my first walk post packing and discovered that my shoes and hat have been packed!) but I will start to respond to comments tomorrow <3

Greek Cross Cushion by Aoife of thREDhead
A big thank you also to everyone who linked up last week! I finally got around to visiting everyone’s blogs last night I hope everyone linking up is showing some of the love and visiting other linkers, we all love comments and traffic This week I am featuring the talented Aoife, I LOVE her blog name, thREDhead. Seriously girl, how long did it take you to come up with such a great name?! I thought about mine forever and I still question it LOL Make sure you pop by Aoife’s blog, last week she shared her Greek Cross cushion which is absolutely stunning in bold solids with some AWESOME quilting to boot. Aoife pointed out how dense quilting dramatically shrinks your quilt and she used this as a clever design feature and densely quilted half of her cushion back (photo below). Aoife, you may have completely inspired my current work in progress Thank you xx

Greek Cross Cushion (back) by Aoife of thREDhead
My post yesterday probably left you thinking that I’m somewhat introspective at the moment. Yep, it kind of happens when you go through the moving process and touch every item that you own. Left with an empty house I put up our advent calendar that I made two Christmases ago. My idea was to make a Christmas tradition/symbol that was portable as we are often in transit during December. I had very little quilting experience (and confidence!) when I made this wall hanging. The wadding is synthetic felt, the white fabric is a super high threadcount sheet (NOT fun to quilt through!) and I did all the blanket stitching and binding by hand. Yep, I have grown a lot since I made this baby!

Quilted Advent Calendar with felt decorations
Growth is good. I love the quilts I make now (I love my early quilts too). I’d never use synthetic felt as wadding now (never say never!!) LOL I rarely mark my quilts anymore and for this quilt I even marked all of those straight lines in chalk. I didn’t even own a walking foot so I dragged that sucker through my old Husqvarna. Yep, I don’t do any of those things anymore, but I love this wall hanging and so does my family. If I hadn’t jumped in and made that wall hanging and lots of other projects, I wouldn’t have ended up where I am now. Marking quilting lines gave me the confidence to quilt. Quilting gave me the confidence to not mark lines. Not marking lines gave me the space to get creative and play.

my current quilt in progress 12″ x 27″
I would love to hear about how you’ve grown as a quilter. How did you build your confidence? Do you still have your early projects? Did you have lessons and learn methods or did you just jump in and give it a go? As much as I am a perfectionist, I don’t think there is really a right or wrong when it comes to quilting. Sure, you might not feel every piece is “show worthy” but we learn from each piece we make and that is invaluable. My Blessings quilt (below) was a major turning point in my quilting journey <3
I have also become a better photographer since then but I gave this quilt away so I can’t photograph it again. You can see the quilting better from the back (where I learnt that sometimes whole cloth is better)

Blessing Quilt back (I thought a pieced back was fun, but in hindsight it took away from the quilting.)
How is your quilting journey progressing? I’d love you to link up below. I ask that you visit at least two other linkers and link to me in your post and/or add my button to your sidebar/post. You can find the button html code near the top right of my blog or, at the bottom if you’re on a mobile device. Remember that this linky is all about quilting process, I’d love to hear all about your process!
Thanks for linking up xxx

Once again I am participating in the Blogger’s Quilt Festival which is very generously organised and hosted by Amy’s Creative Side. This time I am entering two quilts. South Pacific Dreaming in the Wall Hanging category and “Celebrate” quilt #1 in the bee category. If you’re new to Pretty Bobbins, welcome! I am all about free motion quilting, it’s my passion and I host a weekly linky party on quilting process I’m soon to become a longarm quilter, but for now I work on a Bernina 440QE. I’m currently based in Nouméa, a French territory in the South Pacific but am about to return to live in Australia.

Back in June some very good friends of ours left Nouméa. They had lived here on their catamaran for many years and are one of the happiest, nicest family’s that I know (can you tell that I miss them?). They commissioned me to make a set of three wall quilts (above) for their family as a souvenir of their time in Nouméa. Honestly, the pressure was on. I don’t know if you know many “boaties” but they tend not to have a huge amount of belongings (because they need to fit them all onto a boat). These three quilts were to be a key souvenir of their time not only living in Nouméa, but sailing around the world and the South Pacific. (I’m tearing up writing this LOL). I spent a lot of time talking to them and they gave me some special photos for inspiration.

They are kite surfers – go girl!!
I made three quilts for them but the one I’d like to enter into the festival is South Pacific Dreaming (also the title of the set).

I used a lot of techniques in this quilt that I have learnt in the last year or so. The improv curve piecing was based on the class I did with Rachel of Stitched in Color.

The family portrait outline style thingy (very technical!) was self taught and involved merging two photos, tracing, some freezer paper and some free motion quilting. I’m planning a tutorial at some point but I’m sure you can figure it out yourself I merged two photos, in the original photo the Father and son were sitting in a hammock and I tried to keep the texture of the hammock to give the idea of my friend sitting with his baby on his knee (seriously cute baby!). The second photo was taken years later and my friend was leaning in perfectly toward her now four year old. Pairing the two photos to create a family portrait was a lot of fun and I love the outcome.
You can see the family silhouette better from the back.

The detail in the quilting is momentarily lost when you glance at this quilt. I didn’t want the family portrait to be overly obvious and it took me a few days to work out how to quilt it. Whilst I’m usually up for all sorts of fancy free motion quilting, this quilt called for lots of straight lines to really give the picture that I was after. You can see that I went with the beach scene quilting a palm frond in the top corner.

A photo taken on a joint family vacation. See those palm fronds everywhere? :)
The white section is quilted to show the iconic shape of the Catana Catamaran windows.

My friend’s catamaran moored at The Isle of Pines. Can you believe this? Stunning!
To me this quilt really felt like a night scene in the South Pacific but I took the colour palate for all three quilts from the Mahi Mahi fish. My friends gave me a great photo of a freshly caught (by them) Mahi Mahi and it took my breath away.

Photo courtesy of my friends
Whilst I am only entering the South Pacific Dreaming quilt in the Blogger’s Quilt Festival, it is a set of three and I’d like to briefly share the other two with you because they are deep with meaning. ”She Travels” was for my girlfriend (the wife/mom of the family) and the pink symbolizes her sailing around the world. I included some prints with French text to represent the French culture in which we live (and remind them of me – one has a sewing machine!).

For the quilting I followed the path that my friends took from Florida, to the Caribbean onto the Galapagos, Tahiti, The Cook Islands, New Zealand, New Caledonia and Australia (with many stops in between!). I then echoed this route in ever expanding lines to give the idea of a map of the sea bed or currents. The three circles come from details of the catamaran and I added the phrase, ”Know your dream, find a route” just above these circles.

The third quilt is called “Elements” as to me it represents the elements of the wind, water and land as well as kiting, a clear passion of my friends. This quilt excites me. I really pushed myself by pairing a busy pieced section with an expanse of white which I then quilted in bold colours. Absolutely no room for error!

I took the shape of the island from the photo below, the lighter blue of the wake behind the board shifting into the darker blue. The colours represent the turtles that laze about in the seagrass bed and the unsuspecting kiters that have to dodge them. The flaming C represents the kites that my friends have used during recent years.
I have no idea of winds and waters but I absolutely love these photos of my friends kiting. I can see how much they love it and I can feel the excitement. These things zoom and on a good day there are dozens of them weaving around each other. Pouring over these photos I could almost imagine the wind and I did my best to capture this in my quilting.

My friends now live in Floriada and are sorely missed. You know the kind of friends that you can pick up with at a moment’s notice? The ones that you randomly think about and imagine what they might be doing? We will leave Nouméa in two months and I hope to make something similar as a souvenir for my family.

South Pacific Dreaming (set of three wall quilts)
Usually when I share a quilt I talk about the materials used, these quilts used more than just materials, there were memories and emotions and dreams involved. It was a privilege and a pleasure to work on these pieces and I miss my friends dearly. They sent me a photo last week showing me the quilts on the walls of their new home and I want to share their words with you, “…we hung your quilts today and I am feeling so much better. I wanted to get a photo for you with/before the sunset… Anyway, they have very much lifted our spirits – thank you so much again. They have just so much meaning in every stitch and really look amazing in their spots.”
Details:
Pieced and Quilted: by me on my Bernina 440Qe
Size: approximately 30″ x 20″ (from memory!)
Thread: Aurifil threads (2000, 1135, 5005, 5006,1128, 2810 in 50 wt and 2024 in 40 wt)
Fabric: Bella solids (the white is snow) and lots of favourite prints from my stash. If you would like the details of a specific print, please let me know and I’ll try and help you, but I suspect I used around 40 different prints so I’ll skip trying to list them all
Wadding: 100% cotton
South Pacific Dreaming – my entry into the Wall Quilt Category
Thanks for stopping by and I encourage you to participate in the Blogger’s Quilt Festival by either visiting and/or entering the festival. This is my third time entering and it’s a great quilty and bloggy event. Thanks for all your work Amy!
Hello! Welcome to I Quilt, a weekly linky party all about the process of quilting. 23 awesome crafty peeps linked up last week, yay! I’m going to give a shoutout each week to someone from the previous week Lindsey from Inspiring Creations linked up last week and shared her GORGEOUS sunnyside pinwheel quilt. Her first quilt! It’s beautiful, pop by and check it out if you haven’t yet <3 Lindsey made the great point that she considered diagonal lines but really wanted her piecing to shine so stitched in the ditch. As much as I love quilting the heck out of everything in reach, Lindsey is spot on, the piecing is really important in determining the quilting design and ditch stitching is a great way of letting the piecing tell the story I haven’t stitched in the ditch since my first quilt as I find I’m too impatient to be super accurate Well done Lindsey, your quilt is beautiful! Thanks for sharing

Speaking of letting the piecing speak to you this is my current work in progress. I have an idea for quilting but I’m not sure. This was entirely pieced using scraps most of which came from my Primary Plus Quilt but a few from my scrap stash. I’m thinking I might stick with the colours of each area or using a thread which blends in with all the scraps such as Aurifil 2000 (a golden colour). I’m trying to decide between some stark SLQ and really intense FMQ. So rather undecided really

I shared a progress pic of this mini on Instagram and a few friends commented on how tidy the back is. First up I will admit that I am pedantic when it comes to my own work. In all honesty though, I really think that a tidy back helps with quilting. I trim all loose threads, press my seams open (to reduce bulk and improve accuracy) and press the heck out of my top. I’ve never used starch and I’ve heard that spray basting is not great for free motion quilting. Do you have any things that you do to improve your quilting?
Speaking of tips and tricks, I wanted to introduce a theme for the next Thursday I would LOVE it if you could talk about thread issues. It’s very easy in blogland to select which photos you share and hide any little mistakes. This week I’m going to share some photos of my work that you may not have seen before
You may remember the Rainbow I Spy quilt I made a while ago for my eldest son. I really wanted the quilt to be truly double sided so in addition to the top you see above I pieced a rainbow back with scraps and a grey solid (Bella Steel from memory). I then decided to quilt pebbles in white thread in the white sashing and use grey thread in the bobbin. Alarm bells are ringing right about now.

Rainbow I Spy quilt back
For some reason lots (all? most? or maybe just me…) of quilters have issues when using significantly different coloured top and bottom thread. Seriously, the quilting was a right pain. I persisted but I was messing with the tension constantly (I normally rarely have to adjust tension on my Bernina 440). In the end I found some solace by dropping the top tension to zero, using a spool stand and (strangely) missing the last loop when threading my machine (so not running the thread through the little metal loop just above the needle). Pebbles probably made it worse with all of the tight turns as I didn’t have as many issues with the straight line quilting (SLQ) in the borders.

The pebbled area here is about 2″ wide to give you some perspective :)
If you look closely at the above photo you will see the threads popping through. After a wash and some wear the thread issue isn’t an issue. The quilt is loved and NO ONE is ever going to look at it as closely or as critically as I will look at my own quilts (tell me I’m not the only one who does that LOL). I did learn a good lesson from this though, now when I use different coloured threads in the bobbin and spool I make sure they are not as dramatically different as dark grey and stark white. I also quilt more smoothly now than I did at that point which I also think helps reduce thread issues.
When I made my daughter’s Princess Quilt I used a range of different threads colours from white to soft mauve and with each thread change I used a different colour in the bobbin. For example, White on top, soft pink in the bobbin. Soft pink on top, soft mauve in the bobbin. Pink on top, dark pink in the bobbin. Et voila! No thread peaking through, no tension issues, no constant stressing and fiddling. Lesson learnt

I would love to hear if you have any tips on thread. I exclusively use Aurifil thread as I believe it’s the best (and I pay for it out of my own pocket – no sponsorship or paid reviews here). It is super fine so the bobbin goes further (win!), the colours are beautiful (win!) and my machine feels smoother when I FMQ. Win, win and win

Some stash favourites including Aurifil thread and kona solids <3
Do you have a favourite thread? How do you prevent thread issues? I’d love to hear your thoughts and experience, I’ve aired my dirty laundry, maybe you can share yours too There’s no requirement to link up a post on thread issues but if you feel like it, that’s the theme for the next week. I’ll be talking about quilting designs that I find particularly easy and troublesome when it comes to thread showing through.

Blessings Quilt in progress – an all time favourite <3
Please remember to visit at least two other blogs and to please write about your quilting process. As much as we all love finished projects, this linky is about process. Your linked up post will be most helpful to everyone else if you talk about your quilting in some way, even if you’re discussing an old finished project, a current work in progress, quilting sketches, that kind of thing Please feel free to link finished projects, or any type of quilting project, just include some of your process so we can learn I also ask that you add a button to your post or sidebar. You can find the html in my left hand side bar or right down the bottom of the page if you’re on a mobile device.
Now it’s your turn to link up and talk about your quilting process I’ve been having so much fun visiting new blogs, I hope you’re enjoying the quilty party too <3
Yesterday I shared with you my quilting progress on my X quilt. I originally started it as a cushion cover but the quilting kind of took over You can read more about the quilting process (and join my weekly quilting linky party) here.

Today I decided this mini was destined to become a wall quilt et voila!

As much as I love this mini I am giving it to my husband. He is always asking me for quilts to hang on the walls in his office. This week he needs some extra loving so this mini will be heading into the office with him on Monday.

This quilt is only 17″ by 24″ so I just added hanging pockets to the corners and used a piece of dowel to hang it up I love the binding fabric. The teal print and thread are slightly different hues but the dotted print really brings it all together.

As always I used Aurifil threads for super vibrant colours, 1100, 2605 and 2810 in 50 wt. The grey is Kona Steel and the prints are all from my monthly Stash Stack subscription with Pink Castle Fabrics.

I also just wanted to quickly touch on some boring housekeeping. Since moving over to my own domain I’ve had some doubling (or tripling!) up of posts in Facebook and Blog Lovin’. I am struggling to work out why this is happening and fix it. If you’re keen to stick around and keep reading my blog, can you please check that you’re following me using my current url: http://prettybobbins.com rather than the old blogspot one? I’m going to change the settings in bloglovin’ a few hours after this post so if you don’t ever see me again it might be because you were subscribed to my old address. Thank you xx I’m hoping that will fix the problem and this is the last time that there will be doubling up
I’m linking up with TGIFF over at Quokka Quilts this week.

Welcome to my very first linky party! This linky is for you if you like to quilt, if you love to quilt, if you’re just dipping your toe into the (quilting) water, if you have a domestic or long arm machine and if you want to learn and share your quilting journey I want to emphasize that there is no need to share a finished project and please don’t be scared to join in if you’re a total newbie. All I ask is that you talk about your quilting process Grab a button (html is there on the right —>), add it to your post or side bar and visit two (or more) other bloggers to share the quilt love <3

Mini Cross Quilt
My best piece of quilting advice is to not worry about whether your quilting is perfect. Sure, that’s easy to say if you’re already good at it, not so easy if you feel like the machine is running away from you and every stitch is a potential disaster. But honestly, my quilting did not really take off until I stopped trying to produce perfect quilts. Relax, enjoy the process.

mini cross quilt – basting
I started this piece with the idea of turning it into a cushion cover. It is about 18″ x 25″ and when I quilt something this size I tend to use pins rather than curved safety pins as they’re faster to remove. I always point my pins in the same direction and even spaced. This allows me to anticipate them as I’m quilting rather than coming across them in surprise and breaking a needle.

Auditioning thread – I always lay a long piece of thread over the quilt top in natural light when selecting threads.
When I started to gain some confidence and try new quilting designs I was careful to make sure that my thread blended into my quilt, I didn’t want any errors to show through. I learnt the hard way that this also means that you’re beautiful work can’t be seen. Now I enjoy using bold colours and showing off my quilting.

SLQ with free motion foot
I really love the texture that dense straight line quilting (SLQ) gives but I hate the drag you get when going back and forth using your walking foot. I either start and stop, always returning to the same end so I’m quilting in the same direction or I slap on my free motion foot and go with “organic” straight lines. I really like the organic look but you have to be willing to accept that your lines will not be straight
Another reason that I love dense SLQ is that you can make your piecing pop. In the above photo I’m starting to quilt in the middle so I’ve lined my needle up with a seam so that the start point will disappear into the seam. I come back and bury my threads later (you need to leave a decent tail to bury your threads).

Burying threads
In case you have no idea what “burying threads” means (which will auto correct to “burying heads on the ipad), it is when you pull both threads to one side of your quilt, tie a double knot, grab a needle and then bury your threads by inserting the needle into the hole the threads came out of. Make sure you keep the needle in the quilt sandwich for a few inches, pull it out and trim your threads. It is always a good idea to make sure that your threads haven’t traveled through to the other side of the quilt before you trim them. Ask me how I know…

Review your design as you go
I rarely sketch out my quilting design. I usually have an idea and just jump in. For this project I had the idea of the SLQ but nothing else. I am happy to work this way but I regularly step back and look at my quilting.

Too much!!
I really cannot resist colour. That doesn’t mean it always looks good! After stitching the blue and pink paisley designs I really felt this mini was too chaotic.
I added some dense grey quilting to tone down this mini and I think it worked well. The grey fabric is Kona Steel and is quite dark. The thread is Aurifil 2605 in 50wt which is a lighter grey. I really like how it softens the saturated hues.

angled light and photography helps show quilt texture
Actually showing off your quilting is a whole different skill set. Adrianne from The Windy Side gave me the terrific tip to photograph my quilting indoors with natural light coming in on an angle. I’ve taken this a step further and tend to photograph my quilt on a steep angle to really show the texture.

Detail
I tend to quilt the heck out of every quilt I always quilt right up to the edge and go back and fort so that my stitches (and piecing) remain secure as I work and later when I trim it.

quilting the negative space allows the piecing to pop
The above photo demonstrates why I love dense quilting so much. Each of those X’s are 3.5″ finished blocks so you can get the idea of how small some of those paisleys are. I did wander into the piecing once or twice, but I don’t worry about trying to be perfect

I really enjoy the meditative quality of quilting. I don’t mark my fabric so I’m constantly visualizing the space. Filling out the curls above I used the edge of the quilt as a reference point. Sure, my lines aren’t perfectly straight, but they give the affect that I was after
I’m still not sure whether I will turn this mini into a wall hanging or a cushion but I really love it. The quilting took about 3.5 hours (including basting) and was a lot of fun. I used Aurifil 50wt 2605 (grey – my go-to colour for piecing dark prints), 1100 (pink) and 2810 (teal). The grey is kona steel and the prints all come from my Pink Castle Stash Stack subscription. I used some left over wool wadding with more kona steel for the back. The piecing and quilting was all done on my Bernina 440QE, I like to use the BSR foot with the clear plastic sole so that I can see what I’m doing.
Now it’s your turn! You don’t have to write an essay (sorry, I get wordy!), just share some of your process so we can all learn together I will keep the linky open for a few days and it will run weekly. I really hope that you’ll join me <3 Make sure to visit two (or more) other bloggers and add the linky button (html at right –>) to your post or side bar.
Put your hand up if sewing is your therapy This week is selfish sewing week and I totally needed to make myself some pretties to feel better. Yesterday I turned my quilt as you go (QAYG) mini into a cushion. I didn’t quilt it at all as I just wanted the colours to show. Isn’t she pretty?

QAYG selfish cushion
Because it’s selfish sewing week I decided to use one of my favourite prints on the back. I’m worth it dammit.

Because it’s Selfish Sewing Week I used a special print just for me!
As much as my daughter loves this cushion I managed to snaffle it for myself and I love how it looks on my bed.

I used some favourite scraps and LOVE how it turned out!
This morning I really needed some sewing therapy; look good, feel good, right? I pulled out the last of my Nottinghill voile yardage and grabbed a dress that I love but is a little too small. I managed to kind of figure out the measurements and set about making myself a dress.

Nottinghill voile halterneck dress
Big love to the folk on IG who gave me some honest feedback that the boobs were baggy so I spent a good hour adding darts and trimming. In hindsight I think the issue is probably that I joined the skirt to the bodice too low. I think the dress would have a better shape if the elastic casing was just below the bust rather than at waist height. Anyway, I got on with it, hemmed her (I love a good blind hem!), added a contrasting sash and decided that if it feels good it looks good

You will notice there is one spot and one spot only in my yard suitable for photos LOL
I’m not generally one for a halterneck and I actually prefer this dress with the straps hanging long rather than tied in a bow. It will be nice and cool on our hot summer days anyway

Summer here I come!
And the all important details I use Aurifil 50wt for dressmaking, in fact I use it for everything! I do need to start growing my Aurifil stash again, at the moment I’m getting by with about 20 spools. The cushion is 20″ square with wool wadding, has a concealed zipper closure in the bottom seam and is backed with an old Alexander Henry print, African Butterflies. I bought the Nottinghill voile at Pink Chalk fabrics and 3 yards got me both a Washi dress and this halterneck dress (I’m stingy LOL).

I’m linking up to TGIFF over at Cherry Valley Designs for my cushion (it’s a mini quilt!) and Selfish Sewing Week because this week it’s all about me!

If you’ve read this far you probably already know, but don’t forget that I’m starting my quilty linky party here at Pretty Bobbins from next Thursday. You can read more about it here.
***August is a month of celebrations for Pretty Bobbins. It is my two year blogiversary and two of my children have birthdays this month. There will be a giveaway for each of these events, you will find the first giveaway at the bottom of this post.***
Back in April I was Queen Bee for Wombat Stew, a paper piecing bee. I struggled with a theme from the beginning, I really wasn’t sure that ‘celebrate’ would work. I put together an inspiration board and by the time my month rolled around I hadn’t thought of anything better so I decided to go for it. I asked the girls to make blocks of any size to fit the theme ‘celebrate’. I planned to make a wall quilt to hang every time we have a family celebration. I also like the challenge of making a quilt from different sized blocks. I asked the girls to stick to fun, bright and relatively gender neutral colours (so pink is OK but not all pink). You can see some progress shots here. Today it’s all about the big reveal! (And if you really like the patterns you should keep reading right to the end *HINT HINT*)

Celebrate – a paper pieced quilt
I LOVE this quilt! My kids love this quilt and August is a month of celebrations so as soon as I buy some dowel it is going on the wall I quilted the heck out of the quilt and had soooo much fun doing so! You can see the quilting better on the back. It measures 37″ x 37″ and was put together and quilted with Aurifil threads by me on my Bernina 440. Full credit to each of the bee members below <3

Celebrate – quilting details on back
I had my own little party quilting with a rainbow of Aurifil 50 wt threads (really, what’s a party without Aurifil? Alex seems to be everywhere if you follow him on Facebook LOL). I used 2000 on the cream/off white areas and I love how they sparkle. Can you see the word PARTY popping out in Kristy’s party hat blocks (Kristy of Quiet Play designed most of these blocks, isn’t she AMAZING???)?

Party hats by Kristy
Marieka baked me a delicious cake. I was really unsure of how to quilt this block but really happy with how it turned out. My icing is never that neat LOL There is enough cake here for everyone, LOVE!

Tiered cake by Marieka
I had a lot of fun playing with Alyce’s pom poms (and I’m sorry, I had to make that joke LOL). She very cleverly used a flying geese pattern, you can see her tutorial here. I’m still considering adding a few beads to the pom poms but for now I’m sticking to the star in the middle (and yes, more micro-stippling there). Aren’t they fun?!

Pom Poms by Alyce
Jane’s block is immediately apparent to Australian’s but some of my readers may be wondering what it is. This is an absolute classic and staple of children’s birthday parties. Known as “fairy bread” it is sliced white bread, spread with butter and then covered in sprinkles. Jane obviously took a bite out whilst piecing and left her party blower behind as evidence

Fairybread by Jane
Fiona’s cups (pattern by Ayumi of Pink Penguin fame) had a real retro feel so I quilted the wall paper to enhance this vibe. Possibly better seen from the back, but aren’t they the cutest drinks ever? (There is a fourth block, you can see it in the larger photos)

Paper Pieced cups by Fiona (pattern by Ayumi Mills)

What party would be complete without bunting? The adorable Lara (she is completely adorable, you should check out her instagram – luellabella) made me rainbow bunting. LOVE! I went a little nuts and quilted pebbles with each dot being inside a pebble.

Rainbow bunting by Lara
Whilst the wonderful Ms Midge wasn’t in round one of Wombat Stew she decided to join the party early and brought the candles. Can you believe she tried to tell us she was a novice paper piece-er when we asked her to join us????

Candles by Ms Midge
And whilst we’re on the topic of Ms Midge, she sent me the cutest scrap EVER! I LOVE this fairy and I quilted her in a micro version of the the FMQ design that I used on my daughter’s quilt. I’ve saved the last skerrik of this scrap and plan to make my daughter a cushion with it. Thank you Midge xx

Cutest fairy scrap EVER complete with micro quilting
I totally got my FMQ on and micro-stippled this fantastic cupcake print (did I mention the girls sent the most amazing scraps with their blocks?!).

scrap love from the Wombats
I think every block/print features a different FMQ design. I must admit I went a little crazy quilting around each candle (print in the bottom right of the above photo) this scrap is only 1.5″ x 4.25″. I was so impressed with the affect that I then quilted around the jellybeans and balloons too LOL

Celebrate paper pieced quilt
I added in some three dimensional bunting down the side (left over from another project) and at the suggestion from a friend quilted words underneath (sing, dance, encore, cake, secret, surprise, kiss). The idea being that the birthday person must choose an activity to complete

You gotta dance! (then shout hooray)
Well done if you’ve read this far! Possibly my favourite part of quilting this beast is the words in the border. I used 12wt Aurifil (2250) for top thread and the same colour in 50wt on my bobbin. The stitches are perfect (I suggest going slow and smoothly and dropping your top tension a few notches). Can you believe that I didn’t mark the words first? It was all done free hand and I’m so pleased that it filled the borders perfectly and looks rather neat YAY for machine quilting with Aurifil 12wt. I will be doing this again and again and again <3
FMQ writing in 12wt Aurifil in the border, woohoo!
Did I mention that it was worth reading to the end? Well, the fabulous Kristy of Quiet Play who designed most of these patterns has come to the party with a giveaway of most of the patterns seen in this quilt! Thank you Kristy xx I highly recommend that you give her patterns a go if you’re thinking of trying out paper piecing. I’ve made quite a few of them and they’re always easy to follow and very well designed. You can find her shop here on Craftsy.

Pattern giveaway thanks to Quiet Play
All you have to do to enter is leave me a comment letting me know that you follow both Pretty Bobbins and Quiet Play blogs. (Head over to Quiet Play and follow Kristy here.) You can have an additional entry if you follow me on Instagram, Facebook or Flickr, just leave me a comment letting me know You have a chance to win a bundle of paper pieced patterns by Kristy of Quiet Play as seen in the collage above (bunting, candles, hat and cupcake). The giveaway will close at midnight 18th August Australian Eastern Standard time (google Sydney time).
***This giveaway is closed***
Bravo if you made it to the end. What a mammoth post! I’m taking my celebration to the Paper Piecing Party at Quiet Play and TGIFF at Bedtime Quilting.