Archive of ‘Pattern Design’ category
Put your hand up if sewing is your therapy  This week is selfish sewing week and I totally needed to make myself some pretties to feel better. Yesterday I turned my quilt as you go (QAYG) mini into a cushion. I didn’t quilt it at all as I just wanted the colours to show. Isn’t she pretty?

QAYG selfish cushion
Because it’s selfish sewing week I decided to use one of my favourite prints on the back. I’m worth it dammit.

Because it’s Selfish Sewing Week I used a special print just for me!
As much as my daughter loves this cushion I managed to snaffle it for myself and I love how it looks on my bed.

I used some favourite scraps and LOVE how it turned out!
This morning I really needed some sewing therapy; look good, feel good, right? I pulled out the last of my Nottinghill voile yardage and grabbed a dress that I love but is a little too small. I managed to kind of figure out the measurements and set about making myself a dress.

Nottinghill voile halterneck dress
Big love to the folk on IG who gave me some honest feedback that the boobs were baggy so I spent a good hour adding darts and trimming. In hindsight I think the issue is probably that I joined the skirt to the bodice too low. I think the dress would have a better shape if the elastic casing was just below the bust rather than at waist height. Anyway, I got on with it, hemmed her (I love a good blind hem!), added a contrasting sash and decided that if it feels good it looks good

You will notice there is one spot and one spot only in my yard suitable for photos LOL
I’m not generally one for a halterneck and I actually prefer this dress with the straps hanging long rather than tied in a bow. It will be nice and cool on our hot summer days anyway 

Summer here I come!
And the all important details I use Aurifil 50wt for dressmaking, in fact I use it for everything! I do need to start growing my Aurifil stash again, at the moment I’m getting by with about 20 spools. The cushion is 20″ square with wool wadding, has a concealed zipper closure in the bottom seam and is backed with an old Alexander Henry print, African Butterflies. I bought the Nottinghill voile at Pink Chalk fabrics and 3 yards got me both a Washi dress and this halterneck dress (I’m stingy LOL).

I’m linking up to TGIFF over at Cherry Valley Designs for my cushion (it’s a mini quilt!) and Selfish Sewing Week because this week it’s all about me!

If you’ve read this far you probably already know, but don’t forget that I’m starting my quilty linky party here at Pretty Bobbins from next Thursday. You can read more about it here.

I have a little Miss who turned three on the weekend and is obsessed with Princesses. We have been trying to decide on a name for her dolly and she is adamant that dolly should be called “Princess”. Anyway, with a third birthday looming we decided it was time for Missy to move into a big girl bed and a quilt was therefore needed.

Princess Quilt in direct sunlight
As I mentioned previously, this quilt is sooooo hard to photograph. The colours come across as washed out. Trust me, this one is a stunner. I love absolutely everything about it and it is not at all washed out in real life

This shot captures the true colours of the Princess Quilt well
I started out with some Alexandra Henry “Princess Kingdom” prints from Hawthorne Threads and then pulled themed prints from my stash (I was quite shocked when I discovered three magic toadstool prints, there’s a possibility that I’ve become a hoarder!). I then selected high value/high volume/saturated prints from my stash, many of these have come from my stash subscription with Pink Castle Threads. I actually meant to use a darker background as Missy is known for staining quilts with textas but I ended up using some Bella Bleached White from the Fat Quarter Shop (I use both Kona and Bella solids but have a slight preference for Bella). (And this post isn’t sponsored, just letting you know where to source these goodies.)

Lovely Princess prints by Alexander Henry
I framed each of the feature prints in the high value prints and then added white sashing. I love improv piecing and I’ve found that it pays to layout your pieces on the design wall, break them up into sections and then try and get these sections to either the same width or length. To do this I generally cut sashing at two widths, a wide sashing of around 3.5″ and a narrower sashing of around 2″. These can then be trimmed back or added to.

In this progress shot you can better see how different sized blocks were pieced together using a wide and a narrow sashing
I added some floating blocks to the top and the bottom using some super special Liberty of London scraps, some voile and some favourite quilting cottons.

The top and bottom feature floating squares of some favourite prints, Liberty scraps and voiles.
I like big quilts. I like a quilt that covers the pillows and hangs nicely over the end as well as both sides. This quilt ended up at 87″ x 62″ (I lost a fair amount in both trimming and washing) and I love the size.

L-R: Rainbow I Spy Quilt, Princess Quilt, Kitchen Windows Quilt
I actually didn’t realise that I had unintentionally made quite similar quilts for my children until I lay down and admired them. How cool is this view? If only I could snuggle here all day!

I love that they match without being too matchy-matchy
I used a super soft and snuggly Anna Maria Horner flannel (again from Hawthorne Threads) for the back. I love how the quilting looks on the back

AMH flannel paired with 100% wool batting makes for a super snugly quilt!
Free motion quilting is my passion. If I could quilt every day of my life I would be a happy woman indeed. A little while ago I read a quote that was something like, “be so awesome that they can’t ignore you” and it has rung in my ears ever since. I put that philosophy 100% into my quilting. I want to be a famous quilter, not for the money or the fame (like there’s any of that in handmade LOL) but because I want enough people to want me to quilt for them and actually get paid so I can make this my job. That’s the dream, but the reality is that I love to quilt and that I spend a lot of time coming up with designs, practicing them and making myself the best quilter I can be. And I enjoy it!

Here you see a mix of feathers, dense lines and large pebbles. The quilting was designed to enhance and compliment, but not overshadow the quilt.
I quilted feathers in the negative space around the floating blocks in a soft pink (if you’re looking for a soft pink thread, try this one!) Aurifil 2410 in 50wt. I would have used it for the whole quilt except the spool was low, so I outlined the feathers in white (Aurifil 2024 in 50wt) and then densely FMQed the blank areas.

I quilted around the designs in some of the larger prints.
I quilted large pebbles between the feature blocks. I didn’t want the quilting to distract from the prints and I think I achieved this well.

Each section of the quilt is quilted differently but all with a princess in mind. I see vines covering a tower, flowers to be used for a crown and true love aplenty :)
I saw the negative space between the curved borders on the side and the pieced center as an opportunity to have fun. Again using the soft pink (Aurifil 2410) I did a kind of curvy pattern inspired by Angela Walters quilting of Tula Pink’s Anchor Quilt. I would have liked to have had three of these on both sides, but I didn’t have space to do a third nicely so instead I densely FMQed swirls, butterflies, paisleys, hearts, flowers and a few words in white (Aurifil 2024 in 50wt).

The curvy lines on the left were inspired by the quilting of Angela Walters on Tula Pink’s Anchor Quilt.
The curved pieced border was a lot of fun and a key feature of this quilt. I selected matching low value prints from my stash cut them at 7″ x 5″ and then did an improv curved piecing technique to join them to the bella bleached white. I realised afterwards that I should have done this part slightly differently to get perfect corners but am happy with how it turned out.

The pink quilting in the pieced border was inspired by a ribbon I bought years ago.
Coming up with a quilting design for the pieced border was difficult. I worked hard to make sure that the borders were directional when the quilt is hanging on a bed. I wanted to incorporate love-hearts into the design but it was difficult to come up with a repetitive, princess type design that was directional and did not overpower the prints. Yes, I think a LOT about every aspect of the quilt LOL I’m super pleased with the design I came up with in the end and Aurifil 2452 in 50wt was a perfect fit!
I have not always had great results using different top and bottom thread when quilting but I didn’t want to use super light threads on the back. I paired Aurifil 2510 (a light lavender) with white and used a lot of the dusty pink (Aurifil 2452) in the bobbin. This worked well because the colours were similar enough not to cause any tension issues and I got the look I wanted on both the front and back.

Quilting detail on back
I know I’ve already said it, but I LOVE this quilt. It even fits on my bed, but seeing as I quilted my daughter’s name onto it I figure she should keep it

Princess Quilt (very large and very hard to photograph well!)
This quilt was designed, pieced and quilted by me on my Bernina 440QE using Aurifil threads. I used 100% wool batting, flannel back and an array of quilting cottons (including bella solids) for the top. It measures 87″ by 62″ and was deemed fit by my little princess We’re hoping to find a pea under her mattress which we can then remove to solve all of our sleep problems
Whilst I love, love, loved making this quilt (which I think took about two weeks, funny how speedy I can be with a deadline!) I am happy to be back to more saturated projects Next up is a mini for Mr Husband for father’s day <3 Do you tend to work with the same palette over and over or do you mix it up? Do you feel a bit funny when working with a palette outside of your comfort zone? What do you do to make it work or check that you’re on the right track? I’d love to hear about your process
I’m linking up to Sew Cute Tuesday at Better Off Thread and Anything Goes Mondays at Stitch by Stitch


I asked a friend recently how her blog was going and she replied that she was too busy ‘doing’ to be blogging. The recent silence around these parts is due to the same reason! My little girl turns three later this month and I have a princess quilt to make! Way back in the first week of July I pulled a heap of prints to go with some Princess prints from Hawthorne Threads. I have been pondering the design ever since…

Whilst I have been beavering away on other projects my mind has been contemplating a design for the Princess Quilt. I can’t tell you how many times I have looked through my favourites on Flickr. I really had a mental blank and even asked the lovely peeps on Instagram what I should do. As Alyce pointed out, I couldn’t just do a classic square in square LOL My problem was that I wanted to feature the princess prints, I wanted a scrappy style quilt but I didn’t want chaos and I also wanted to challenge myself in design and technique. Finally it all came together and I *think* I have a winner I have a beginning at least!

My idea is to frame a number of princess themed prints in saturated prints. I want the frames to be narrow, to compliment the feature prints and to highlight them rather than over power them. I plan to then add a fat border in a complimentary low value print. I’m thinking that I will quilt the low value prints in a soft pink, bringing them all together and not making them look like princess vomit. I hope!

I have selected a range of themed prints that I will fussy cut fat squares out of and add in at some point. I really want the framed prints to float on a sea of three year old fun.

I’ve found so many themed prints in my stash that I’m thinking of adding some big borders and just having the framed prints right in the center of the quilt. I’m thinking a lot about the design LOL I’m excited about this quilt but I also have a deadline looming. Miss soon-to-be Three knows that a Princess Quilt is coming and she hasn’t yet mastered the art of compromise…

I went looking for magic toadstools in my stash and found three!
I’m linking up to Work In Progress Wednesday over at Freshly Pieced.

The last week has been a bit all over the place. I’ll save you the details, but on top of the usual craziness, we had general strikes last week, public holidays, half day at school and then got some incredibly frustrating and disappointing news yesterday. I’m trying to take it in my stride, but it’s certainly not smooth sailing here at the moment. In addition to the recent ups and downs I am very much in the early stages of preparing for an international move next February.
Twice this week I’ve had photos ready to go and been planning to blog when admin issues have gotten in the way. Unfortunately I think this will continue and possibly increase as our move gets closer. This will be our fourth international move and whilst we are certainly getting better at it, it is still a huge undertaking. Quilting and blogging is my happy place, and I’m dedicated to it, the frequency may just drop a little. I’ve totally got my head in the sand about the prospect of packing up my machines for two months when we move. *Lalalalala hands over ears*
That’s a very long winded way of explaining why I am doing my work in progress Wednesday post on a Thursday
So, enough of the chatter, what am I working on…
My gorgeous helper and I have been working on a layout.
I’ve wanted to try wonky stars for awhile and I started this project as a cushion cover with all of the stars close together. Then I pulled some additional prints and decided a quilt was in order.
 |
| I’m always amazed at how much a quilt shrinks as it’s sewn together! |
I’m actually thinking of putting a pattern together for this top. I’m planning a lot of negative space and possibly a border or two (run with me here). But I basically have had to shelve it for now as I ran out of Kona Steel!!!


I have ordered some more and am crossing my fingers that it’s a perfect match. When I realised that I didn’t have enough grey to finish this top I sat down with some graph paper and worked out the most efficient way of piecing the stars together. This quilt top is about as structured as I get but it still has that delightful look of improv. I have all the cutting instructions written down and I thought this might be a fun project for those who like the look of improv but find it hard to achieve. What do you think? Would this appeal to you?
I’m really looking forward to seeing this baby finished, lots of possibilities for FMQ fun
I would be linking up late with Work In Progress Wednesday at Freshly Pieced except she isn’t having the linky this week and it’s Thursday LOL.
Are you struggling to keep up this week or ploughing ahead in leaps and bounds?
I seem to be making more minis and fewer large quilts recently, but they’re all fun, so on with the show and tell
Earlier in the week I finished a fun retro TV cushion for the boys. I used my own pattern for the centre block and it is now available to purchase on craftsy. I had previously made a 10″ version of this block but I wanted to have fun fussy cutting a print for the TV screen so I went with a 15″ block this time. The cushion requires a 26″ insert but our cushion are rather deflated from pillow fights, but you get the idea I plan to make a few more large cushion covers for the children to play pillow fights with have in their playroom.
It’s a week of birthday celebrations for us, I turn 35 tomorrow (keep an eye out for a celebratory giveaway over the next few days.) and Mr Husband had a birthday earlier in the week. We have a few bought presents coming but I made this mini for Mr Husband.
In my mind my FMQ writing was much neater *sigh* but this probably accurately reflects my messy scribble The words reflect significant points in our life together (my first memory is of him holding the bus door open, I thought he was such a gentleman! I was obviously easily impressed as a 21 year old LOL.)
I selected a red thread (Aurifil 50wt 2250) for the writing to jump out and a pale cream (Aurifil 50 wt 2000) for the rest of the FMQ to blend in. Usually when quilting I have a plan. Before I jump in I generally sketch out my design or run my finger over the fabric to work out the size and shape or any obstacles I might encounter. This time it was made up as I went. I threw a couple of feathers in because Angela Walters says they’re her favourite and she will always fall back on them.
I love harsh geometric shapes and I played off the sharp edges of the numbers and symbols balanced with lots of swirls and organic shapes for interest. At one point I stitched a leaf and decided it was perfect for an apple. We fell in love in a village that grew apples so there you go, there’s an apple
 |
The apple looks a little strange as I wrote the name of the village.
But hey, the recipient gets it
|
We lived in Beijing for awhile so I stitched out The Great Wall and then underlined it with the highrise skyline of Beijing.
 |
| The Ls got chopped off when I trimmed the mini. This is where planning would have been helpful! |
I decided this location theme was fun and added in some bicycles. We used to go on lots of family bike rides in Australia. Generally with kids on the back of the bikes but I thought I would end up with a mess if I started to draw a kid’s seat attachment LOL
As you may know, we currently live in the South Pacific so I added in a little scene of the Pacific, some waves, a traditional hut, a coconut palm and the brilliant sun.
There are lots of love hearts hidden in the FMQ and the whole thing is a bit of whimsy, possibly over the top, but Mr Husband is very supportive so I’m sure that he’ll love it when I give it to him tonight
The mini measure up at 13″ x 15″ and I used some scrap cotton wadding. I used a fun orange print (Soul Garden) for the binding and some favourite prints for the paper pieced equation. I’m hoping the equation makes sense, but it’s meant to represent that 1 (him) plus 1 (me) became 5 when we had our three wonderful children. (Well, mostly wonderful, Miss 2 has spent the last hour refusing to put on leggings and is wearing a dress I made her a year ago which barely covers her bum. Keeping it real, people, keeping it real. LOL)
Once I’ve finished wrestling with the software I will offer the 1 + 1 = 5 pattern for free on both Craftsy and within my Paper Piecing Tutorial.
I’m linking up with TGIFF over at What a Hoot and once I’ve managed to get these pattern pieces into a PDF I will be celebrating TGIFF!!! In the meantime I’ll check out the other linkys and enjoy the quilt candy

More Paper Piecing? Really? Yes, really (Although if you follow me on Instagram – I’m PrettyBobbins – you’ll be sick of this project LOL)
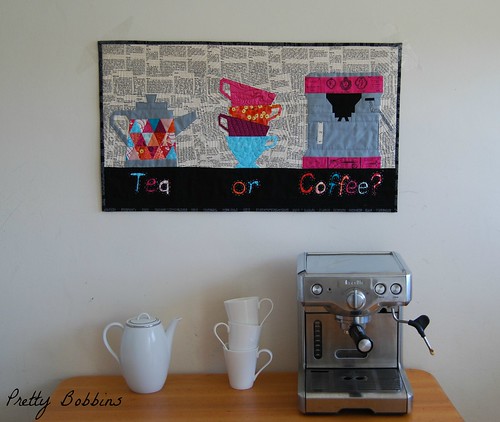
Last week I was super excited to share my Tea or Coffee mini and announce the release of my very first patterns
This week I’m working on my next pattern for release and because I just can’t do things by halves I had to turn the block into something pretty
I first designed the block for Fiona as part of our Paper Piecing Bee, she selected a “mid century modern furniture” theme.
 |
| Paper Pieced retro TV block 10″ for Fiona. |
I’ve keep the design the same, just tweaking it a little (mostly making it more user friendly). For the cushion cover I actually scaled it up to 15″ square and I had so much fun with it that I’m thinking I might include pattern pieces for both a 10″ and 15″ block. The 15″ block just gives you a little more versatility for the TV screen I chose dueling Pirates as my monkeys boys often break into a wrestling match whilst watching TV.
When I originally made this block I left the vase empty with the thought that Fiona could chose to embroider her own flowers or not. This time I went a little nuts. I’ve never tried thread painting before and to be honest I’ve been dreaming of making an art quilt so I got out my BSR foot and and had some fun. I’m thinking of putting a tutorial together showing how I did these flowers. Would anyone be interested in that?
I think my favourite part of the entire cushion cover is that droopy flower and the fallen petal LOL
We will move into our new house early next year, we will have lots more space (yay!) including a rumpus room The bedrooms are quite a modest size so the rumpus room will be a big playroom with either an old bed set up as a day bed or an old sofa (because I’m dreaming of replacing ours). With that in mind I went for bright, kid-friendly colours and plan to make a few more cushion covers and decorations with a rainbow theme. You might want to squint, that back is insanely bright LOL
 |
My children are bilingual Francophone/Anglophones so I just couldn’t resist the number
print as Mr 6 is learning to read. |
I added log cabin style borders and had a whole lot of fun with quilt as you go. To be honest, it probably made the whole process a lot longer, but it did mean that I could secure my ends by going back and forth rather than burying all those threads. It’s hard to see but I quilted each section differently, mostly FMQ but a little SLQ thrown in. Of course I used my favourite thread, Aurifil, in 50wt (colours 2000, 1128, 2605, 2250, 2235, 1100, 5006, 2884 and possibly my favourite 2810, a brilliant, glowing aqua).
 |
| I trimmed the cushion cover front down to 25″ x 25″ and actually considered turning it into a mini at this stage. |
The back of the cushion front actually shows the quilting better (and you know that I can’t resist a good back!).
Whilst this cushion insert definitely needs replacing (I figured out it is 6 years old and it has seen A LOT of pillow fights!) I like the look of the binding and it will be a lot plumper once I replace it with an actual 26″ insert and not a terribly deflated one.
For the first time I’m linking up with Sew Cute Tuesday over at Better Off Thread. If you haven’t checked it out, you should. Janice is one of my favourite bloggers
Have you fit any sewing in yet this week?
You may have noticed that I have a thing for Paper Piecing Yesterday was a big day for me, I launched my first Paper Pieced Patterns, exciting!
Today I’m sharing a tutorial (and free pattern for the teapot block – you can download it from the second last page of the tutorial) for anyone new to this technique. I hope that you find this tutorial useful and that you enjoy the new format that I am using for my tutorials.
simplebooklet.com
I would be absolutely delight to hear from you if you do make something with one of my patterns. Please feel free to add images of your creations using my patterns to my Flickr group
Do you have a favourite piecing or quilting technique?
It’s awhile since I’ve linked up with TGIFF but I definitely have that TGIFF feeling today! I’m also linking up with Finish It Up Friday over at Crazy Mom Quilts.
Recently I’ve been working hard to produce a number of paper pieced patterns. It’s fun and creative but there is also a lot of tedious computer work involved in creating a simple downloadable pattern to share on Craftsy. Today I’ve finally achieved that and I’m super happy! You can find my very first pattern here.
I originally designed this pattern for Lara as part of our paper piecing bee, Wombat Stew, so I’ve made this block twice now The second time around I decided to design two more blocks and turn them all into a mini.
Never one to be overly ambitious I also decided I needed a tutorial to refer back to. So I put together a Paper Piecing tutorial for beginners (I’ll share it here tomorrow) using the teapot block. And because I’d been talking about this block for so long I decided to make it available for free on craftsy
But I’ve also been talking about opening an etsy shop for like, FOREVER! So I’ve listed it over there too. I’ve almost finished the teacup and coffee machine patterns and they’ll be there soon too *Phew* What a day!! Definitely got that TGIFF feeling!!
 |
| Coffee machine pattern is now available here. |
 |
| Teacup Pattern is now available here. |
But back to the actual quilt LOL
This mini measure up at 30″ x 17″ and was machine quilted by me using Aurifil 2000, 2065, 2692, 2245, 5006 and 1100 in 50wt. I also had some fun hand quilting around the reverse applique in a lovely verigated pink (4660) 12wt Aurifil thread.
It feels like forever since I got my quilt on and I think my soul was crying out for some quilt time so I densely echoed the teapot, cups and coffee machine.
I don’t think I can produce a quilt without getting my FMQ on so I played around with the teacups and the teapot. I didn’t want to overdo it and tried to work with the various prints.
The teacup block is really easy and I have to thank Kristy for coaching me through the process. Her patterns are fantastic and I was trying to channel my inner Kristy while designing this one The coffee machine is actually my coffee machine LOL
I even tried tried to get all trendy and do some styling
I added hanging corners to all four corners as I think a piece of dowel running along the bottom will help this mini hang flat.
I’m super happy with this mini but I don’t know if I’ll keep it or sell it. I’m not really one to decorate in the kitchen (you should see my old French kitchen – paint peeling off the walls, not old rustic – it does not inspire spending time in it other than to cook) but I have used some favourite prints here. Plus now I’ve finally got that etsy shop with one listing I should add a few more items LOL
I’m linking up with TGIFF over at Sew at Home Mummy for the first time in awhile and holy moly, I am happy it is Friday and that my patterns are published and my quilt is done!
Have you had a big crafty week? Do you set yourself deadlines? I’d love to hear if you make any of these patterns
The last week or two I have been spending more time on the computer and less sewing. But it’s all for a good reason Yesterday I shared my tutorial for replacing a patch or block and I’ve been drawing up lots of patterns with EQ7. I’m hoping to have three patterns ready to download this Friday along with a Paper Piecing tutorial for beginners and a mini. Ambitious?
I’ve finished my teapot and coffee machine blocks and just need to turn them into something:
Today I am working on a stack of teacups and hopefully by Friday I will have turned all three blocks into a mini
***Update: You can now find all three patterns available here and a paper piecing tutorial here.***
I am still very slowly working on Mr 6′s Rainbow I Spy quilt. Next time I will FMQ the writing
I just ordered a heap of Aurifil from Quilt Jane in preparation for three upcoming quilts. (Again, ambitious?) So far I only have pretty stacks of fabric but after all this computer work I am busting to roll around in piece some pretty fabric.
I still need to get onto my BOM and Bee blocks for this month (I’m queen bee for Wombat Stew and the girls are producing some amazing blocks! Party/celebrate is my theme and you can see my inspiration board here.). I’m really loving the Lucky Stars BOM and have ordered some more of the architexures print that I have been using for these blocks as I have decided to turn them all into a quilt Here are my blocks so far:
For April I’m thinking of one of these two bundles.
I’m trying to stick with my original pinks, oranges and teal but last month I brought in some purple. Either way, I hope to work on this block before the end of the week.
I’m linking up with Work In Progress Wednesday over at Freshly Pieced. Have you been getting stitchy this week?
After a big week this week is much calmer. I’m happy to report that the stress I referred to last week is in the past Yay! So this week I’m catching up on things that got set aside.
Yesterday I designed two new Paper Pieced patterns for Fiona‘s theme of Mid Century Modern for our paper pieced bee, Wombat Stew. Originally we had agreed that I would make a star burst clock (my Poppy had one and I’m a bit nostalgic) so I came up with the pattern from hell LOL
 |
| Sunburst Clock paper pieced pattern |
I’m going to try it out when I have time but there are a lot of Y seams in this baby LOL
In addition to the clock pattern I drew up this television (it’s meant to be a vase on top if you’re wondering LOL) and when I put the two patterns to Fiona she preferred the television.
 |
| Mid century modern television paper pieced pattern |
So today I have been working on putting together this block. I had a lot of fun searching through my stash for appropriate prints and had a few options, I hope Fiona likes what I selected!
 |
| pattern testing in progress |
It didn’t take too long to come together and you could make it a lot easier by using a dot print for the TV knobs.
|
| Can you guess what TV show this is meant to be? I used to watch it with my Grandpa
|
I spent yesterday working on a tutorial in a new format (think slider) using some new software, Simple Booklet. Hopefully it will be ready to share in the next few days. It was superfast being able to edit my photos and add text all within Simple Booklet and I think it will make my tutorials page much tidier and easier to manage having all the tutorials in one place rather than having to click through to a post and scroll down to see a million photos. This was a trial run as I’m hoping to use it to share some paper pieced patterns I’ve been working on using the same software, I should be able to include a downloadable PDF within the booklet. It’s my current WiP, so watch this space
Speaking of patterns, I now have a few patterns that I’d like to share but only I have made them.
 |
| Vintage Kitchen Scales Pattern |
If anyone is interested in helping me test patterns, please let me know At this stage I’m planning to offer a couple of free patterns but of course it is much better if they have been tested by a couple of people
 |
| Triangle Teapot Pattern |
So the rest of the week will include slowly handstitching words on Mr 6′s quilt (yes, it is STILL a WiP!), working on these patterns and new software and hopefully basting and quilting my create quilt. I think I may be being a little over ambitious there LOL Do you set yourself ambitious or realistic sewing goals?
 |
|
Create quilt top
|
I’m linking up with Work In Progress Wednesday.