April 2012 archive
I’m so excited! Guess what I’m doing this afternoon?
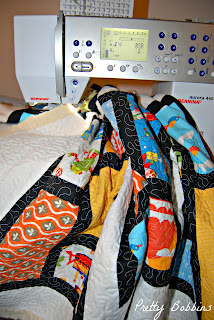
We have visitors arriving tomorrow night so chances are I won’t have this quilt finished for another week or so, but it’s getting close 
I’m trying to really stick to the proper definition of stippling; meandering stitches, no sharp curves and no more than 1/2″ apart. It’s not perfect, but I’m loving it!
You can read more about my progress on Mr 3.5′s quilt here, here, here, and here :) You can view the completed quilt top and back in the last link
The black borders have lost some of their punch as I’m using a white thread, but a decision had to be made and I’m happy with it so far I’d love to hear how you choose which colour thread to use when quilting. It was a tough decision as I knew that the quilt would start to look very different after a few hours work free-motion quilting. The back is coming along beautifully too! In fact, I’m going back to it right now
I’m just sharing a guest post that I wrote a few weeks ago for The Oz Material Girl’s blog. I hope that you find it useful I must admit straight up that I’m no expert when it comes to softies, but I do love them and have made a few. In fact I recently pulled a late nighter making 34 soft bunnies and eggs, you can read about my midnight madness here. Or you can read my more sane post with links to some great Easter softies here
If you’ve been getting crafty for Easter you’ve probably seen the Twig and Thistle Bunny. I love it! I have made, oh, about 6 million as gifts for friends but I need to make two more (please note the terms and conditions on the Twig and Thistle site, it is for personal use only). It is a super easy softie and a great one for beginners, so today I’m going to share some tips that will help you make great shaped softies. Of course you can apply these to any softies and there are loads of gorgeous softie patterns over at Patterns Only.
So, let’s get started.
First of all you need your pattern piece. If you are going to make your softie a few times I highly recommend making a template rather than using your printed pattern piece. A template will give you a more consistent shape and is more durable. Today I am using some clear template plastic, but cereal boxes also work well.
Trace your pattern shape onto your template material.
Cut out your template.
PLEASE don’t use your fabric scissors! Save them for your pretty fabrics, you should love and cherish your fabric scissors Don’t put them near paper, glue, carboard, plastic, anything that’s not fabric or thread really. It is handy to have a few pairs. I keep my scissors together in an airtight box (remember I live in the tropics and near a salty lagoon) and have a number of pairs.
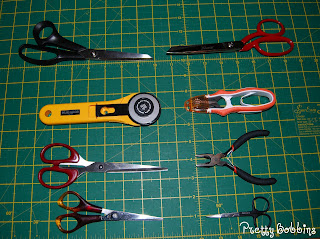 |
Clockwise from top Right: old fabric scissors, thread snipers,
pliers, curved nail scissors, craft scissors, paper scissors, rotary cutter, good fabric scissors. |
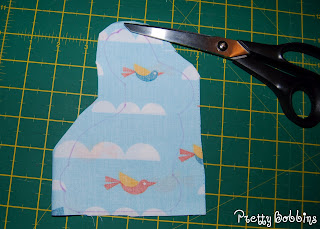
Now that you have a nice template to work with select and iron your fabric. Lay your fabric right sides together and place your template on top. Using a fabric pen trace around your template.
If you’re a beginner it is going to help you to use some pins. I may have mentioned before that I don’t really like pins…
It will make life easier if you’re not working with a big piece of fabric, so at this point I tend to roughly trim around my shape making sure that I cut no closer than 1/2″ to my softie outline.
Before you take your fabric over to your sewing machine. You need to consider a few things first:
- Where are you going to start sewing?
- Are there any tricky shapes that you might find easier to approach from the left instead or the right, or vise versa?
- What colour thread and fabric are you using?
- What stitch length have you set your machine to?
I find that:
- It is always easiest to start and finish on a straight section, in this case his bottom.
- Curves can be tricky when you’re starting out. You need to lift your foot or pull your fabric to make it turn with your feed dogs. Maybe you find an inverse curve easier to manage than a converse curve. I find this something I need to consider more on an overlocker, but it is still worth considering when using your sewing machine.
- I know that it can be tempting to just use whatever thread you have in your machine or to only change your top thread and leave your bobbin alone. But trust me, your softie is going to look so much nicer if the thread is invisible. Select a colour that blends into your fabric as much as possible.
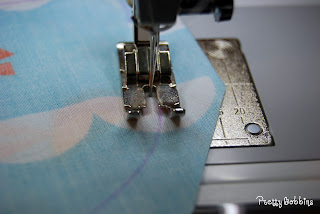
- When making softies you want to reduce your stitch length down to 1.4 or 1.6 This is really important when you come to triming your seams a little later.

Sew a couple of stitches back and forth to secure your ends. You might want to reduce the speed on your machine to help you with those tricky corners.
Don’t forget to leave a gap so that you can stuff your softie! I leave about a 1″ gap but you might find 1.5-2″ easier for your first few goes.
Now we want to trim our seams to 1/4″.
Clip any corners and cut little Vs on your curves cutting very close but not too close to your stitches.
Snip right up to your corners including the divide in your Bunny’s ears.
You’ve probably got a sore hand from the scissors, but it’s worth it! You will get nice smooth curves from all those little snips you’ve made
Now you want to turn your Bunny right side out. I use my fingers first.
Then I use my fabric pen with the cap on to gently push out the seams (I find that the smooth plastic cap which has a slightly rounded end is a perfect turning tool). You can use a chopstick, rubber end of a pencil or anything that isn’t sharp. Don’t use the right end of a chopstick or knitting needle as you will end up poking a hole in your seams. If you do poke a hole in your softie, don’t panic, just turn him wrong side out again and sew a little inside the section that has a hole remembering to secure your stitching.
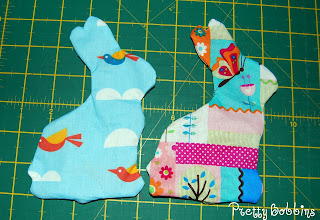
Your rabbit skin should look something like this.
Now you want to stuff him. Take a small amount of stuffing (I’m using the inside of a cushion, you can use toy fill).
Push the stuffing up to the tip of his ears. I start out using my fingers and then use the wrong end of a chopstick to get it all the way to the end.
Keep using small amounts of stuffing and pushing them into your bunny.
You want to make sure that you are pushing the stuffing right to the edges of your softie.
It can get a little frustrating using such small pieces of stuffing at a time, but it is worth it. If you use big pieces you will end up with a lumpy softie. Keep going until your softie looks like this!
Recently I was given some fantastic advice on an online sewing group, The Sewing Library, in regards to stuffing softies. Use the chicken breast test. It should be firm like a chicken breast and like a chicken breast, it is safer to go too firm than too soft. Isn’t that great advice? Now I know exactly how firm to make my softies!
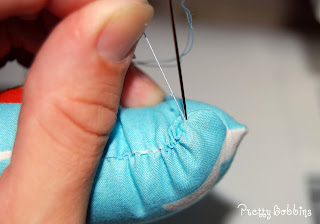
Once you have finished stuffing your softie you need to sew him up. Select a thread that blends with your fabric and grab yourself a needle.
You want to use a ladder stitch so that your stitches end up invisible. There are lots of good tutorials online but I’ve put together some photos to try and show you how to do it.
First sew a heap of little sitiches within your seam allowance to secure your thread. Then bring your needle up right on the seam line right next to where your hole starts.
Take your needle over to the other side and push it in to the seam line and bring it back out about 1/8″ on the seam line on the same side (see photo below).
Pull your thread tight and insert your needle back into your seam line on the other side directly opposite your last stitch. Bring your needle out again 1/8″ along on the seam line same side.
Continue until you get to the end of the hole.
Now you need to secure your stitches but you want them to be invisible. [If I'm using a thread and material that allow me to make a few tiny stitches that can't be seen, then I will do so in addition to tying a knot.] Bring you needle out as close to your last stitch as possible. Now you want to tie a knot as close to the fabric as possible. I tend to do about 3 or 4 knots on top of each other.
OK, get close to your fabric and pull your thread tight. Can you see the hole that your thread came out of last? You want to thread your needle back into that same hole.
Without loosing your needle inside your softie take it through your softie and bring it out. Pull the thread firmly but not hard. You want your knot to pop into the inside of your softie but not tear a hole in it.
Pull your thread tight and snip it nice and close to the fabric so that the thread tail disappears inside the body.
Hooray! You shouldn’t be able to see where you closed up your softie!
Now stand back and admire your work
You can even add a ribbon and watch your Bunnies hop around the garden.
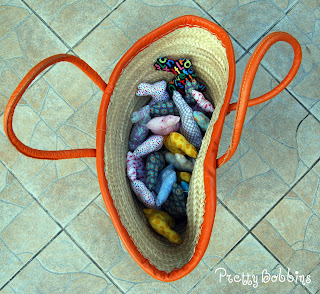
Or put them in a basket and take them to school for your kid’s friends!
You can use these tips for any softies and you will probably find that the shape of your softies improves with time I hope you found this tutorial helpful!
Recently Mr 5.5 pulled a moldy lemon out of my trusty black handbag. To explain, I’m not completely disgusting, we have a lemon tree that attracts thieves, so I tend to grab the lemons if I see a yellow one and pop it in my bag. I obviously forgot about one… I had bought the Melly and Me Raspberry Ripple pattern well over a year ago from Patterns Only and so I decided not to put it off any longer. What do you think?
I added a couple of extra pockets and a key loop on the inside, but otherwise it is true to the pattern.
Don’t you just love the black and white fabric? It’s Dressforms in Black by Michael Miller. The red butterflies are another favourite of mine
You can find my review of this pattern here at The Oz Material Girl’s blog.
There should be a review of the pattern on The Oz Material Girls blog soon, but I just couldn’t wait to share my new bag with you!
This quilt has taken a long time to finish. I mentioned here and here that I had something exciting to share with you. Then I had a bit of a hiatus… Then I got scared about free motion quilting (FMQ) Mr 3.5′s quilt and decided I better practise. So after putting down this quilt for a couple of months I picked it up on Sunday and it was finished in a matter of days.
I LURVE it! I hope the kids at creche do too I had a lot of fun with the details.
 |
I started FMQing in this corner and the
kite diamonds are the only applique I quilted over. |
There was a lot of experimenting with this quilt. I used a totally unsuitable backing fabric (POPLIN!!!!), the reasoning being that I live on a Pacific Island and I need to use what I have.
 |
| No one will ever see this… |
I used felt as wadding and the white fabric is actually sheeting weight cotton. I read A LOT about the pros and cons of using sheets in quilting before I made this decision. It ended up completely fine to machine quilt. The binding, two borders and most of the applique is quilting weight cotton. All the applique was done using a web adhesive and then machine blanket stitch. Gone are my days of hand blanket stitching big projects! The Christmas tree on my advent calendar nearly killed me, that white fabric is also sheeting weight and left me with bruised fingers!
I found this insanely BRILLIANT tutorial on how to join the ends of your binding. It worked perfectly the first time and I will use it again and again and again. You must go and visit her blog now (And then come back and finish reading:)
I am really new to FMQ but I much prefer it to stitching in the ditch. Having said that, there is a place for everything, and I have a long way to go before this stitching could technically be called stippling 

I also made a bit of a radical decision with the quilt label and binding. I have a bit of a bad back which has been playing up recently. There is no way I could have hand stitched the binding down or hand embroider the label this week. I really wanted to present the quilt today so I went against my usual habit and machine stitched the binding down (stitching in the ditch on the front and catching the binding on the back). I didn’t bother cutting the binding on the bias as it was only going around a rectangle. Gee that saves some time! And the label? Well, I don’t know if I’ll do one like this again, but I used felt! (It’s OK to shudder.) I selected the cursive script on my machine and stitched out two very long lines of text. I decided it was hideous, slept on it and decided it was not a problem. OK, now wait for it, this is really crazy… I used iron on adhesive to attach it to the quilt back. I told you there was a bit of experimenting (and time saving)!
 |
| Little Miss had a lot of fun walking back and forth under the quilt. |
But wait, there’s more! The idea behind the quilt is that it will be hung on the wall as a fun decoration. I really didn’t feel up to making double folded bias binding for ties, so I cut some matching ric rac and sewed it into the binding. I just used a little fray stoppa on the ends.
It feels good to have broken so many “rules”. I’ve read a few times recently that there are no quilting police, but honestly, I am a bit embarrassed to share some of my experiments with the quilt. But sewing would be no fun if I followed the “rules”
I hope you like it. I’m very proud to be sharing it with you!
Just in case I haven’t bored you silly yet with the progress of my quilt for Mr 3.5, here is another quilt in progress I mentioned here that I was really excited about a project that I was working on and that I would share it with you soon.
That was a little while ago…
Well, it’s a wall quilt for Mr 3.5′s creche and I was so happy with the quilt top that I had to put it aside and think about it for awhile. It has LOTS of applique and I really wanted to get it right, I felt that stippling over the whole thing would take away from the applique but I didn’t have the courage to try and attempt to free motion quilt between all the applique.
Mr Husband obviously doesn’t understand the creative process because he has been bugging me about this quilt since I put it down, “When are you going to finish that gift?”, “Have you done any more on that cool quilt?” Today he went to the Island of Mare for work and Mr 3.5 spent the afternoon at a friend’s house, Mr 5.5 spent some time on Reading Eggs and Little Miss napped. I took a long hard look at my quilt in progress for Mr 3.5, decided that I needed to practise before I attempted to stipple the whole thing (and possibly ruin it!).
I pulled out the wall quilt, loaded up a bobbin and dived in.
I just finished stippling the whole thing, but here is a photo from earlier today when I had done about half of it. What do you think?
I won’t win best in show, but I think it pretty good for a first proper attempt at FMQ. Technically it isn’t my first attempt at stippling, but it is the largest piece I have attempted to FMQ so far. And I had some beginners luck, look how much thread was left on the bobbin when I finished the first half!
I’d love to hear any tips you have for FMQ. I think I’ll practise a little more before I attempt Mr 3.5′s quilt. I’d love to stipple the whole thing but maybe straight line quilting would be better. What do you think? Here is the quilt top in case you’ve forgotten what it looks like
So I’m assuming that you’re all following my quilt progress with bated breath I’ve finished the quilt top!! I’ve shown you some before and would share it all except it is nearly 10pm here and I realised I haven’t take a photo of the entire quilt top. So here you go
I spent about 3 days mulling over the quilt back. I had the following definite criteria:
- to use fabric from my existing stash only;
- to not look like I didn’t have enough fabric;
- to look balanced and not overly pieced;
- to include Mr 3.5′s name;
- to tie in with the quilt top; and
- to give a somewhat more mature option.
I’m not very fussy am I?
I drafted about 21 different designs and ended up with 2 that I was happy with. Mr Husband helped with the final decision, I always like having a second opinion
The ladies over at Quilt Club Australia on Facebook gave me some great advice when I needed it at the last minute. Don’t you love the generosity of other quilters/crafters/sew-ers? This is what I came up with.
 |
Why the French moustache? Well, I do live in France and
I think it looks better than a blurry blob
|
The orange window block has Mr 3.5′s name appliqued on it, but I have blocked that out. Trust me though, it looks great!
(I figure the children can decide whether they want to be on my blogs when they’re all enough to understand.)
I was going to get busy basting tonight but am exhausted so will do that tomorrow and then start the actual quilting on Monday or Tuesday. It’s not something I want to rush. I’m so happy with how it is coming along. The only problem I foresee is that Mr 5.5 will want one so I might have to start work on a second quilt before I hand this one over (Mr 3.5 doesn’t know that it is for him yet).
Post edit:
I’m normally really good with referencing, but am super tired, sorry! I just wanted to add that I took inspiration from a whole range of quilts that you can find on my pinterest quilt board. In particular the back of this one and this one and this one. Aren’t they all lovely?
I’m still very excited about my quilt in progress but I’ve come to somewhat of a standstill The top is finished, hooray! The back… I’m trying to finalise a design for the back.
I have about 15-20 sketches scattered around me and I still haven’t decided on anything. The only firm decision I have made is that I will not buy fabric for the backing. I will use my stash. And therein lies the problem.
I only have one print from the quilt top which I have enough to do the back. But I’d actually planned to make some boy’s clothes with that particular piece of fabric… This is what my sewing table (it rarely qualifies as a dining table anymore) has looked like for the past 2 days. I want to move on. I want my back finished and I want to start machine quilting…
I’ve been searching pinterest, quilting blogs, quilting books, google images… I’ve seen lots of things that I like but most of them require more of a single fabric than I have. I have also done a pretty good job of populating my quilts board on pinterest and found some fantastic quilt blogs. I want my quilt back to be balanced. I want it to coordinate with the front. I want to make it out of fabrics from my stash. Surely that’s not too much to ask!
I think the core of the problem is that every time I make something I become completely lost in the creative process. This item is going to last, it is going to become a family heirloom. I can honestly say that I cannot think of something that I’ve made that I didn’t love so much that I found it hard to part with. That’s a good thing, right? I keep telling myself that Mr 3.5 won’t even notice, that he’ll love it no matter what it looks like. But then I imagine him as a teenager or as a young adult and I’d love him to still like the quilt and not see it as too babyish. That probably is too much to ask, isn’t it?
So, because I can’t share the back with you yet I am going to show you a little more of the front.
I don’t know if any of you guessed, but I’m following the “Kitchen Windows” pattern by Elizabeth Hartman. You can find it in her book, The Practical Guide to Patchwork. I think I spent about 12 months looking through this book just admiring her colour choices. The inside of the book definitely lives up to the cover.
This lady has a blog that you have to visit. Serious quilt candy. Not only that, but she is intelligent, contemporary, and outrageously cool. She has quite a few free quilt patterns (make sure you read the conditions of use) and I can see one or two of them in my future (while planning the back of Mr 3.5′s quilt I am vaguely planning Mr 5.5′s quilt).
If you have any tips or suggestions for my quilt back, please please please comment below! Do I sound desperate? I know it will come together but I’m girl who needs instant gratification (instilled in me by 3 children who believe that now is not soon enough) and I am barely holding my frustration at bay. Why oh why did I not buy enough fabric for a quilt back? Oh wait, I did. But that was when I was planning a completely different quilt and was guided by the girl in the shop. Now I know what I like and I would not have bought 3 billion yards of batik.
Anyway, back to the design board… Hopefully I have more to share with you soon!!
!!!!!!!!!!!!!!!
So all it took was for me to write this post to actually come up with a design for the quilt back! Hooray! I’m hoping it’s not too piece-y, but I’m happy with the idea I look forward to sharing it soon
I’m so excited about this quilt! I mentioned previously that I’m working on a quilt for my Mr 3.5. It is my first big quilting project in awhile and I am really enjoying it. I just have to sew the four border strips and then the quilt top is done! I probably won’t get much done it today as we are having a social day
Have you guessed yet which pattern I am following? Here are a couple more sneak peaks
I really want to show you a photo of the quilt top, but I think it is more fun this way
This will be the biggest project by far that I have stippled… Wish me luck! I look forward to sharing some more photos with you soon. I haven’t decided what I’m going to do for the quilt back, so maybe I’ll work that out and then share a photo of that with you
Yesterday I spied this gorgeous quilt that inspired me to finally start making a quilt for Mr 3.5. I selected a pattern and bought fabric to make quilts for both of the boys 18 months ago. Then I had a baby who didn’t sleep, moved countries, got distracted by other pretty sewing… Anyway, I’m back and I’m REALLY excited about this quilt!
I’m just going to give you a sneak peak, I’m hoping to have the quilt top finished tomorrow.
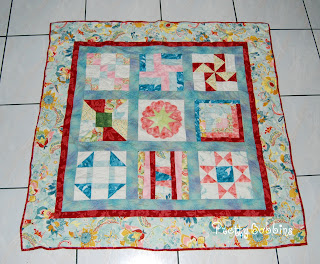
I’m trying something different with this quilt. The first half dozen baby quilts I made I pressed the seams open. My experience was in dress making so I assumed that open seams was the way to go. Then I attended a beginners patchwork and then quilting course to develop my skills. It was a lot of fun and I made this sampler quilt.
One of the things we were taught to do in the patchwork course was to press our seams to one side. It’s all about stability and longevity apparently. So I said goodbye to my open seamed quilting days and folded to the left (or the right).
Today I have gone back to pressing seams open. Elizabeth Hartman of the fantastic quilting blog, Oh, Fransson! says in her book The Practical Guide To Quilting that you will get a more accurate finish pressing your seams open. I think her quilts are amazing so I am following her advice. It will be interesting to see how it turns out
I look forward to sharing more of this quilt in progress over the next few days. I won’t name it yet, but I am following a pattern. Can you guess what it is?
Mr Husband has two more days off for Easter so he is being as supportive as ever and spending lots of time playing with the kids so I can get some sewing done. I’m also hoping to make a few Barbie outfits…
Joyeuses Pacques!
 |
| The last Bunnies Standing |
I’ve mentioned my crafting buddy Angelique from No Life Without Wife previously. We had a market stall together late last year and we get together weekly to craft and chat over a cup of coffee. She makes the cutest crochet items for Blythe dolls. I’d never heard of Blythe before I met Angelique but I can see why people collect them!
It’s school holidays here this week and today Angelique popped over for an Easter morning tea with her two kids. These kids are only 10 and they blog! You have to check out Cute Club and Toko’s Adventures. We had a bit of an Easter Egg Hunt (I love watching the kids try and find them) and then a swapped some Easter goodies.
 |
| Counting the bounty |
Can you guess what we gave Angelique and her kids?
 |
| Twig and Thistle Bunnies |
In return we received three cute crochet Bunnies.
 |
I will point out that these photos were taken after the bunnies
had received a fair bit of attention from a 3 year old (including
bicycle grease) |
I like to think of them as Jungle Bunnies.
And that my friends, is the last of the Bunnies, I promise! Although if you’d like to make some yourself, check out this guest post I wrote over at The Oz Material Girls Blog. It takes you through the basics of making softies step by step (with lots of photos) and uses the two Twig and Thistle Bunnies pictured up top as an example.
So, just in case you missed my Easter post with all of the links, the fabric Bunnies were made using the Twig and Thistle template and this tutorial from My Little Mochi.