September 2012 archive
Whilst Mr Husband might say that my sewing space is cluttered and surely I don’t need all of those things, I believe that having the right notions makes sewing so much easier! Case in point; when I upgraded sewing machines I started to enjoy sewing again, my old machine was frustrating me and taking the fun out of my hobby.
 |
| Um… Someone needs to clean their cutting mat! Sorry!! |
Recently I’d read a few mentions of paper pieces using a fabric glue stick. I thought it sounded like a bit of a gimmick, but that didn’t put me off ;P I must say, I LOVE my new fabric glue stick! It has made paper piecing so much easier! Those tiny little 1/4″ pieces… eek! OK, I’m starting to sound like an infomercial, but I’m so glad I purchased this notion. I just put a dab on the paper, push the fabric onto it and within thirty seconds it is stuck in place. It washes out and whilst the paper stays firmly in place, it is easy to pull off when you’re finished with it.
I also recently bought some super fine clover pins. These babies are reserved for Art Gallery Fabric, organics and similarly fine weaves. They are a bit bendy/springy (they don’t bend permanently they are just kind of bendy when you’re pushing them in) but they are so fine that you don’t have to worry about pulling threads. Another purchase that I’m glad that I made!
Do you have any notions that you can’t live without? I’d love to hear your favourite notions are and any tips on where to purchase them. I bought the above two items from ozquilts.com.au (I’m not sponsored, I just like their friendly and speedy service and they have a really wide range).
But I can’t finish up Sunday Stash without sharing some totally awesome fabric that has found it’s way to me recently (yes, I’m stuck in the 90s and it’s awesome!).
Who doesn’t love Kate Spain? (OK, please don’t answer that if you don’t LOL) The other three are stash builders and I LOVE them. I used the blue on the left for my paper pieced Japanese dumpling block. I also have it in yellow which I’m currently using for a quilt. Such a gorgeous print.
I don’t need to tell you what these are. This a complete example of caving to peer pressure. Everyone else has them so I wanted them too. Absolutely no idea what I’m going to do with my little stash of Nursery Versery, but it sure is cute!
I saw these cool foxes around a while ago and knew that they would be mine eventually

To be honest I’m not a big fan of foxes. They liked to bite the heads off our chooks when I was a kid. Rotten foxes wouldn’t even eat the birds, they just wanted to murder them. But cute ones on fabric are OK. It’s nice that they remind me of my childhood, right?

I also love the alphabet panel. So clever! M made from mushrooms and X from xylophone this will be stashed until I can think of the perfect project! The cooking fabric is too cool.
I’m thinking this has to be incorporated into a mini quilt for the kitchen. Not that it helps my dieting, but I love this guy’s philosophy!
Do you have any new must have additions to your stash this week? I’m linking up with Sunday Stash over at Quiet Play this week (lucky Fiona has been on holidays and too busy having fun to blog!). I’m also going to apologise for the funky photos. I’ve been busy sewing this week and really didn’t take the best photos!
I have a gorgeous friend who has ordered a few things from me recently. She is a great customer, the type who says, “Could you please make me a pillowcase with helicopters and airplanes, I know it will be great so do whatever you want.” I think my best work comes through when I’m given free reign on a project because I am making something that I have envisaged and loving every minute. Anyway, enough waffling I just wanted to share a few recent items that I completed for her but have held off sharing as they were gifts
This helicopter and airplane themed pillowcase was a birthday gift for a two year old boy who LOVES helicopters! I had a lot of fun making this one and I would have loved to have kept it for one of my boys Both Mum and the birthday boy loved it which made parting with it a little easier

I used Quiet Play’s paper pieced helicopter pattern, you can find it here. It was really easy and straight forward, I bought a few of her patterns so will definitely be making some more. This is a great PP pattern for a beginner, not at all fiddly in terms of paper piecing If you’re considering giving paper piecing a go, I would recommend giving this one a go. I used quilting cottons for the top, a layer of flannelette and then a quilting cotton on the back of the paper pieced square. I FMQ the sky and then echoed the main pieces of the helicopter in matching thread. I wanted the helicopter to really stand out but keep it simple. To keep the straight line quilting very close to the edges I used my walking foot with the edge guide thingy (you know the one, looks like an invisible hem foot) and moved my needle to the side. I’s a great way to achieve really accurate echo stitching

I made a nice simple back for the pillowcase so that it will be nice and soft to sleep on. I love this fabric, it is destined to be part of a quilt for Mr 5.5
I made this cushion cover a little while ago for a newborn baby. It has to be one of the sweetest things I’ve made!

Lots of hand stitching including the baby girl’s name in the bunting. I really love this one. The fairy is the same as the one I made for my little girl but this time the fairy is sending out her blessings to the baby
I have to say that projects like this one make me very grateful for my machine’s blanket stitch! Some of those appliqued sections are very small (can you see the ankle poking out there?) and even though it requires a lot of concentration doing it on the machine it is much faster than hand sewing blanket stitch.
I wanted the cushion to be double sided so I put an invisible zipper in the side seam and did a fun patchwork back incorporating the colour scheme from the front.
I doubted myself on this cushion cover half way through but was really happy with the result. I knew what I wanted to do but all of the hand stitched flowers were done free hand without drawing up a design first. I used a combination of DMC and perlé 8 threads and I think it has come together beautifully. The verigated pink perlé 8 has been so versatile and I will need to buy some more soon.
An ongoing issue I have is managing my time for paid projects. I really like to put a lot of work into the things I make but at the end of the day I need to think about how much customers are willing spend. After spending so much time on the front of this cushion cover I decided to put together a very simple back with a snap closure
I had so much fun making the cushion covers and pillowcase but it was even nicer to hear how much the new parents and birthday boy love them. It is both satisfying and energizing. I know I like the things I make, but it is always reassuring to hear that I’m not the only one! LOL
I’m linking up with TGIFF over at Quiet Play.
So I got sick of dithering and decided to start cutting.
 |
| Ready for cutting and ironing |
Now I’m not sure I did the right thing (but I was destined to feel that way after looking at a billion quilts online).
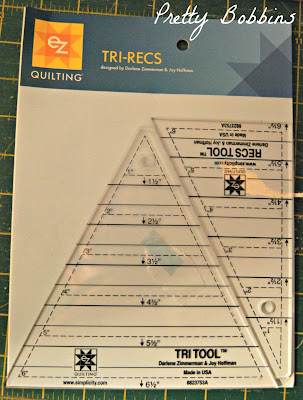
I recently purchased a Tri Recs ruler and decided to use it (the idea behind the purchase was to try new things, I like to push myself). But once I started placing the triangles on the design wall I kind of decided I like the diamonds better than the triangles…. What do you think?
But then I’m thinking, if I wanted diamonds why the heck did I cut triangles? Not that I can’t turn triangles into diamonds… It just seems counter productive….
It’s early days and the placement is very rough (you may remember I added yellow to a blogger bundle of pinks and oranges), I haven’t even cut up all the fabric yet. I’m loving the colours so far. I’m not sure if I can bring myself to throw yellow into the mix, but I just added some lighter fabrics (including the fun pink and white Washi print) and I like the change that has brought. Dare I bring yellow into the mix?
I could just pull more pale pinks from my stash. But the only additional oranges I have are dark hues and I don’t want to end up with a pink quilt that has a little orange in it. I have a few more greys which I was planning to add in but I don’t want to make it too heavy.
Do you love the quilt design thought process or does it drive you nuts? I love the whole process from fabric selection to quilting, but I spend far too much time mulling it over. If I spent as much time sewing as I did thinking about it I would be a lot more productive!! Anyway, it’s fun to be playing with triangles I’d love to hear of anyone’s experiences with a tri recs ruler. Any fantastic patterns out there that I should be trying out? These triangles are 5 1/2″, I’m thinking some really tiny triangles would be fun for a future project… Always thinking about the next project
(BTW, I’m trying out having my photos as extra large size. What do you think?)
Last night we had two lovely friends stay for a sleep over. I’m somewhat (!) lacking in sleep today, but we had so much fun. Nothing like complete kid chaos to make everyone happy Either side of the sleepover I managed to get a little sewing in. A gift for one of the guests to celebrate his sixth birthday
 |
| The birthday boy’s name starts with an “M”
|
Pillowcases are one of my favourite handmade gifts for boys. Both of my boys sleep with Spiderman pillowcases that I made them for Christmas last year. They love them and it reminds me of the Disneyland Parade pillowcase that I had when I was little
I also managed to fit in a trio of skirts (I forgot to take a photo of the first one before it went to it’s new home).
These were fun to make and a pleasant break from quilting and patchwork. These photos are a good example of colour not showing true in photos. The middle tier of the second skirt is a deep pink, not the red that shows. I have photographed this fabric a number of times and have never managed to capture the true colour.
I also got busy while the sun was still in all her glory today and played around with some fat quarters. I received a few new additions to the stash this week including this gorgeous selection. I had been toying around with the idea of the blogger bundles/stacks currently available at a few online stores. In the end I purchased Dancing with Hazel by Rachel (Imagine Gnats) from Pink Castle Fabrics thinking it looked rather nice. Oh my goodness! It is absolutely stunning in real life and I am so glad that I purchased it!
I dug into my stash to add some yellow to the pinks and oranges. I wanted to lighten it up a bit but not go for lots of white. I’m thinking the bright yellow microdots (top left) would make a good binding and the top left grey linen/cotton blend might be a nice solid to throw around. Then again, I might change my mind completely after some sleep LOL
So tonight in my sleep deprived state I’m contemplating twin sized quilt patterns that utilise fat quarters. I played around with some graph paper and came up with one design that mixes square inside square with solid squares but I am not at all confident in my mathematical abilities so I’m thinking I might just purchase a pattern and make my life easy. Please feel free to make any suggestions
I’m envisaging a simple design that will feature the colours and prints. I also like the idea of something quick to work on until my white homespun arrives so I can finish off my I Spy quilt
 |
| Don’t you just want to dive in and play? |
I’m linking up with Sunday Stash at Finding Fifth.
Is it Pooh Bear who says that? I think so. I could go check but I’m so excited about this block that I want to share it right now
Total fiddle sticks But I love it and I hope Alyce does too!
I’m participating in a Paper Pieced Bee with some of my favourite online quilting buddies. Fiona, Alyce, Marieka, Jane, Kristy and Lara. We have called ourselves Wombat Stew and you can find us on Flickr. Alyce is Queen Bee this month and she selected a Japanese Cuisine theme.
I designed this block myself using Quilt Assistant after I read about it recently on Sew Hooked. It was relatively straight forward and I learnt a lot. The block itself is super fiddly (it is 8″ x 8″ finished so the chopsticks are 1/4″ wide or tall, depends which way you look at them I guess) and I don’t know if I could do it again. Luckily this is the second time around, so I have the practice go to keep for myself I am definitely making a mini for my wall above my machine with the practice block. Looking at this block will remind me that I can make whatever I envisage Mind you, I might envisage something less fiddly next time
 |
| Practice block, not quite finished
|
I used to live in Beijing and I love dumplings, I knew exactly what I wanted to do. One problem, dumplings are a very fiddly shape when you turn them into a paper pieced block! But I kept thinking of my Ayi (housekeeper) teaching me to make dumplings and I had to get the shape right. The arch is made by pressing your fingers together. I think I did OK, I did compromise on having the little bit poking out the side. I hope my Ayi can forgive me!
I’m linking up with TGIFF (Thank Goodness It’s Finished Friday) which Jane is hosting today and holy moly I am glad this baby is finished! (Oh, and Alyce just saw it and said she likes it, double yay!)
It’s true! Today between playgroup, baby sitting and the usual running around I was auditioning borders for my I Spy quilt top. I had originally planned a wide border in white. I have about 4″ x WOF (width of fabric) of white homespun left. I knew this would happen. I just kept piecing, and sure enough my top wants a border and there isn’t enough white left.
What to do? After spending a fair amount of time laying out fabric I took some quick photos, threw together a dodgy collage and asked some quilty pals what they liked and didn’t like. I mentioned that whilst not all the options were ideal they were just there for comparison as really my plan had been a 5-6″ border in white, heavily quilted and then some bright binding. That was when a lovely lady that I only know online (but am looking forward to meeting in real life about 6 weeks!) offered to buy me some more homespun and post it to me.
I am so touched. I just want to say a big thank you.
Thank you xx
Quilty pals are the best! And just so this isn’t a pictureless post (because I don’t like those), here is what my I Spy quilt won’t look like
 |
| I warned you it was a dodgy collage LOL |
I always find taking a photo helps me with fabric selection. Does anyone else photograph their fabric options when trying to make a decision? I find it helps give me a different perspective.
I jinxed myself when I posted this morning that I hoped to be finished my I Spy quilt top this morning. I have never spent so much time with my quick unpicker! I don’t mind. The result is worth it, but honestly, I am a much more patient person than I give myself credit for.
Right now I have a pounding headache and I just need to put the quilt down and come back to it tomorrow but I before I do I have to show you where I got up to! It’s in 2 pieces!
Sorry for the dodgy photo. It’s night and I’m tired but I just had to share!
Did you get any sewing done today?
My two big boys went back to school this morning after a two week break. I would be lying if I said I wasn’t in a good mood today. Don’t get me wrong, I love my kids and I love having them home with me, but I am also looking forward to a quiet day First up this morning a walk (I’m determined to burn off the fat that crept on while I was recovering from pneumonia. It’s temporary, not a new body shape!). Then back to this baby…
It has been a great project for the school holidays. It is slow going, the kids like watching the progress and I was able to pick it up and put it down at a moment’s notice. I’m crossing my fingers that I might get the top finished this morning.
The top section is in two large pieces at the moment.
The bottom left hand side is also mostly pieced.
This last section is tricky and will require some extra pieces I think. It’s hard though as I’ve been very consistent with the design so far and I know I will regret it if I slip in something the fits a hole but isn’t quite right with the rest of the top.
Then back to the list of things that actually need to be done ASAP! I am wavering as to whether or not to put this quilt up for sale now. I think I will, but the kids love it. I’ve never sold a quilt before but when I started this one that was the idea. Now I’m thinking to do something simpler that I can put a lower price tag on. Oh, such a quandary! But at least the house will be quiet so I’ll be able to ponder
I love to sew. Everything from bags to quilts to baby clothes and shoes. I’ve even made cloth nappies, pillow cases, toiletry bags, belts, hats, playmats. I could probably come up with a Dr Seuss rhyme of what I love to sew. But I won’t because that would just be silly
I first started sewing on my Mum’s machine, then took a few classes at school. Then about ten years ago I inherited my Nanny’s machine when she passed away. It’s an old Husqvarna and really solid. That baby will sew through anything. It weighs a tonne. When I first inherited it I had it serviced and the man told me it would last longer than anything I could buy now and that it was in full working order (I even have the original paperwork).
 |
| My beloved husqy
|
Last year my youngest baby (I’m talking humans, not machines now) stopped sleeping. It was tough. Really, really tough. I’m talking waking 7 times a night. I needed something for me and whilst I had been sewing regularly for awhile, I really started to get into it again. It was a great way to forget how tired I was. A few months and a bazillion stitches later and I started to realise that my Nanny’s machine was taking the joy out of sewing. In her old age she had become touchy and whilst she was still reliable I was playing with tension every two seconds, not to mention the foot falling off regularly and the bobbins being very little.
I started to research new machines, after a lot of reading I decided I needed a Bernina 440 QE. By chance this machine was being phased out and the price had dropped a little so I was lucky enough to end up getting one. She is wonderful! Her name is Delilah and she has brought the joy back into sewing. There is room to grow and learn. She is reliable and capable. I’m very lucky to own such a fantastic sewing machine.
I often get asked for tips on the 440 so I thought it would be helpful if I shared some of the things I have learnt I hope you find this useful
The foot pressure on the 440 is awesome. Unless I’m using the walking foot I reduce the foot pressure below the standard setting.
 |
| Foot pressure dial. |
 |
| Foot pressure indicator. |
If I want really accurate piecing I place the top fabric slightly less than 1/8″ before the bottom fabric. This takes the foot pressure into account and I end up with perfectly aligned edges.
 |
I would actually place the red fabric on top and the white
sashing underneath. I have photographed it this way to
demonstrate the allowance I give myself to account for the foot pressure. |
The bobbins are HUGE. Don’t bother using 100m spools of thread, you will fill a bobbin and have nothing left. While we’re on the bobbins, it is REALLY IMPORTANT to wind your bobbin at the slowest possible speed. Just slid the speed control all the way to the left and then start your bobbin winder. You might need to slightly increase the speed as sometimes the bobbin will stop winding prematurely. Ideally your bobbin will feel kind of springy when you squeeze it. Initially I wound my bobbin at full speed and often ended up with a birds nest on the underside of the fabric. Now that never happens
 |
| Speed dial. |
Just before we move off threads. I find that even with a wonderful machine like the Bernina 440 QE, the quality of your thread makes a difference. I recently started using Auriful 50 weight thread and I can feel the difference when piecing and quilting. It glides through the machine and I highly recommend you try it out. It is expensive but I believe it is worth every penny.
 |
I prefer Aurifil thread (and no one is paying
me to say that, I really do think it makes a difference!)
|
I’m sure you already know this if you have a Bernina, but you need to really push the bobbin in to place. My Husqvarna was similar but a number of people have mentioned that they find getting the bobbin properly in place difficult. If you push it in slowly you will feel a kind of double click If it isn’t in place it will fall out and you end up with a big mess and your fabric stuck to the foot plate. This still happens to me sometimes.
 |
| Invest in as many bobbins as you can afford
|
Even if you’re a speed demon, start slowly and then put your foot down. I find that if I start at full pelt I am much more likely to end up with a tangled mess. This might just be because fast is fast on the 440
Use the knee lifter! I didn’t try mine out until I’d had Delilah for a few months. Now I couldn’t sew without it. It is so handy, especially when quilting, but I use it every single time I sew.
 |
| Knee lifter in action. |
The Bernina Stitch Regulator (BSR) is great in my opinion.
 |
| BSR and an almost empty bobbin. |
I have read that people who are experienced quilters tend not to like the BSR but before I had Delilah I only ever Straight Line Quilting (SLQ) without a walking foot (yes, I dragged the fabric through, was not fun!). I love the BSR, it really helps me with Free Motion Quilting (FMQ). I also really enjoy SLQ and I regularly use all three foot attachments for the walking foot.
 |
| Walking foot with edge-stitching foot attachment. |
Buy the invisible zipper foot. It makes putting in a zipper a pleasure! The outcome is great and in my opinion it is easier than a normal zipper.
 |
| Left: invisible zipper foot. Right: normal zipper foot. |
Button holes are super easy, but the key is threading the bobbin thread through the little hole in the arm of the bobbin. It makes a huge difference to your tension. I also do this when quilting and I think it helps with tension for quilting too. If your buttonholes still aren’t quite right, try a stabiliser.
 |
| Threading your bobbin thread through this little hole helps with tension issues. |
I will write up some more tips as I think of them, but please feel free to ask any questions that I may be able to answer or help with. I found the blog Dog Named Banjo fantastically helpful regarding the Bernina 440. She has quite a few posts, so go have a look around I have also written previously about my 44 here. Fembellish Journal has some good information too. Another blog I found with some information on the 440 is Creative and Handmade. As for totally useful information that I can’t believe I didn’t already know, this post by badskirt completely opened my eyes to the versatility of the edge-stitching foot! I already used my edge-stitching feet (both the normal one and the one on the walking foot) a lot, now I use the ALL THE TIME.
I hope that you’ve found this post useful
Happy Sewing!
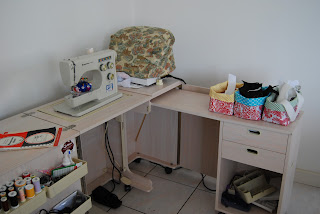
I have to share a true story with you today as part of Work In Progress Wednesday. Mr Husband was sitting at the dining sewing table the night before last night talking to me while I worked on my I Spy quilt top. I am using the fabulous design wall he helped me rig up so my progress was on display for all and sundry. I am either producing an artistic masterpiece or just a quilt that I should have designed better as all the pieces are different sizes so I’m doing a bit of a jigsaw puzzle. I think the quilting will bring it together. I have grand ideas, we’ll see where I end up.
 |
Yes, I have the world’s ugliest ironing board cover, replacing
it just isn’t a priority at the moment, so I will continue to
torture you
|
Anyway, getting back to the story. Mr Husband started asking me about what I was doing and how I knew what I was going. Then he told me, “You know what you should do? You should take photos along the way and then share online what you’re doing so people know!” Ah, I love you Mr Husband! His brilliant suggestion made me think that he must wonder what I do all day. Apart from looking after three young children and running our household, I sew and share what I’m doing online. Mr Husband visits my blog regularly. Now I guess I’ll find out if he just looks at the pretty pictures or reads the words (but he wouldn’t know how to comment on a blog post so I guess we’ll never find out!)
Enough teasing of my fabric fund provider, I love him dearly and I really appreciate that he is so proud and supportive of my work that he suggested I share it online. Even if I already do share online and he hadn’t noticed ;P
So, what am I getting up to? An I Spy quilt that I’m hoping to sell. I’m starting to suspect that I won’t be able to bear to part with it, so it might never end up on etsy, but we all need motivation, right?
I fussy cut a bazzilion prints and have placed them in a rainbow pattern. I didn’t want to just blend all those blocks together and end up with fabric vomit, so I’ve cut 1.5″ white sashing and am using it to join the prints together into actual blocks. I love where I’m going but the progress is slow. Nothing is the same size. (I think school holidays are slowly progress further and I need to accept that I am lucky to get any sewing in during vacance!)
I have a few extra fabrics which arrived as part of a novelty swap I was in so I might add in a few of those to fill odd gaps or I might just add more white. I’m thinking I will heavily quilt the white sashing as some areas might have 2″ squares of white. I don’t think I’ll quilt over the I Spy prints. They are mostly very small and I’m hoping the quilting of the sashing will make them pop. I might just outline a couple of the larger ones so they don’t get too puffy or fluffy. But I’m getting ahead of myself…
 |
| Progress as of right now |
I have some big bold multi coloured fabrics that I think I might use for the back. I don’t think I’ll piece it with extra I Spy blocks as I don’t think the quilting would work. I’m open to suggestions though. This is totally a “make it up as you go” kinda quilt I’m very happy to have kept it gender neutral, there are a few fairies and butterflies, but my Mr 4 thinks they’re cool, and there are a few trucks to balance them out. In this house the boys are happy to dress up as Snow White and Little Miss is more than happy to play cars and trains all day. Hopefully this quilt will appeal to boys and girls
The major WiP this week though is one that I am really behind in! I have joined some amazing ladies in a Paper Piecing Bee. We’ve called ourselves Wombat Stew (yup, we’re all awesome Aussie gals) and you can find us on Flickr. This is my first bee and these ladies are awesome! I am behind (let’s blame school holidays again!). First up we’re producing a Japanese cuisine inspired block for Alyce and I’ve sketched up a block based on my favourite dumplings and accompaniment. I need to draw it up properly to see if I can actually do it! I don’t have a lot of experience paper piecing so these ladies are putting a lot of faith in me and I’m hoping I can produce worthy blocks There are curves in my sketch but tomorrow I will get out my trusty ruler and see if I can wrangle enough triangles to match my sketch. Cross your fingers for me!
I’m linking up to Work In Progress Wednesday at Freshly Pieced.