The big day has arrived and I’ll be up at the crack of dawn and on a plane back to Australia in a few hours. I’m an emotional wreck. Even when it is so right to leave, moving is so definitive, so final. It is hard to say goodbye. My last week in Nouméa has been exhausting and I have another big week ahead of me! This time next week I will be falling asleep dreaming of my longarm that will be set up the next day. Exciting!
So I’m very sorry to say that I Quilt Linky Party is taking a break this week. I need to curl up in a corner and lick my wounds. Wipe my tears as I farewell friends and dream of the South Pacific. All that I have learnt and experienced here.
Bisouses xxx
It’s Thursday and time for the I Quilt Linky Party  I’m going to keep it short and sweet this week as moving chaos has set in and I am exhausted!

Last week I shared my thoughts on wadding and invited you to also. The lovely Dasha from Patching Pixies wrote a fantastic post on wadding. Seriously, check it out. She raises some important points about selecting your wadding and shares her favourites which I am going to look into. Thanks so much Dasha! I’m totally not one for handquilting (patience is not one of my virtues when it comes to quilting!) but check out this amazing piece of Dasha’s hand-work. LOVE.

Thanks so much for sharing your wisdom Dasha, it is a great post, really good info for both newbie quilters and those with a bit more experience who want to know more about options when it comes to that invisible but essential middle layer!
I have been pumping out the quilts the last week. Am trying to avoid burnout and arrange delivery of our shipment, attending end of year school concerts and even packing one child off for his first school camp. I’ve finished three large quilts in two weeks and have almost completed two cot quilts this week. Did I mention I’m losing my mind…  At this point I’m going to finish up and
 go crawl into my bed cook dinner.
I’d love you to link up your quilting process. Please visit 3 other bloggers (seriously, please do, that’s the fun of linky parties ) and add my button and/or a link in your post. My goal is to share the quilty love. I love reading about your process and I hope you are enjoying visiting the linkers as much as I am! Next week I will be back on board with lots of quilty process. This week I will have to live vicariously through you lovelies xxxx
I blinked and November disappeared! I missed making a collage last month as I was too busy but here for your viewing pleasure (and so I can feel like I achieved something) is my November round-up

Clockwise from top: side two of Bee Quilt, Butterfly quilt (2m square!!), side one of Bee Quilt, quilted table runner, Pirate quilt (over 2m square!!)
I did manage to make three large quilts, and in addition to the above there were a number of cushions and quilted minis that were made and distributed too quickly to photograph! It was that kind of month… I don’t think I’ve blogged any of the above yet *sigh*
I’m linking up to Fresh Sewing Day at Lily’s Quilts.

Welcome to Pretty Bobbins! I’m stop number two on the Cushion for Christmas bloghop and today I’m sharing a QAYG cushion tutorial. The lovely Ms Midge came up with the great idea to feature cushions that can be made in a day – the ideal Christmas gift! Speaking of Ms Midge, I’m pretty sure she is freaking out right about now as my modem died over night and I have been offline for over 24 hours leading up to my stop on the hop… Amazing how long the battery lasts on my iPad when there is no wifi in the house

I am sharing a cushion that I made yesterday morning. I didn’t time myself but I started after breakfast and finished before lunch, so it is definitely do-able in a day I am familiar with the techniques though, so it might take a beginner a bit longer I find the key to the Quilt As You Go (QAYG) method is to be organised. I set up my machine, ironing station, cutting mat and fabrics (in order) within reaching distance. I used a 16″ cushion insert. I pieced together cotton wadding and cut backing both at 18″ square.

Now my QAYG cushion is technically not QAYG as I didn’t quilt the sections other than to sew them in place. Usually with QAYG you will sew your strip down as I describe below, flip it right side up, then quilt it in place. I have done this and it does look rather lovely but I find it to be an unreasonably time consuming and thread hungry method. So I cheat a little Below you can see a lovely QAYG iPad pouch I made last year. I keep meaning to FMQ over a cushion that I’ve made using my cheats QAYG method but I always love the end result too much to add any extra quilting The choice is yours


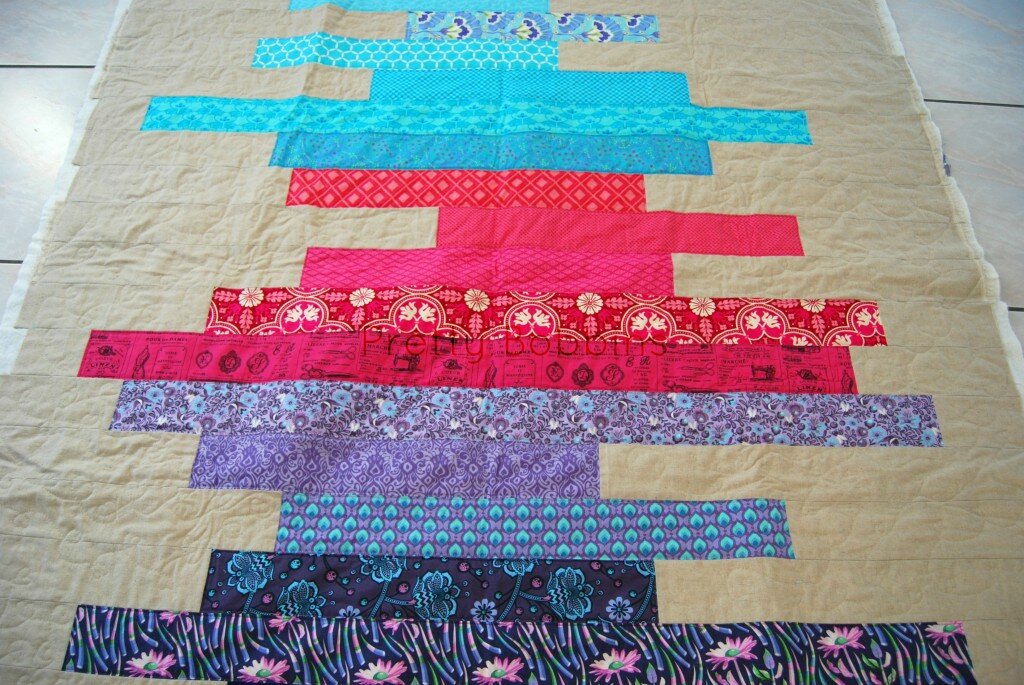
I started with a reasonable sized scrap off center and then added a piece that covered the width and over hang 1/4″ each side. I cut all my pieces 1.5″ wide and worked out the length as I went along. The key being to ensure that each piece overhangs by 1/4″ at both ends.

I used my walking foot which has 1/4″ marked on it and I secured my stitches by going back and forth a few times at each end. I didn’t use any pins, I just lay my wadding on my backing and they stayed in place while I was working. After sewing each strip in place I trimmed back any overhang from the previous piece to the 1/4″ seam allowance. After trimming I ironed the most recent piece flat. Ironing after adding each strip will give you the best outcome.

I was trying to be clever with colour and laid all of my prints out in order and then checked as I went along. I didn’t quite get the affect that I was aiming for but I’m still really happy with the cushion.

After finishing the teals I laid out the purples. So pretty

I found it easiest to use my ruler to measure the required size of the next strip. You need to ensure that you strip has 1/4″ seam allowance from any raw edges.

In the above example the strip would need to be 7.25″ x 1.5″
I started to fall in love with this cushion when I was about half way through adding the purples

There’s something about pink that I love. In hindsight I should have gone teal, pink then purple but in the end I added the pinks starting from light to dark (both purple and teal were added lightest to darkest).

I realised after adding a few pinks that I didn’t have enough to continue with only 1.5″ strips so I laid out my remaining pieces to finalised the placement. I started with an 18″ square piece with the intention of a finished 15″ cushion cover.

After adding all of my pins I trimmed back my mini to 16″ (width) x 17″ (height) and cut a backing piece the same size.

I decided on a zipper closure in the bottom seam and I always like to add an extra inch for this purpose. I don’t have access to my overlocker/serger at the moment so I used a flatlock stitch on my sewing machine along the bottom edge (17″ edge – important if your prints are directional).
Lay both your backing fabric and mini right sides together and stitch 1/2″ in from the edge. This will be where you insert your zipper. You want approximately 1.5″ at both ends in your normal stitch length and the area in between in the longest stitch length possible. You can sew these three areas separately, but I’m lazy and just secure my stitches and adjust my stitch length without trimming

After timming your threads press the seam open. Because we’re making a cushion cover that involves quilting I always fuss with the pressing. You want a nice straight and flat seam

Select a zipper longer that the width of your cushion (I think I used a 21″ zipper) and pin in place so that the teeth are ligned up to where the front and backing meet. I use pins to remind me where my basting stitches begin/end. Grab your zipper foot and sew your zipper in place. Don’t forget to make sure that the tab is within the sewn area. I cross over the zipper just outside of the basting stitches and sew back and forth a few times.

Trim your zipper ends and secure with a few stitches. Next you want to grab your seam ripper and carefully rip out those basting stitches. I usually use tweezer to grab the tiny threads left afterwards.

Then you want to sew your cushion cover together. Make sure you leave the zipper open so that you can turn it right side out. I like to use a 1/4″ seam allowance, first with a straight stitch and then with the serger or a zigzag stitch to prevent fraying.
Et voila! You have a brand new cushion ready for Christmas!

I used a lovely Kate Spain fat quarter (from her line Good Fortune) for the back. LOVE.

I hope you have found my tutorial helpful. For me, as always, this was an exercise in colour play as much as it was in quilting and whilst I didn’t end up with exactly the affect I was after, I do love it In case you’re wondering, yes, it will be a Christmas present for a very special friend
Don’t forget to head over to Ms Midge on the 14th of December to link up your cushions. You can find all of the details here and links to the other fabulous bloggers below. I can’t wait to see what everyone has been up to!
Sunday 1st December – Ms Midge
Tuesday 3rd December – Kristy at Quiet Play
& Ms Midge
Wednesday 4th December – Joshua at Molli Sparkles
Thursday 5th December -Rachel at Little White Dove
Friday 6th December – Fiona at Finding Fifth
Saturday 7th December – Abby at Things For Boys
Sunday 8th December – Lauren at Molly & Mama Makes
Monday 9th December – Jodi at Tickle & Hide
Tuesday 10th December – Adrianne at On The Windy Side
& Ms Midge
Wednesday 11th December – Alyce at Blossom Heart Quilts
Thursday 12th December – Gina at Party of Eight
Friday 13th December – Jane at Quilt Jane
Saturday 14th December – Round up of Blog Hop and link up YOUR projects at Ms Midge!
Wednesday 18th December – Winners Announced at Ms Midge!
 |
| Patterns Only - $20 Voucher |
 |
| The Oz Material Girls - $20 Voucher |
 |
| Fat Quarter Shop - $50 Voucher! |
 |
| Polka Dot Tea - Fabric Bundle! |
 |
| Intrepid Thread - $25 Voucher! |
 |
| Blossom Heart Quilts - Ornamental Quilt Pattern! |
 |
| Quiet Play - Winner’s choice of 3 Paper Piecing Patterns! |
Let the cushion madness begin!