Archive of ‘Craft’ category
THIS GIVEAWAY IS NOW CLOSED
So last week was slightly crazy. Two of my babies had birthdays and we had the removals company come over to start the process of our return to Australia. I have done a number of international and interstate moves but it still threw me for six. I often feel like I live in a toy shop that exploded. Well, it’s not really possible to move when you’re house resembles a bombsite, so I have a lot of work ahead of me. It’ll be fine, but I did take a few days to come to terms with that. Oh yeah, and the little fact of returning to work after eight years on leave! Yes, it’s been eight years! But that’s a whole different story so let’s just ignore that fact for awhile 

French Cross Stitch magazine cover
I mentioned that August is my bloggy celebration month. Two family birthdays and my blogiversary. With our time in France coming to an end I have been hitting the bookshops, so I decided to giveaway a French quilting magazine. Except after spending a good half an hour choosing between the three available I realised that the measurements are all in centimeters! So I spent another half an hour deciding whether or not my readers could cope with quilt patterns in centimeters (I know I couldn’t). In the end I selected a lovely (and very French) cross stitch magazine. Now I know that you might not be interested in cross stitch, but it is a lovely magazine and cross stitch was my first craft love.

Basket cover
As much as I hate chopping up books, you could even just use the lovely images and text for something crafty.

Wild flowers
There are some really sweet projects and the magazine provides the number of the DMC threads used, so it should be fairly straight forward to make the projects.

Drink cooler cover
My favourite project is the drink cooler cover. I love the colours but I also can’t go past French text. Oh la la!
Don’t despair if cross stitch is the last thing that you’re interested in. I have another giveaway ready to announce tomorrow. It will be the last for the month and is going to be hard to part with! In fact I’ve hidden it from my husband as he will want to keep it! If you follow me on Instagram you will have seen a sneak peek already, but for the rest of you, here is a progress shot from earlier today 

Cushion cover in progress
To be in the running to win the French Cross Stitch magazine you need to follow my blog. Just leave me a comment letting me know that you follow along. If you like you can let me know what (if anything) is your favourite French thing. Do you love baguettes, French accents, French films or French country style? Living in France I have found that the stereotypes are true but there is also so much that I didn’t know about I hope that you will appreciate this little piece of France <3
The giveaway is closes midnight AEST (google Sydney time) Saturday 31st of August. I will draw a winner using random.org and announce it on the blog and contact the winner via email on Monday 2nd September. Please leave your email address so I can contact you
Bon chance!
THIS GIVEAWAY IS NOW CLOSED
Earlier in the week I was having a love hate relationship with a wall quilt. Trying my hand at some improv piecing I found I kept over thinking it. I have found the solution!
For about a year now my one real life crafting buddy, Angelique of La Petite Chouette (formerly of No Life Without Wife), and I have been getting our craft on each week. Well, that’s the plan, but we both have kids and lives and these things often got in the way of our weekly catch up. A recent arrival to our balmy Island decided she was keen to join us, a mutual friend of mine mentioned that she would love to come along and then another lovely girlfriend mentioned that she might just pop over with her preschooler as she had a project she was working on. Et voila! We had our first crafty get together with more than just two of us. And it was so.much.fun!
How cute is that strawberry beanie? So cute you get a second pic
Even better, I found that the distraction of these talented ladies totally got me in my groove and my improv came together! Hoorah!
OK, looking at this photo it doesn’t look so exciting, but I’m happy with how it’s coming along. I really love this bit above the sun.
I do think the sun looks better in real life than this photo shows.
This is the night sky, obviously more work required here.
Here is the beginning of our very own New Caledonian mountains. I don’t know why, but I didn’t realise that New Caledonia would have really tall mountains. I was so surprised the first time I saw them. It truly is a beautiful place, although I don’t think my wall quilt does it justice, but it is nice to be paying tribute to this place.
And keeping up with Kristy over at Quiet Play I’d like to pay tribute to my Quilty Gals, although I probably need to say my crafty gals You know who you are, the ones who comment on my posts, who read my blog, who craft with me on Thursdays, who encourage me and whose work inspires me. You gals are awesome! Thanks for being part of my creative journey
 |
| Who needs stickers to create pretty Easter Eggs? |
So, after reading about my Bunny Rage you thought I’d had enough Easter craft? Never! (Although I am yet to get back to the sewing machine…) Yesterday the kids and I got busy dying hard boiled eggs. I have to tell you this was a HUGE hit! They would have eaten ten boiled eggs each if I let them.
 |
| Mr 3.5 would not let go of the eggs for a photo. Note the proud smile. |
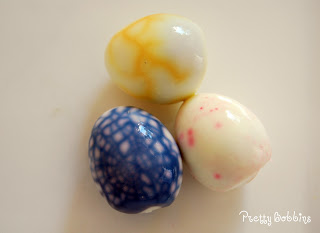
I know there are a million Easter blog posts and tutorials out there at the moment, with fantastic ideas such as dying your eggs with silk ties, including a hidden message (these are probably my favourite!), using stickers and natural dyes. Here is what we did.
1. I gently placed the raw eggs into boiling water for 12 minutes. I used a big stock pot with plenty of water so that the eggs weren’t crammed in. If you don’t want your eggs to crack I would place them in the cold water and then reduce it to a slow boil. Our eggs cracked slightly, but read on, it turned out GREAT!
2. After 12 minutes I removed the eggs from the water with tongs and placed them on an airing rack in a bowl in the fridge. We wanted to eat our eggs so kept everything cold after we boiled them.
3. Once the eggs had cooled I set up 3 bowls of cold water and mixed in food dye. The kids chose yellow, blue (I used black) and red.
4. We stuck some stickers to our eggs but due to the condensation (they’d just come out of the fridge) the stickers didn’t really work. We also grabbed some crayons and did a little drawing.
5. Within about 30 seconds Mr 3.5 dropped his first egg. I took a deep breath. We carried on. Almost all of the eggs had hairline cracks as we’d left them in rapidly boiling water.
6. We left the eggs in the water/dye mixture in the fridge for a few hours. The kids kept going back and turning them. I couldn’t keep them away; it was very exciting!
I decided that boiled eggs would be the perfect accompaniment for roast Chicken. The stickers had fallen off and we didn’t really get any of the great patterns that I’d hoped for.
 |
| The plain looking ones are actually yellow. |
But wait, we got an even better result!!
And look at the pretty shells.
These eggs were such a hit that they might become a regular snack at Chez Moi.
 |
| Of course it helps if you have pretty egg cups |
Are you getting crafty this Easter? I have some hand blown eggs drying at the moment that I’m going to get busy with when the kids are asleep. At 1.5, 3.5 and 5.5 they are not up to decorating fragile egg shells. Maybe next year…
I just endured 24 hours without an internet connection. It was less than pleasant. Mr Husband thought it was hilarious and told me I could spend my time sitting with him on the sofa. In addition to my usual activities I spent my time trying to fix the wifi router and modem. I guess I was a little productive… Look at all these hairclips I made!
I grew up in a rural area, we were on town mains, but some families used generators which were only used during the day for the washing machine, otherwise they were reserved for night use. I kept reminding myself of this and telling myself it was good for me, and an opportunity to get things done. Let’s just say that I am very glad that I am connected once again!
But back to being crafty
These alligator hairclips are SO EASY and quick to make! I made 3 and then I made LOTS!
 |
| Snap, snap! |
What do you think about having a button on them? I’m not convinced…
 |
| Are you sick of seeing this fabric yet? I LOVE it! |
I also decided to do the snap style hairclips a little differently. Now they are secured with beading wire, glue and a little felt back.
Little Miss and I are happily testing out their durability at the moment
Do you think that a pair of clips with a directional print should look like this
or this?
I think a pair should be like the second photo, but my Little Miss has only just enough hair to start using clips so it’s all new to me!
Mr 3 and Mr 5 are desperate to learn to sew. Mr 3 has tried by himself a few times which is actually rather scary. Luckily he hasn’t hurt himself or anyone else (or damaged any of my projects) yet!
Anyway, seeing as I have been getting crafty for Christmas I decided it was time to have our very first sewing lesson. Let’s use the term sewing loosely shall we
 |
| Early on I helped Mr 3 to hold the needle, but he soon got the hang of it. |
Armed with a bowl of cut out felt pieces and beads, a large darning needle and beading thread, Mr 3 and Mr 5 got to work making some hanging Christmas decorations. It was so much fun and they were really proud of themselves! I was super proud 
I tied a heavy bead to the end of the thread. Beading thread was perfect as it is big and stiff and they were able to rethread the needles themselves without any help. They did need to be repeatedly reminded to hold the needle and thread at the eye of the needle so they wouldn’t have to keep re threading.
It was a great help having Mr Husband around, but I think I could do this again without additional adult supervision. Having said that, we did it during Little Miss’ nap time, there is no way I could have managed with a 15 month old trying to help!
 |
Please ignore the massive scratch on Mr 3′s tummy…
A close encounter with the corner of a glass table top 
|
 |
| L-R: Mr 3′s hanging decoration, Mr 5′s hanging decoration |
We then moved on to making felt Christmas trees. This was a lot harder for them and I’ll wait until next Christmas to try again. Or maybe I’ll just do it first up next time when we all have more patience and energy. I had to help them with these ones, but they pretty much did them by themselves. Sewing the trunk on was a little tricky though.
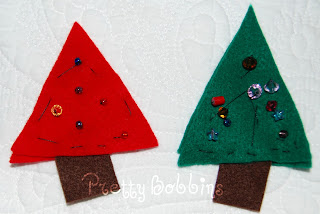 |
| Mr 3′s tree on the Left and Mr 5′s Tree on the Right. |
Do you have any Christmas craft ideas for kids? I have a few on pinterest but would love any other suggestions!
Prior to this year I wasn’t really one for Christmas craft. Well, with a 5 year old in the house the excitement is infectious and I have been busy getting crafty for Christmas
Here is the advent calendar that I have been working on. It was inspired by this one here at Pink Chalk Studio. I am rather proud of it and the kids love it which is great. It is hanging in our kitchen above the breakfast table which means that we can put a decoration on it first thing every morning leading up to Christmas.
Here is a close up of some of the decorations that hang on the advent calendar. The only double-ups are the baubles with our names on them.
I’ve also been inspired by my crafty buddy Angelique who makes these gorgeous Christmas friends. Isn’t she clever? These cuties are destined to be Christmas gifts
Here is our lovely Christmas tree! I thought you might like the palm tree in the background. Christmas in the South Pacific
The kids have a multi-coloured one in their room, but I decorated the family one.
As it turns out, craftiness runs in my family. Here are the very special Santa and Mrs Claus that my Nana made years ago. I was a teenager at the time and didn’t want any, all the Aunts and Uncles and Cousins got their own ones but I was too cool for school. Which meant that I inherited the set that Nanny made for herself. I love them and they remind me of her so much. Wasn’t she a clever crafter? Now Mr and Mrs Claus are enjoying the South Pacific
I hope you are all enjoying a crafty Christmas xx


