Archive of ‘Design’ category
In a few weeks I will be teaching the first of a few quilt classes featuring my pattern, Starry Skies, at HobbySew Beclonnen. It’s a fun quilt that is originally lap sized but can easily be enlarged. Read on for details and quilt candy <3
April was such a whirlwind of activity that I haven’t had a chance to blog about all the quilts I finished! Today I’d like to share Starry Skies (#2) with you (and subtly mention an upcoming class that I’m teaching  ). I also want to apologise that I didn’t post I Quilt last week, I spent Thursday night in ER with my son (he is OK, just a little glue holding his scalp together!)

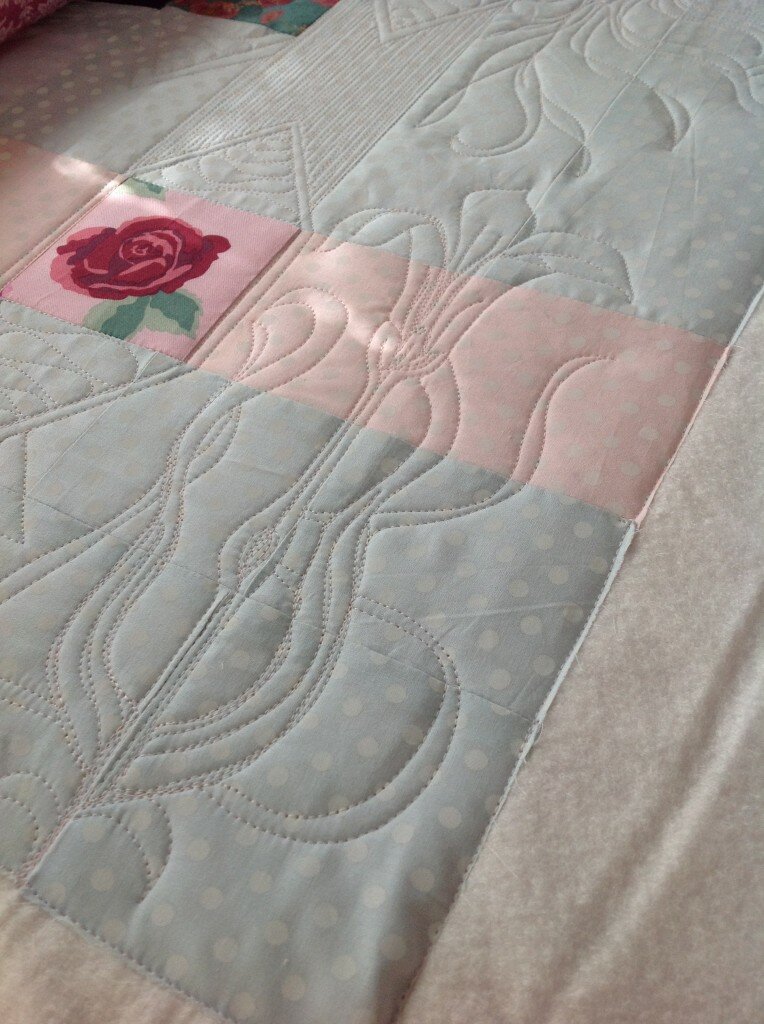
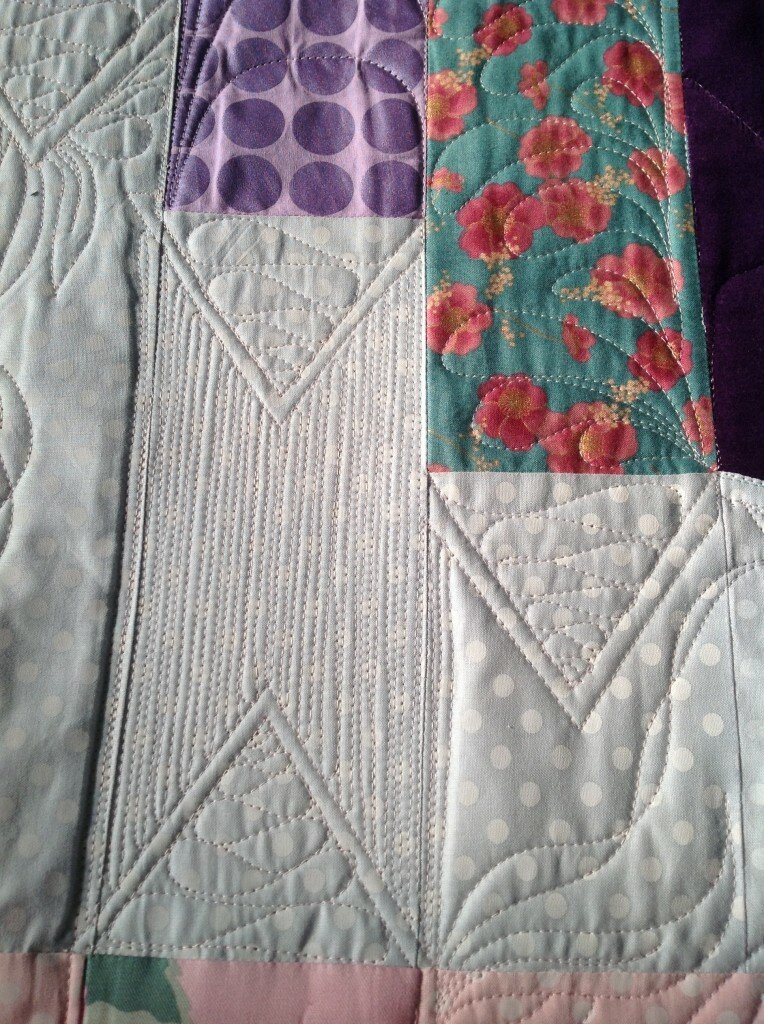
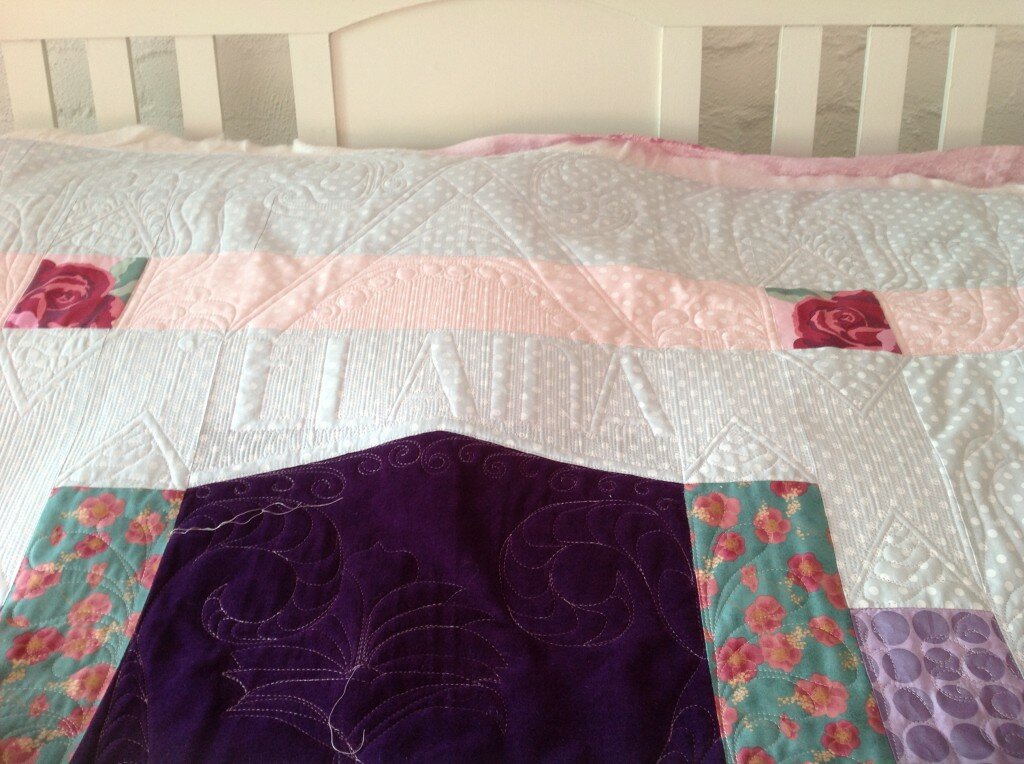
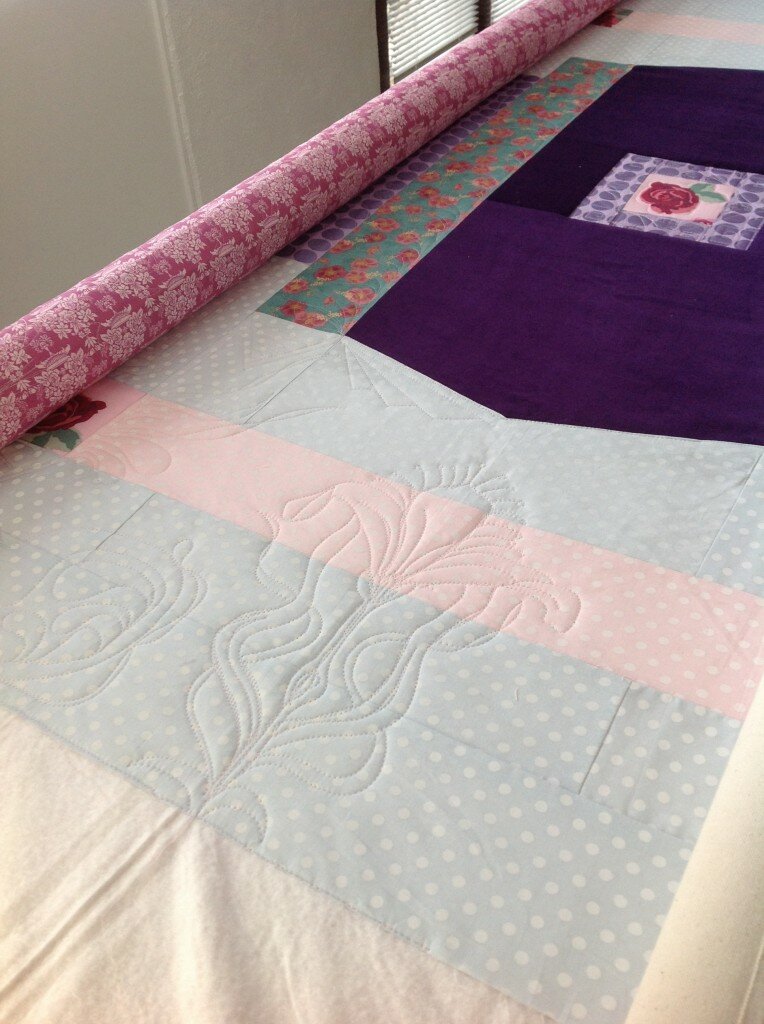
I first made this quilt a year or so ago in a very different palette for a Kate Spain blog hop. I love the pink with the grey, but this time I wanted higher contrast.

Starry Skies #1
This quilt is great for imaginative quilting! You can really go anywhere. FIrst time around I mixed in some hand quilting and kind of did a shooting stars theme. This time I went for movement again, but more swirls and bubbles. It’s also a great one for using up scraps and gaining confidence with improv techniques. I’m going to talk a lot about colour play in the class as I feel this is an area where we can all always learn more 

The texture is really quite fabulous (if I do say so myself…)

As pretty as this quilt looks in our house it is on display at HobbySew Belconnen tempting quilters to sign up to a one day workshop with me on the 24th of May. I’d love you to come along and spend the day piecing with me! You can call the lovely ladies at HobbySew on and book in It’s $60 for the day and you get cutting instructions to take home and get busy in advance of the class so we get the most out of the day.

If you’d like to find out about other upcoming classes you can see them here.
Welcome to I Quilt at Pretty Bobbins! The last week has been a flurry of activity in the studio as I finished off a heap of quilts and have been getting ready to submit them to a quilt show Entry is due by tomorrow, but if you’re interested you can check it out here.

First up I finished binding “Dream in Colour”. You may remember it from way back last year… On second thought I may not have shared it before… It is pieced using scraps from a beautiful plus quilt (still haven’t finished that one…) and is meant to hang in my studio to remind me to take my vivid, colourful dreams and make them real and tangible.

Made with scraps and quilted with dense, wonky, SLQ
Then I bound my improv, self-reflective, arty-farty piece. I wrote about this quilt a few weeks back, it breaks all of the “rules” and I will be interested to hear feedback from the judges and people who visit the show.

Not the best photo I’m afraid..
I’m also entering the quilt that doesn’t have a name that I recently had in a local show. It mixes hand quilting, longarm quilting, improv piecing, needle-turn applique and goodness knows what else!

I’ve filled out entry forms for a couple of minis but then I remembered the Blessings Quilt and my lovely friend agreed that she was happy for me to enter it.

All in all I’ve entered seven quilts and I’ll be stitching on a heap of hanging sleeves if they’re all accepted! Which is a nice segway to my topic of this week; hanging sleeves. Do you have a favorite hanging sleeve method or tutorial? I used the directions from the Canberra Quilter’s recently, but I know many shows provide specific dimensions. If I am making a small wall quilt for my house, I generally just do a pocket in each corner and hang it with a piece of dowel. This method has the added bonus of avoiding handstitching
Next time I attach a hanging sleeve I am going to go with a D shape, similar to this tutorial by Tallgrass Prairie Studio.
I haven’t featured a quilter this week as I haven’t had the time to seek permission and my Dad arrived today and I really need to get out of the studio and spend some time with him Please add your link below and don’t forget to add the linky button or a link to my blog in your post or side bar. To those of you celebrating, have a lovely Easter and to those of you who aren’t, have a great weekend xx
An InLinkz Link-up
Welcome to Pretty Bobbins! Today is my day in Jennifer Sampou’s blog hop for her new line Shimmer. I am super excited to be involved and I have a lovely fabric giveaway for you <3

I was so excited when Jennifer first contacted me to be part of the Shimmer party, and had a lot of trouble deciding which prints to use, they’re all gorgeous! The sparkle of these prints is just fantastic and I really love the wavy line prints, very dynamic and ones I know that I’ll be using again and again.

We’re heading into winter here in Australia and I couldn’t resist making a sparkly, modern lap quilt to snuggle up under and reminisce about summer time. We have beautiful, clear skies in Autumn here in Canberra and photographing this quilt by the lake was a lot of fun. I love how the piecing looks like part of the skyline, totally coincidental but I’ll happily claim good design

I was inspired by Jennifer’s cushions (check out her lookbook!!) and backed it in a super soft, cream minky and it’s super soft and cuddly.

I really wanted to come up with a design that was modern and featured Jennifer’s gorgeous prints. The improv curves with set in contrasting blocks nicely highlight how well this line plays together. I must say, as a longarm quilter some metallic prints are very troublesome to work with, Jennifer’s line quilted BEAUTIFULLY without a tension issue anywhere in sight! If you want metallic highlights and lots of shimmer AND you love to quilt, then Shimmer is a must! As always I used my favourite thread, Aurifil 50wt in 2000, 2600 and 5004.

This lap quilt measures 38″ x 62″ and was made for cuddling <3

I still haven’t decided which way is up and which was is down (is it stormy seas or dark skies over snow?) but I love the subtle prints and tones.

I had a heap of fun finding all the background shimmer that I could. I can’t lie, this quilt was fun from beginning to end

So now that you’re dying to get your hands on some Shimmer I can happily tell you that there is lots on offer! It will be hitting stores soon, but in the meantime you can win some right here at Pretty Bobbins and at each of the other stops on the blog hop (schedule below)!!

All you have to do is leave me a comment on this post before 18 April (I’m sticking to a US timezone for this giveaway) and a charm pack of Shimmer could be heading your way! I will use a random number generator to pick a winner, but if you like you can let me know what your favourite charm square project is

Bon chance!
And if a charm pack isn’t enough Shimmer for you, you can head over to Jennifer’s blog for a chance to win a fat quarter bundle of the entire Shimmer line!! To enter the giveaway, new readers should sign up on Jennifer’s mailing list and comment on her blog before the end of the hop. Be sure to comment about your favorite projects and why. Existing followers are automatically eligible to win.

BLOG HOP Schedule:
April 1-21.
April 1- Robert Kaufman/Jennifer Sampou- announce blog
April 2- Janice Ryan- Better off Thread
April 3- Alissa Haight Carlton- Handmade by Alissa
April 4- Julie Herman- JayBird Quilts
April 5- Natalie Barnes- Beyond the Reef
April 6- Stash Books- C&T Publishing
April 7- Amanda Jean Nyberg- Crazy Mom Quilts
April 8- Lee Heinrich- Freshly Pieced
April 9- Cheryl Arkinson- Naptime Quilter
April 10-Christina Cameli- A Few Scraps
April 11-Elizabeth Hartman- Oh Fransson
April 12-Faith Jones-Fresh Lemon Quilts
April 14- Katie Blakesley- Swim Bike Quilt
April 15-Amy Smart-Diary of a Quilter
April 16- Laura Nownes, Jennifer Rounds, Pati Fried, Darra Williamson- See How We Sew
April 17-Holly DeGroot- Bijou Lovely
April 18-Jennifer Sampou-Wrap Up
April 21-Jennifer Sampou- Announce Winner of Giveaway FQ Pack of entire ShimmerCollection.
If you need some more Shimmer in your life you can check out Shimmer on the Robert Kaufman Website

And if all of that isn’t enough, The Cotton Patch (CA, USA) is taking pre-orders of Shimmer.
I’m late, I’m late, for a very important date! No time to say hello, goodbye, I’m late, I’m late, I’m late!! I’ve loved those lines from Alyce in Wonderland ever since I first read it as a child. I’m very sorry that I’m late with I Quilt linky this week, I’ve been super busy quilting, but I do hope you link up your quilty process
Over the past week I have finished a couple of quilts

Starry Skies class sample. I love this version more than the original!!
quilted a few others

Carpentar’s Star quilt by Tracy
taught machine binding at Canberra Quilters Modern Interest Group and handed over a a number of class samples (come join me if you’re local!).

Sorry for the terrible iPhone photo, totally out of focus but exciting to see my work hanging in store at Hobbysew Belconnen
I have been pondering my business, how to manage competing deadlines (every second enquiry I get is from someone who needs their quilt quilted yesterday), how to best get my name out there, how to ensure that I continue to get to do fun stuff and enjoy this quilty gig and when to say no. This whole quilty thing is a continual learning process. I feel like I’m good at what I do but there is still so much to learn and achieve!

Improv LV cushion secret Birthday swap gift for Ms Midge
I also had two quilts on display for the first time at a local show which was super exciting. I was lucky enough to get to help hang many of the quilts in the show and learnt so much from that experience. Plus it was a heap of fun!

Me with my quilt hanging in the Queanbeyan Quilter’s Biennial Show
So that’s why I’m a little late with the linky party
 Used with permission from http://www.schnigschnag-quiltsandmore.blogspot.com/caption
I did ask the lovely Nadel and Falzbein if I could feature a few of her photos but didn’t hear back. Even without photos of her amazing work I strongly encourage you to pop over to her blog and check out her work. Her yellow and white chevron quilt last week just made my day! It’s beautiful!!! It looks like she is moving her blog, so head over and visit her new site here She has a google translate button on the right hand side, but the quilty candy is delightful even without the words
 Used with permission from http://www.schnigschnag-quiltsandmore.blogspot.com/caption
So that’s it folks! Please link up your quilty process xx
An InLinkz Link-up
Welcome to I Quilt, a weekly linky party all about quilting, here at Pretty Bobbins. I have to say, I am still in shock by all the amazing linkers last week! Thirtynine fabulous quilters linked up and yes, once again I am still getting through all the blog posts… I hope y’all visiting a few other linkers too, there’s nothing like quilty comment love <3 Don’t forget to add a link to my blog or the linky button to your post or sidebar

Image used with permission by katyquilts
This week I’m featuring the very talented Katy of KatyQuilts. Katy shared a practice piece that she was working on. Katy, I love you for sharing this! All too often we see the polished, perfect, errorless final product. But this linky is about process and we all experience tension issues, design imperfections and quilters block at some point! Thanks so much for sharing Katy! I think your feathers are beautiful, but if they’re your practice piece then I can’t wait to see where you end up! Oh! I’ve just checked out Katy’s post this week, make sure you pop over! Great stuff!

Image used with permission from katyquilts
Katy’s post got me thinking about how it’s important to look at the entire quilt, not just elements of the quilting design in isolation.
This week I’ve been working on my very first customer quilt and I’ve been super critical of myself and spent ages working out the design. As always I just jumped in and I didn’t mark anything other than the points. I did use my straight ruler and whilst I still need a lot of practice, I’m happy with where I’m at.
My customer asked me to incorporate the art deco style arum lily so I went to town creating art deco designs for the whole quilt. I also incorporated the recipient’s name and I LOVE how it turned out (I did mark the letters first)!
Quilting the lillies was kind of death by nerves. I started with the bottom two leaves, then the stem, then the petals, back down to the bottom and then the curly bits up the sides. I honestly was not a fan but once I’d finished the first lilly and stood back and looked at it in context, rather than isolation, I actually loved it and am really proud of my efforts.
I’ve said before, and I will continue to say, please don’t worry about achieving perfect quilting. If you aim for perfect, every little error will erode your confidence and you won’t be able to appreciate the big picture. Whenever I quilt I work on an area or specific aspect of the design and then I stand back, re-evaluate the quilt and only then do I come up with the design for the next stage of quilting. I try not to worry about the little errors, rather, I focus on the whole design, how the next stage of quilting will improve on what I just did.
I love to quilt and I firmly believe it should be a fun, enjoyable experience. Sure, quilting my first customer quilt was terrifying, but once I forgot the nerves I had a great time!
So here’s to imperfect quilting, to having fun and to not worrying about every single mistake!
Happy quilting
P.S. I have to apologise about image quality and tardiness of this post. My laptop is officially dead and I’m working on my husband’s itty bitty 10″ laptop.
Welcome to I Quilt linky party at Pretty Bobbins, it’s Thursday (in Nouméa) and time to link up your quilting process. Please link up, visit a few other linkers and grab my button (code at top right or down the bottom if you’re on a mobile device) and link back in your post. Let’s spread the quilty love <3 We had some seriously impressive linkers last week and as I was visiting all of the blogs I started thinking about quilting with confidence as quite a few people mentioned this. Last week a Facebook friend shared a quote that said something like, “don’t compare your middle to someone else’s high point”. It really struck a cord with me (as did the response that we should never compare our middles ).
The online quilting community is great, blogs are great, craftsy and flickr and instagram are great. But every now and then I catch myself comparing my work rather than being inspired. Don’t get me wrong, 95% of the time I am surfing the web I am being inspired but there is a small part of me that every now and then thinks, “I’m not that good.” rather than “I look forward to being that good” or “I’m going to try that”. Of course there are better quilters than me, there always will be! And that’s great, it gives me something to aspire to. But my point is, compare yourself to yourself. To how far you’ve come, to what you achieved during your quilting time today, to the skills that come easily now compared to that first lesson when EVERYTHING was a challenge. (I remember being totally perplexed by how to use a rotary cutter and ruler and cutting all my blocks .5″ wrong!). I used to sometimes feel like blogland was too happy and no one ever said anything real or negative. But I have come to understand that the encouragement that we give each other is far more important than saying, “it would have looked better if you….” or “those really aren’t my colours…” I read every comment I get and whilst I can’t always respond, those comments all build my confidence and that makes me a braver and better quilter. Share the love people!

Photo used with permission from Marelize @ Stitch by Stitch
This week I am featuring the lovely Marelize from Stitch by Stitch. I think I originally “met” Marelize on Instagram and I just LOVE LOVE LOVE seeing her work. She also quilts on a Bernina and is super amazing at free motion quilting. Seriously, check her out if you love quilting candy! Last week she linked up the most BEAUTIFUL quilt in progress and was talking about how it just wasn’t how she imagined. Marelize, the rest of us can see how stunning that quilt is, your work is divine! The back really shows the detail. AMAZING!

Photo used with permission by Marelize @ Stitch by Stitch
I’m actually in the same head space as Marelize at the moment. I love the quilting I did on my “Dream” mini (below) but it isn’t quite there, it’s not how I imagined it would be. I need to add a bit and I think by attaching the binding next I will be inspired to stitch on those words like I envisaged and decide whether or not to outline the word “dream” or leave it subtle.

As often is the case, the back is the show stealer here…

My other current quandry is the table runner I am making as a thank you/farewell gift for Mr 7′s teacher. (Thank you for all the useful suggestions and kind thoughts yesterday. Apparently he was improved this morning but lost focus this afternoon. That in itself is a HUGE improvement. Funny that my son is stubborn… ) After so much dense SLQ on the Dream mini I just couldn’t do it again even though it was my first thought for the table runner (this girl needs curves!).

Triangle table runner in progress
I LOVED this baby during the piecing and felt oh so clever how I’d used all teal and placed it from dark to light with the bold pink thrown in. I actually really thought this one needed some harsh geometric quilting but I didn’t want to quilt over the triangles. I pondered it for a day and then decided to just jump in.

Stuck in a rut!
I kind of got stuck on the same pattern. Does that ever happen to you? Completely not loving it I gave up the idea of something I would love and decided to throw in some half swirls spewing out into pebbles. I like it a lot more now, but it looks really beachy to me and that wasn’t at all what I was going for…. Ah! I need to think less and have more confidence in giving hand made gifts!! Do you give handmade gifts confidently? It’s that real conundrum, do you give handmade and put in lots of effort and then maybe it ends up at goodwill or in the rubbish… Or is it only me that is lacking in confidence on the handmade gift front? Spill the beans people!

Adding swirls and pebbles for interest
Now it’s your turn. I’d love you to link up below. Please remember that this is a quilting process linky. We all want to hear about your process, we want to learn and be inspired and share your quilty journey <3 Please remember to visit a few other linkers and add my button to your post or sidebar. Happy quilting!!
As the title suggests, I’m just hanging in there. I’ll spare you the grim details of post-packing fallout, suffice to say that Mr 7′s teacher pulled me aside today and told me that he is going to fail his final evaluations because he has mentally shutdown following the packing up of our house. If anyone has any suggestions on motivating, building confidence and managing change when it comes to children… I’m all ears! In the absence of good parenting I have promised Mr 7 the Nintendo DS (game thingy) that he desperately wants if he works hard like he did before last Monday. I have been saying all year that it is too expensive and not possible but I hope the lure of the DS is enough to get him working again. I have informed his teacher of this incentive and asked that she remind him if possible when he is head down refusing to work. Terrible parenting but I’m desperate. It is heartbreaking to watch your child shutdown and risk repeating a year of school because they are not coping with the thought of leaving their friends and the only home they remember. Sorry, I meant to spare you the details…

‘Dream’ mini in progress – made with scraps from Rainbow Plus quilt top. Aprox 15″ x 30″
Usually I keep my works in progress to a minimum. At the moment I’m suffering a lack of clarity when it comes to quilting designs but I’m pushing on and then procrastinating when I feel that the design I’ve gone with is not right. I was thinking the word “dream” in the above mini was too obvious but when I shared it on IG the clever peeps there suggested outlining it in black. I’m still procrastinating…

I use my ‘tri recs’ ruler when piecing triangles :)
I’ve started a table runner for Mr 7′s teacher as a thank you/farewell gift. I loved it during the piecing stage. I’m worried I messed it up whilst quilting. I’ve probably quilted a 1/4 of it but didn’t grab a photo before the light went (and can’t find the charger for my DSLR, sorry for the ipad pics!) so here it is pieced.

Aprox 15″ by 60″
The other main piece I am working on is a custom order, a Butterfly quilt based on a cot sized one I made a few weeks back. My wadding arrived today so I hope to baste it tonight (although crying into my wine is more tempting!).

Butterfly quilt in progress aprox 2m x 1.9m
I’m using fusible adhesive and raw edged appliqué and I love all the pink on the grey. Quilts like this make having a large stash a lot of fun. My customer had a great time going through all of the pinks and putting together her picks
I’m linking up to Work in Progress Wednesday at Freshly Pieced. I’d love you to pop back tomorrow and link up to my Quilting Process linky <3

It’s about three weeks until I pack up my house and I currently have about five in progress WIPs (let’s not count the ones that are being ignored). So what’s the best thing to do? Start another!
I finished sewing together my Primary Plus quilt top (above) and I LOVE it (I haven’t had a chance to properly photograph the finished top yet)! I’ve just paid for my long arm and this baby will be packed away ready to quilt on the long arm early next year. I ended up with a pretty pile of scraps and seeing as I require a reward for cleaning I decided to play with them this afternoon.

I was originally thinking a cushion cover to match the plus quilt but I just had a light bulb moment and have an idea for a mini One can never have too many minis, right?

I have two piles of fabric sitting here patiently awaiting my attention. First up is a twin sized butterfly quilt for my son’s love (they are both five and I have finally convinced him that they can be in love without having to kiss! This Momma isn’t ready for that!!). This pile of pink will become a flutter of butterflies on grey <3

Second up is a gender neutral baby quilt and I have all sorts of fun modern ideas floating around in my head. This one is for my son’s (same son) teacher as a farewell/baby gift at the end of the year. We’re moving away, she’s pregnant, I quilt. You get the idea

And with that I must get back to the roast chicken. We have a dinner guest tonight and it would appear that I need to vacate the sewing/dining room so that we can entertain
I’m linking up to WIP Wednesday at Freshly Pieced! I’d love you to pop back tomorrow for my I Quilt linky party <3
Hello! Welcome to I Quilt, a weekly linky party all about the process of quilting. Big love to all you amazing quilters who linked up last week! I was so overwhelmed by the response, even my husband was super excited (I think he secretly thought my goal of 3 linkers was ambitious) LOL 16 clever quilters linked up and I’m ever so grateful! I hope you managed to visit a few other blogs. I was super impressed with Rita’s post and would love to give her a shout out :) She shared the quilting of her third quilt (a king sized quilt at that!) and all the things she learned. Seriously, this lady has awesome skills for a new quilter! Rita I’m keen to watch your quilting journey, it looks like you’re having a ball Thanks so much for sharing and I do agree, I find free motion quilting easier than straight line quilting
I was planning to share my current quilting project, a Christmas table runner, but instead I’ve decided to talk about some Artist Trading Cards (ATCs) that I made back in July and have had to keep secret. These ATCs are all about free motion quilting so spot on for our linky party

A sneak peek of next week’s project that I’ll be talking about :)
Earlier in the year I suggested to the Wombat Stew Bee girls that we do a ‘Christmas in July’ swap of ATCs. I had seen some online and I immediately fell in love with the idea of being able to make something super creative for no purpose other than to be creative. We had very loose guidelines and a few of the girls struggled with having no guidelines other than a rough size limitation. I take full blame there, I thought that it would be easier with no guidelines, but I guess that just reflects that we all work differently

South Pacific Dreaming – set of 3
I wanted my ATCs to reflect me so I decided to use some scraps from the above super special project that in itself was all about the quilting (there’s a family portrait quilted in there! Can you see it?).

First up I pinned my pieced scraps to my quilt sandwich and secured in place with lots of organic lines, sticking within the pieced section.

One thing that you may have noticed is that when you quilt your quilt sandwich changes shape slightly. I have been known to lose up to 2″ length and width because I have quilted so densely that the fabric is slowly pulled in (a good reason to leave some wiggle room in your quilt top and back – which I generally don’t do, but should!).

I decided to quilt feathers in the space between the SLQ. I tend to choose feathers for three reasons, 1. Angela Walters says they are her default design as she loves them so much, 2. they are quite versatile and 3. I wanted to densely quilt the ATCs all over and feathers are versatile You can see above that I have squished full feathers into a small space (about 4″ x 6″ at the points of the triangles). I will say that my feathers are probably more organic than the nice rounded ones that you see around. I think of peacocks when I quilt feathers. I guess I need to practice more to get nice, rounded ends

I used Kona lagoon on the back and Essex linen blend on the front. I highly recommend quilting with a linen blend. It gives such amazing texture (it does move and fray a bit). You can see another example here of when I used a linen blend for a mounted, quilted canvas. The surface is a little rough (not enough to interfere with quilting) but it seems to just glow when the light hits it and really show off the quilting.

each ATC is approximately 2″ x 5″
My whole idea with these ATCs was to share a bit of my free motion quilting. I wanted to quilt a scene, cut it up and send each of the participants a piece of the jigsaw puzzle. I like the idea that maybe one day they might put the pieces together again. I love how bright the back is and how the thread (Aurifil 2810, 1135 and 2000 all in 50wt) plays with your eyes.

Each ATC had a section of piecing quilting. Just a taste, not a full scene.

I didn’t take a photo of the ATCs after I “finished” the edges. With all of the quilting, these babies became as solid as a regular business card and they won’t be washed or experience much wear and tear. I didn’t want to lose any of the quilting by using binding so I stitched around the edges three or four times using a really small stitch to prevent fraying. The one you see above is the prototype and the one I kept for myself. The piecing reminds me of Nouméa, the shape of the main island, the colours of the lagoon and the sun.
I received my ATCs today and they’re amazing (and quite a few feature free-motion quilting!). Although this post is about my quilting process I know you’re dying to see what I received

Clockwise from top right: Jane, Gina, Alyce, Lara, Fiona, me, Midge.
Centre L-R: Marieka, Kristy
And the backs

Have you been quilting this week? Or just dreaming about quilting? I’d love to see you link up, I had so much fun discovering new blogs last week! Just from my own experience I seem to get more traffic the earlier I link so I suggest you link up early if you can I’m keeping the linky open for a week and I plan to post around 4-6pm AEST (that’s Sydney time if you google) every Thursday. Next week I’m going to air my dirty laundry and show you some lessons I’ve learnt about showing your thread when you’re quilting – the good and the bad
Now it’s your turn! You don’t have to write an long post or share a finished project, just share some of your process so we can all learn together I will keep the linky open for a few days and it will run weekly. I really hope that you’ll join me <3 Make sure to visit two (or more) other bloggers and add the linky button (html at right –>) to your post or side bar.
Ages ago I pulled two stacks of fabric both based on the primary colors, one for each of my sons for a winter quilt. My younger son is getting the cascade quilt. I knew all along that I wanted to make a plus quilt for my older son but I I felt the prints I’d pulled were a bit stark. Then I had the brilliant idea to pull in some solids and the whole thing went from hohum to passionate chopping and excitedly filling the design wall.

(mostly) kona on the left, original pull on the right
Big love to Pink Chalk for their awesome Kona Color Box stack. I bought it almost a year ago and it is PERFECT for this project!!! The only reason I had waited so long to use it is that it is so pretty that I couldn’t chop it up LOL

reds first followed by orange
I cut three (where possible) pluses of each print (each plus is made up of 1 x 3.5″x9.5″ and 2 x 3.5″x3.5). I knew exactly the layout I wanted so I just started throwing things on the design wall as fast as I could

I filled in all the colours first, spilling over each other, getting a nice blend of colour. Without the text print it was lacking but I have a thing about needlessly cutting up fabric so I filled the design wall and then worked out what sized strips I needed of the text print.

My lovely friend Jane sent me some of her clever row markers ages ago so I decided to give them a whirl. You press the seams in the direction of the arrows (although I press open) and I found them super helpful for getting track of everything. I was seriously worried about messing with my original layout and having to redo it – not a window was allowed to be opened until I had the pieces off the design wall and safely pinned!

I find quilting quite exciting, but I have to say that this one was extra special to watch as it came together.

Serious love right there folks.

I haven’t sewn the rows together yet. I love the movement of them hanging there and moving every so slightly in the breeze.

I think I love this quilt in progress so much because I used a select few of my favourite prints, stuck to a defined palette, broke into my pretty solids and did the whole thing on instinct. I didn’t change a thing from my original layout and I think this quilt reflects how much I love colour but also how fun the primary colours can be all by themselves.
as
I’m linking up with Work in Progress Wednesday at Freshly Pieced. I hope you’ll join me tomorrow for my iquilt linky party. Tomorrow we’re talking quilting process and I have a few fun ideas gurgling around in my brain to share with you
