Archive of ‘Straight-Line Quilting’ category
I’m late, I’m late, for a very important date! No time to say hello, goodbye, I’m late, I’m late, I’m late!! I’ve loved those lines from Alyce in Wonderland ever since I first read it as a child. I’m very sorry that I’m late with I Quilt linky this week, I’ve been super busy quilting, but I do hope you link up your quilty process 

Over the past week I have finished a couple of quilts

Starry Skies class sample. I love this version more than the original!!
quilted a few others

Carpentar’s Star quilt by Tracy
taught machine binding at Canberra Quilters Modern Interest Group and handed over a a number of class samples (come join me if you’re local!).

Sorry for the terrible iPhone photo, totally out of focus but exciting to see my work hanging in store at Hobbysew Belconnen
I have been pondering my business, how to manage competing deadlines (every second enquiry I get is from someone who needs their quilt quilted yesterday), how to best get my name out there, how to ensure that I continue to get to do fun stuff and enjoy this quilty gig and when to say no. This whole quilty thing is a continual learning process. I feel like I’m good at what I do but there is still so much to learn and achieve!

Improv LV cushion secret Birthday swap gift for Ms Midge
I also had two quilts on display for the first time at a local show which was super exciting. I was lucky enough to get to help hang many of the quilts in the show and learnt so much from that experience. Plus it was a heap of fun!

Me with my quilt hanging in the Queanbeyan Quilter’s Biennial Show
So that’s why I’m a little late with the linky party 
 Used with permission from http://www.schnigschnag-quiltsandmore.blogspot.com/caption
I did ask the lovely Nadel and Falzbein if I could feature a few of her photos but didn’t hear back. Even without photos of her amazing work I strongly encourage you to pop over to her blog and check out her work. Her yellow and white chevron quilt last week just made my day! It’s beautiful!!! It looks like she is moving her blog, so head over and visit her new site here She has a google translate button on the right hand side, but the quilty candy is delightful even without the words
 Used with permission from http://www.schnigschnag-quiltsandmore.blogspot.com/caption
So that’s it folks! Please link up your quilty process xx
An InLinkz Link-up
Welcome to I Quilt linky party! This week I’ve been brave and got my improv quilting on If you’re new, please feel free to join in the fun and link up your quilty process. Don’t forget to visit three other linkers and add a link to my blog or button to your sidebar or post
This week I am featuring the lovely Serena from Sew Giving. I’m not sure when I first ‘met’ Serena, but I love following her quilting and sewing adventures. She sews the cutest items for her two little girls and seriously looks like she is having fun being a crafty gal, Mummy and farmer. Her deer cushion with the 3D pinwheel has to be about the cutest thing I’ve ever seen!!

Image used with permission from Sew Giving
Last week Serena shared her first foray into free motion quilting. I love a quilty gal who shares! Such an awesome effort, the flowers in the border look perfect, I’m pretty certain that my first attempts at FMQ were nowhere near that neat!! You have to check out her post for the dancing elephants on the binding! Seriously good planning to get those buddies to line up LOL

Image used with permission from Sew Giving
This week Serena has shared her experience straight line quilting on her new machine compared to her old machine. Serena, I’m guessing that the walking foot on your old machine was not up to scratch. I also find that I get the best results SLQ if I consistently start and stop on the same sides, rather than going in one direction and then back in the other. If you go back and forwards it can increase the drag and give that kind of pulled/tugged look on the quilting. Not that you need any advice now, your most recent SLQ is PERFECT!! Well done xx

Image used with permission from Sew Giving
This week I have been working up a frenzy. I have so many commitments that need to be met over the next ten days that I am really having to work super hard and yet not burn out. I’ve been stitching til midnight most nights and this morning I woke at 5am because I realised that my domain name was set to expire and despite months of warnings I still hadn’t sorted it out! I ran down to the studio and was super relieved to find that I had set it all to auto renew so I still own my blog LOL *phew* Could have done with another hour or two of sleep though…

Of course in the midst of all the deadlines I figured that I deserved a treat so I pulled out an old WIP and decided to get stuck into it. This WIP is almost a year old. It is a really introspective piece and kind of a self portrait in an abstract kind of way (too arty? LOL) I guess I had been thinking about it in the back of my mind but I was a little hesitant as it was half quilted and I of course wanted to finish it on the longarm.

This is where I got up to in May 2013 on the Bernina and where I started this week on the longarm.
Anyway, I decided to forget about the rules and I loaded it onto the longarm half quilted and pin basted. I removed the pins closes to the top edge and thread basted it in place and then did the same for the sides. I only removed the pins as I moved onto each section. I think if I had removed the pins earlier I would have ended up with an uneven mess. Funnily enough I backed this quilted with an unused IKEA sheet. Man, quilting sheets is a right pain. I’ve done it many times and I don’t recommend it. I totally killed the needle on the longarm quilting this beast, but it was certainly much easier than I’ve found machine quilting sheets on the domestic machine.

The grey essex linen blend is quilted with 50wt Aurifil on my longarm. The white with 40wt Aurifil on the domestic Bernina.
I felt like a total kick-butt rebel quilting this baby. Breakin’ the rules man and going nuts! ;) But seriously, it was fun to quilt and it was a good experiment to see not only how to take a partially quilted piece and finish it on the longarm, but to see my growth as a quilter. Pretty much all of the grey area was quilted on the longarm and a small section of the white area. I’m hoping to enter this into a few shows and I really look forward to people’s reactions. I think it’s OK to break the rules as long as you’ve mastered the techniques. I wonder how other’s will feel about me breaking the rules… I hope the quilt police are kind

I had so much fun creating texture and I really had no plan of what I was doing or where I was going. I kept kind of thinking “over fertilised”, it felt like an alien jungle with too much growth and very organic and unplanned.

I plan to bind it in the next few weeks and take proper photos, but the above picture gives you a good idea of how I have grown as a quilter in the past year. The white was done on the Bernina after I’d been free motion quilting for about a year. The grey is done after about two years quilting and three months on the longarm. I must say, I’m pretty happy with how well the longarming is going

So that’s it from me for this week. Tomorrow night I will be with the Queanbeyan Quilters for the launch of their exhibition, so if you’re local and at the event, please say hi! I hope to pop back to the exhibition again over the weekend, but it will depend on other commitments. You can find all the details here. There are two amazing raffle quilts, so pop in and buy some tickets if you can
So that’s it quilty folks. Be brave and break some quilty rules, you never know where you’ll end up and it might just be awesome! Thanks for linking up and please remember to visit three of your fellow linkers, we all love comments <3
An InLinkz Link-up
Welcome to I Quilt at Pretty Bobbins! It’s been a while since the last link-up and I hope to see you all back linking up with me on a weekly basis. Please remember that this linky party is about the quilting process. Everything from sketching your quilting designs to lessons you learnt stitching it all together. If you love quilting, this is the place to be
All dressed up in handmade and ready for work!
Ironically, as I restart the I Quilt linky party I am also returning to my ‘day job’ for the first time in eight years! This afternoon was my first day back and I was a nervous wreck on the way to the office. I actually had a great time and am really looking forward to working in an interesting area with some really nice, friendly people. Yay! I will still be taking quilts, so please pop over to my longarm quilting website if you’re interested in that
This week I thought I would talk about how I am finding quilting on my longarm This week I have been working on a quilt for my bed – the only bed in our house that doesn’t have a quilt made by me on it! I made the top (above) a few months ago and put it aside to quilt on my longarm.
One difference between a domestic and longarm quilting machine is that you don’t need to baste your quilt. I was looking forward to this as I don’t particularly love crawling around on my knees and poking myself with pins. What I didn’t realise is that the tension is so much better whilst quilting on a longarm as the frame holds everything nice and firmly (in the above photo I am “floating my quilt top”, which means that the batting and top are hanging free and the back is “loaded”/wound onto the take-up rollers). Seriously, I was pinching myself admiring the lovely texture of my SLQ (below), sure the work isn’t perfect as this was my first time using a ruler, but wow, look how smooth that quilt is!
I used a variety of fabric in this quilt top, voile, linen blend and quilter’s cottons. Whilst the voile definitely wasn’t as forgiving as the cotton if I needed to unpick… It really quilted up lovely (the teal border below is a lovely voile.)
I have to say that Angela Walters is a bit of a idol of mine. I’ve read her a number of times saying that if a customer gives her freedom to do whatever quilt design she would like, she always goes with feathers. I really wasn’t sure how to quilt the large outer borders of this quilt and I didn’t want to overpower the beautiful Anna-Maria Horner print (from her Loulouthi line). Feathers in a lovely soft Aurifil thread (2000 in 50wt) have done the job quite nicely I probably went a bit overboard, but I do love to quilt and I really did fall in love with my longarm whilst quilting this beast
Now it’s your turn! What have you been quilting this week? Have you ever swapped machines and had a different quilting experience? Do you have a fall-back design that you use to quilt busy prints? Add your link below and please remember to visit at least 3 other linkers We all love comments!
Welcome to I Quilt linky party at Pretty Bobbins, it’s Thursday (in Nouméa) and time to link up your quilting process. Please link up, visit a few other linkers and grab my button (code at top right or down the bottom if you’re on a mobile device) and link back in your post. Let’s spread the quilty love <3 We had some seriously impressive linkers last week and as I was visiting all of the blogs I started thinking about quilting with confidence as quite a few people mentioned this. Last week a Facebook friend shared a quote that said something like, “don’t compare your middle to someone else’s high point”. It really struck a cord with me (as did the response that we should never compare our middles ).
The online quilting community is great, blogs are great, craftsy and flickr and instagram are great. But every now and then I catch myself comparing my work rather than being inspired. Don’t get me wrong, 95% of the time I am surfing the web I am being inspired but there is a small part of me that every now and then thinks, “I’m not that good.” rather than “I look forward to being that good” or “I’m going to try that”. Of course there are better quilters than me, there always will be! And that’s great, it gives me something to aspire to. But my point is, compare yourself to yourself. To how far you’ve come, to what you achieved during your quilting time today, to the skills that come easily now compared to that first lesson when EVERYTHING was a challenge. (I remember being totally perplexed by how to use a rotary cutter and ruler and cutting all my blocks .5″ wrong!). I used to sometimes feel like blogland was too happy and no one ever said anything real or negative. But I have come to understand that the encouragement that we give each other is far more important than saying, “it would have looked better if you….” or “those really aren’t my colours…” I read every comment I get and whilst I can’t always respond, those comments all build my confidence and that makes me a braver and better quilter. Share the love people!

Photo used with permission from Marelize @ Stitch by Stitch
This week I am featuring the lovely Marelize from Stitch by Stitch. I think I originally “met” Marelize on Instagram and I just LOVE LOVE LOVE seeing her work. She also quilts on a Bernina and is super amazing at free motion quilting. Seriously, check her out if you love quilting candy! Last week she linked up the most BEAUTIFUL quilt in progress and was talking about how it just wasn’t how she imagined. Marelize, the rest of us can see how stunning that quilt is, your work is divine! The back really shows the detail. AMAZING!

Photo used with permission by Marelize @ Stitch by Stitch
I’m actually in the same head space as Marelize at the moment. I love the quilting I did on my “Dream” mini (below) but it isn’t quite there, it’s not how I imagined it would be. I need to add a bit and I think by attaching the binding next I will be inspired to stitch on those words like I envisaged and decide whether or not to outline the word “dream” or leave it subtle.

As often is the case, the back is the show stealer here…

My other current quandry is the table runner I am making as a thank you/farewell gift for Mr 7′s teacher. (Thank you for all the useful suggestions and kind thoughts yesterday. Apparently he was improved this morning but lost focus this afternoon. That in itself is a HUGE improvement. Funny that my son is stubborn… ) After so much dense SLQ on the Dream mini I just couldn’t do it again even though it was my first thought for the table runner (this girl needs curves!).

Triangle table runner in progress
I LOVED this baby during the piecing and felt oh so clever how I’d used all teal and placed it from dark to light with the bold pink thrown in. I actually really thought this one needed some harsh geometric quilting but I didn’t want to quilt over the triangles. I pondered it for a day and then decided to just jump in.

Stuck in a rut!
I kind of got stuck on the same pattern. Does that ever happen to you? Completely not loving it I gave up the idea of something I would love and decided to throw in some half swirls spewing out into pebbles. I like it a lot more now, but it looks really beachy to me and that wasn’t at all what I was going for…. Ah! I need to think less and have more confidence in giving hand made gifts!! Do you give handmade gifts confidently? It’s that real conundrum, do you give handmade and put in lots of effort and then maybe it ends up at goodwill or in the rubbish… Or is it only me that is lacking in confidence on the handmade gift front? Spill the beans people!

Adding swirls and pebbles for interest
Now it’s your turn. I’d love you to link up below. Please remember that this is a quilting process linky. We all want to hear about your process, we want to learn and be inspired and share your quilty journey <3 Please remember to visit a few other linkers and add my button to your post or sidebar. Happy quilting!!
Hello! Welcome to I Quilt, a weekly linky party all about the process of quilting. 23 awesome crafty peeps linked up last week, yay! I’m going to give a shoutout each week to someone from the previous week Lindsey from Inspiring Creations linked up last week and shared her GORGEOUS sunnyside pinwheel quilt. Her first quilt! It’s beautiful, pop by and check it out if you haven’t yet <3 Lindsey made the great point that she considered diagonal lines but really wanted her piecing to shine so stitched in the ditch. As much as I love quilting the heck out of everything in reach, Lindsey is spot on, the piecing is really important in determining the quilting design and ditch stitching is a great way of letting the piecing tell the story I haven’t stitched in the ditch since my first quilt as I find I’m too impatient to be super accurate Well done Lindsey, your quilt is beautiful! Thanks for sharing

Speaking of letting the piecing speak to you this is my current work in progress. I have an idea for quilting but I’m not sure. This was entirely pieced using scraps most of which came from my Primary Plus Quilt but a few from my scrap stash. I’m thinking I might stick with the colours of each area or using a thread which blends in with all the scraps such as Aurifil 2000 (a golden colour). I’m trying to decide between some stark SLQ and really intense FMQ. So rather undecided really

I shared a progress pic of this mini on Instagram and a few friends commented on how tidy the back is. First up I will admit that I am pedantic when it comes to my own work. In all honesty though, I really think that a tidy back helps with quilting. I trim all loose threads, press my seams open (to reduce bulk and improve accuracy) and press the heck out of my top. I’ve never used starch and I’ve heard that spray basting is not great for free motion quilting. Do you have any things that you do to improve your quilting?
Speaking of tips and tricks, I wanted to introduce a theme for the next Thursday I would LOVE it if you could talk about thread issues. It’s very easy in blogland to select which photos you share and hide any little mistakes. This week I’m going to share some photos of my work that you may not have seen before
You may remember the Rainbow I Spy quilt I made a while ago for my eldest son. I really wanted the quilt to be truly double sided so in addition to the top you see above I pieced a rainbow back with scraps and a grey solid (Bella Steel from memory). I then decided to quilt pebbles in white thread in the white sashing and use grey thread in the bobbin. Alarm bells are ringing right about now.

Rainbow I Spy quilt back
For some reason lots (all? most? or maybe just me…) of quilters have issues when using significantly different coloured top and bottom thread. Seriously, the quilting was a right pain. I persisted but I was messing with the tension constantly (I normally rarely have to adjust tension on my Bernina 440). In the end I found some solace by dropping the top tension to zero, using a spool stand and (strangely) missing the last loop when threading my machine (so not running the thread through the little metal loop just above the needle). Pebbles probably made it worse with all of the tight turns as I didn’t have as many issues with the straight line quilting (SLQ) in the borders.

The pebbled area here is about 2″ wide to give you some perspective :)
If you look closely at the above photo you will see the threads popping through. After a wash and some wear the thread issue isn’t an issue. The quilt is loved and NO ONE is ever going to look at it as closely or as critically as I will look at my own quilts (tell me I’m not the only one who does that LOL). I did learn a good lesson from this though, now when I use different coloured threads in the bobbin and spool I make sure they are not as dramatically different as dark grey and stark white. I also quilt more smoothly now than I did at that point which I also think helps reduce thread issues.
When I made my daughter’s Princess Quilt I used a range of different threads colours from white to soft mauve and with each thread change I used a different colour in the bobbin. For example, White on top, soft pink in the bobbin. Soft pink on top, soft mauve in the bobbin. Pink on top, dark pink in the bobbin. Et voila! No thread peaking through, no tension issues, no constant stressing and fiddling. Lesson learnt

I would love to hear if you have any tips on thread. I exclusively use Aurifil thread as I believe it’s the best (and I pay for it out of my own pocket – no sponsorship or paid reviews here). It is super fine so the bobbin goes further (win!), the colours are beautiful (win!) and my machine feels smoother when I FMQ. Win, win and win

Some stash favourites including Aurifil thread and kona solids <3
Do you have a favourite thread? How do you prevent thread issues? I’d love to hear your thoughts and experience, I’ve aired my dirty laundry, maybe you can share yours too There’s no requirement to link up a post on thread issues but if you feel like it, that’s the theme for the next week. I’ll be talking about quilting designs that I find particularly easy and troublesome when it comes to thread showing through.

Blessings Quilt in progress – an all time favourite <3
Please remember to visit at least two other blogs and to please write about your quilting process. As much as we all love finished projects, this linky is about process. Your linked up post will be most helpful to everyone else if you talk about your quilting in some way, even if you’re discussing an old finished project, a current work in progress, quilting sketches, that kind of thing Please feel free to link finished projects, or any type of quilting project, just include some of your process so we can learn I also ask that you add a button to your post or sidebar. You can find the html in my left hand side bar or right down the bottom of the page if you’re on a mobile device.
Now it’s your turn to link up and talk about your quilting process I’ve been having so much fun visiting new blogs, I hope you’re enjoying the quilty party too <3
Welcome to my very first linky party! This linky is for you if you like to quilt, if you love to quilt, if you’re just dipping your toe into the (quilting) water, if you have a domestic or long arm machine and if you want to learn and share your quilting journey I want to emphasize that there is no need to share a finished project and please don’t be scared to join in if you’re a total newbie. All I ask is that you talk about your quilting process Grab a button (html is there on the right —>), add it to your post or side bar and visit two (or more) other bloggers to share the quilt love <3

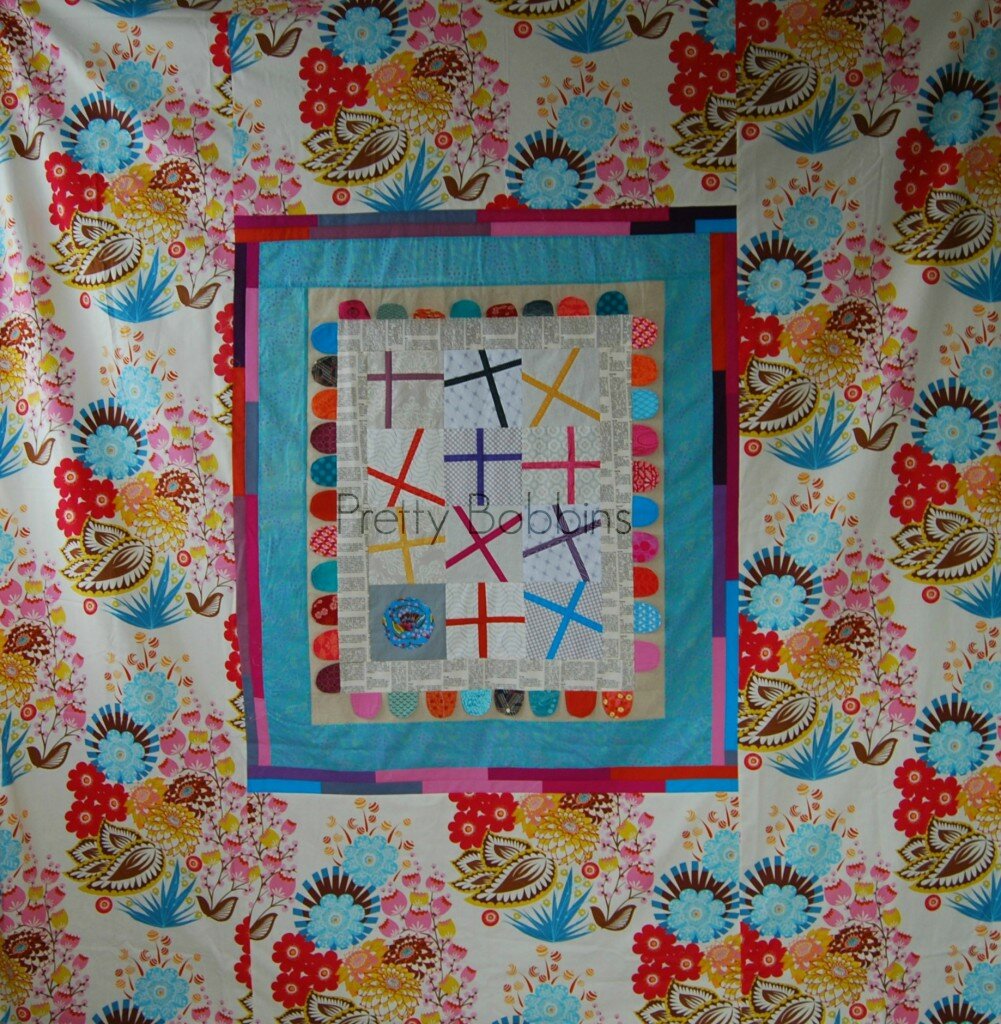
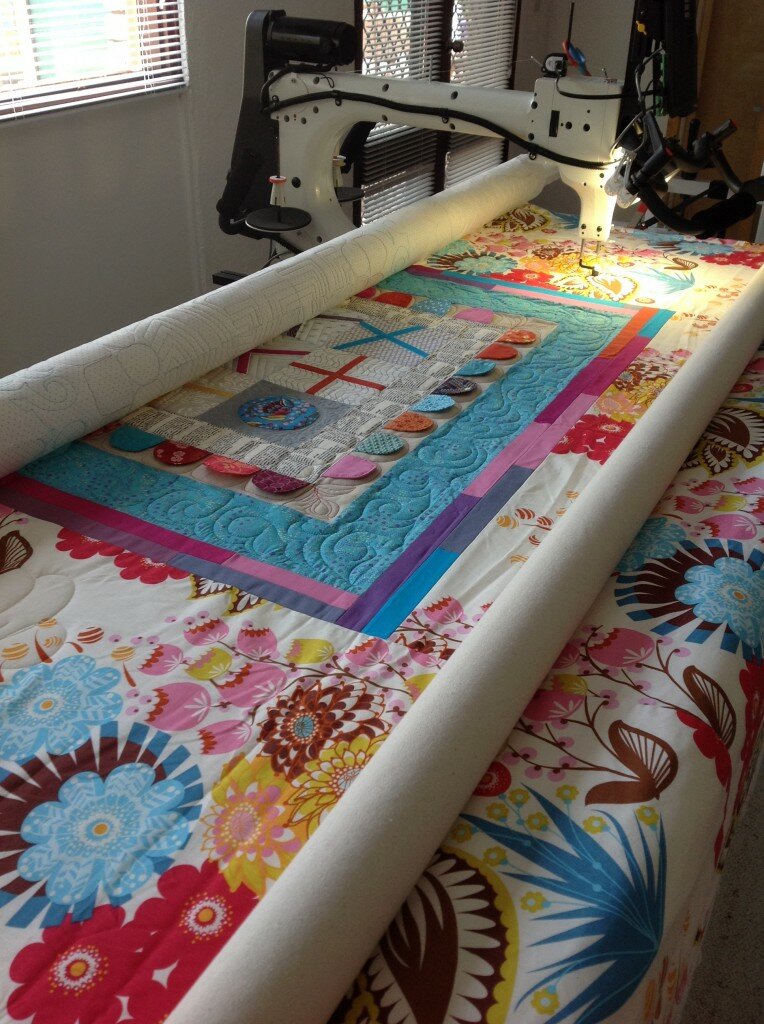
Mini Cross Quilt
My best piece of quilting advice is to not worry about whether your quilting is perfect. Sure, that’s easy to say if you’re already good at it, not so easy if you feel like the machine is running away from you and every stitch is a potential disaster. But honestly, my quilting did not really take off until I stopped trying to produce perfect quilts. Relax, enjoy the process.

mini cross quilt – basting
I started this piece with the idea of turning it into a cushion cover. It is about 18″ x 25″ and when I quilt something this size I tend to use pins rather than curved safety pins as they’re faster to remove. I always point my pins in the same direction and even spaced. This allows me to anticipate them as I’m quilting rather than coming across them in surprise and breaking a needle.

Auditioning thread – I always lay a long piece of thread over the quilt top in natural light when selecting threads.
When I started to gain some confidence and try new quilting designs I was careful to make sure that my thread blended into my quilt, I didn’t want any errors to show through. I learnt the hard way that this also means that you’re beautiful work can’t be seen. Now I enjoy using bold colours and showing off my quilting.

SLQ with free motion foot
I really love the texture that dense straight line quilting (SLQ) gives but I hate the drag you get when going back and forth using your walking foot. I either start and stop, always returning to the same end so I’m quilting in the same direction or I slap on my free motion foot and go with “organic” straight lines. I really like the organic look but you have to be willing to accept that your lines will not be straight

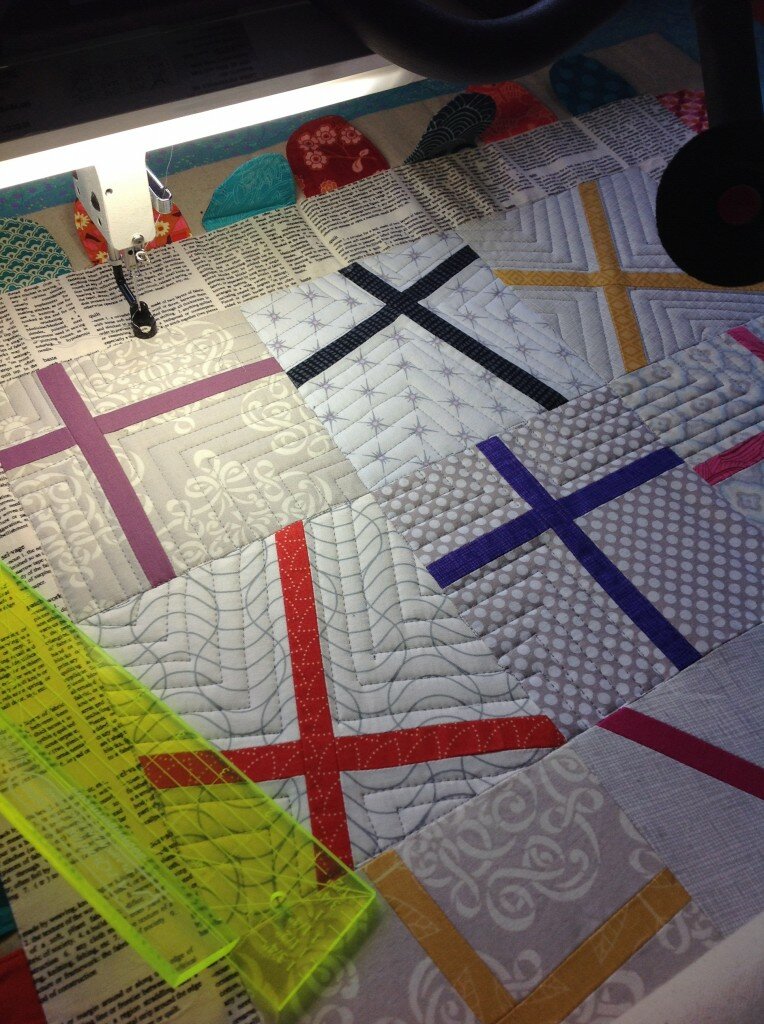
Another reason that I love dense SLQ is that you can make your piecing pop. In the above photo I’m starting to quilt in the middle so I’ve lined my needle up with a seam so that the start point will disappear into the seam. I come back and bury my threads later (you need to leave a decent tail to bury your threads).

Burying threads
In case you have no idea what “burying threads” means (which will auto correct to “burying heads on the ipad), it is when you pull both threads to one side of your quilt, tie a double knot, grab a needle and then bury your threads by inserting the needle into the hole the threads came out of. Make sure you keep the needle in the quilt sandwich for a few inches, pull it out and trim your threads. It is always a good idea to make sure that your threads haven’t traveled through to the other side of the quilt before you trim them. Ask me how I know…

Review your design as you go
I rarely sketch out my quilting design. I usually have an idea and just jump in. For this project I had the idea of the SLQ but nothing else. I am happy to work this way but I regularly step back and look at my quilting.

Too much!!
I really cannot resist colour. That doesn’t mean it always looks good! After stitching the blue and pink paisley designs I really felt this mini was too chaotic.
I added some dense grey quilting to tone down this mini and I think it worked well. The grey fabric is Kona Steel and is quite dark. The thread is Aurifil 2605 in 50wt which is a lighter grey. I really like how it softens the saturated hues.

angled light and photography helps show quilt texture
Actually showing off your quilting is a whole different skill set. Adrianne from The Windy Side gave me the terrific tip to photograph my quilting indoors with natural light coming in on an angle. I’ve taken this a step further and tend to photograph my quilt on a steep angle to really show the texture.

Detail
I tend to quilt the heck out of every quilt I always quilt right up to the edge and go back and fort so that my stitches (and piecing) remain secure as I work and later when I trim it.

quilting the negative space allows the piecing to pop
The above photo demonstrates why I love dense quilting so much. Each of those X’s are 3.5″ finished blocks so you can get the idea of how small some of those paisleys are. I did wander into the piecing once or twice, but I don’t worry about trying to be perfect

I really enjoy the meditative quality of quilting. I don’t mark my fabric so I’m constantly visualizing the space. Filling out the curls above I used the edge of the quilt as a reference point. Sure, my lines aren’t perfectly straight, but they give the affect that I was after
I’m still not sure whether I will turn this mini into a wall hanging or a cushion but I really love it. The quilting took about 3.5 hours (including basting) and was a lot of fun. I used Aurifil 50wt 2605 (grey – my go-to colour for piecing dark prints), 1100 (pink) and 2810 (teal). The grey is kona steel and the prints all come from my Pink Castle Stash Stack subscription. I used some left over wool wadding with more kona steel for the back. The piecing and quilting was all done on my Bernina 440QE, I like to use the BSR foot with the clear plastic sole so that I can see what I’m doing.
Now it’s your turn! You don’t have to write an essay (sorry, I get wordy!), just share some of your process so we can all learn together I will keep the linky open for a few days and it will run weekly. I really hope that you’ll join me <3 Make sure to visit two (or more) other bloggers and add the linky button (html at right –>) to your post or side bar.
So I had an absolutely brilliant idea recently and I’ve been dying to share it with you, I just had to ponder on it for a while (I’m a thinker!). Today I’m announcing a brand new linky party here at Pretty Bobbins. Now I am living in fear that it will be me all by myself, so please feel free to link up every Thursday (starting next week, 3rd October) so that I don’t feel like it’s me and my imaginary quilting buddies

Create Quilt
So what’s it all about??? I love quilting. I mean I really love quilting. For the last twenty years I’ve known that I wanted to go to University, learn languages, get married and have babies but I really didn’t have have any sort of passion for a career outside of being a Mummy. For about twelve months I’ve known that quilting is it for me. It took awhile to be brave enough to say it out loud (and a few times I had people look at me like I’m nuts) but if I quilt every day for the rest of my life I will die a happy and satisfied woman.
In addition to quilting I quite enjoy blogging. Admittedly I do prefer the making of quilts to the sitting at the computer editing, but I really love the sense of community there is in the online quilting/crafting world, and my blog is a big part of how I connect to that. I had been brainstorming trying to think of ways that I can give back to this community.

Celebrate Quilt
So the idea I have come up with is a weekly linky party here at Pretty Bobbins that is all about quilting. Whilst my focus will be on free motion quilting on a domestic (and later a long arm) sewing machine, I would also love to see your quilting be it free motion, hand-quilting, or straight line quilting. Do you use pantos, do you sketch your designs, do you just jump in and start stitching? Come link up and share your knowledge! All I ask is that you talk about your quilting process. For example, how you came up with the design, any challenges you had, how you overcame them, anything you would do differently next time. What weight thread worked for you, do you find one type of batting shows your quilting better than another. The idea is that by sharing your quilting experience we can all learn and improve ours We’re talking process baby!

Single my Aunt
Does that sound like fun? It sounds like fun to me! You don’t need to write an essay, just as long as your post has some focus on your quilting process. Please don’t feel your quilting has to be perfect, the whole idea is that we’re all learning

Flight of the Butterflies
I then plan to have a theme on the last Thursday of the month. For example, if the theme is feathers I would share my tips on quilting feathers and show you some examples of my feathers. You would be welcome to join in by trying out quilting feathers or even just sketching them. I want to encourage you to expand on your quilting. That might be trying free motion quilting for the first time, trying a new design or trying a new technique. I hope to learn as much from you as you do from me. I also plan to share my experience getting to know my long arm next year as well as continuing to quilt on my domestic machine. This party is for all quilters!

When a quilt is needed
I would love to hear from you. Is this something that you’re interested in? Are you excited? Do you have a quilting question that you’d like me to address? Any suggestions?

Starry Skies
I look forward to seeing you next Thursday! Feel free to grab my shiny new linky button <3 The code is over there on the top right ->
Let’s get busy quilting! See you on Thursday xx

South Pacific Dreaming
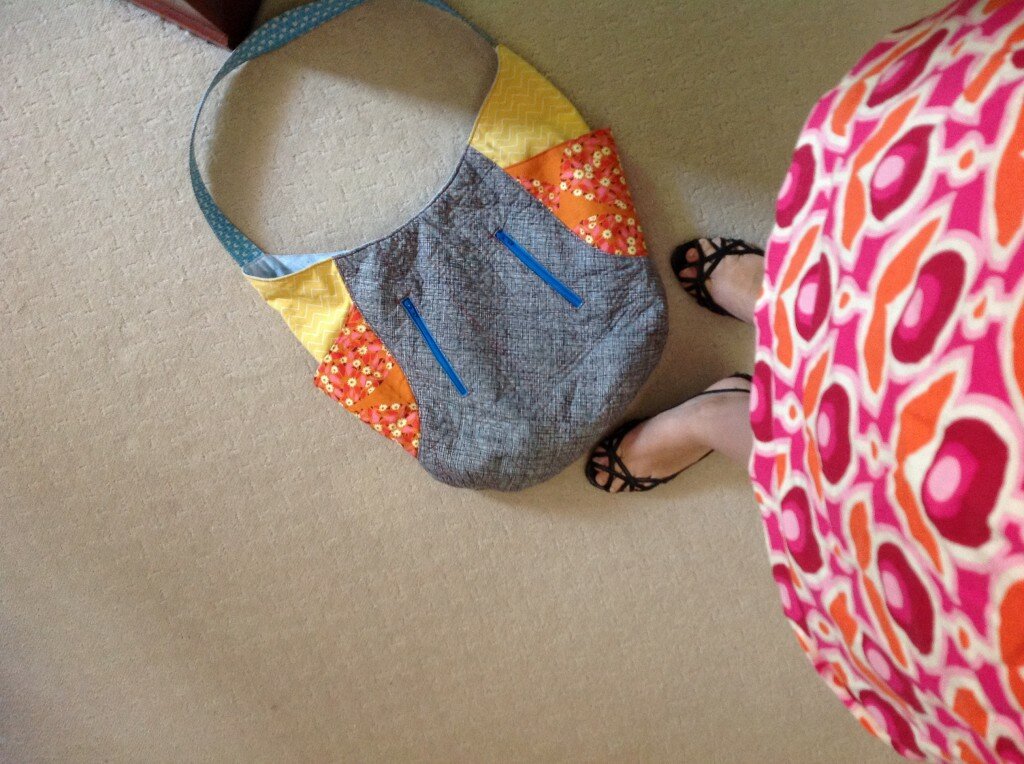
I don’t remember when I first stumbled upon the blog Noodlehead, but I pinned her 241 Tote ages ago. I love the shape and it’s a great pattern to use a number of different contrasting fabrics. I recently purchased the pattern and made myself a 241 Tote to use as a travel bag for my trip to Australia.

Quilted 241 Tote
Almost all of the reviews of the 241 Tote mentioned that it is a little on the small size so I scaled up the pattern by adding about an inch to the pattern pieces (I kept the strap at the original length). I did try to be clever and increase the print size but that was beyond me LOL My tote ended up 15″ tall (in the center) and 17″ wide.

I LOVE the blue zippers! High contrast = fun
The bag ended up the perfect size for travelling but probably a little big for an everyday tote. Mind you I tend to grab my phone, keys and wallet and not even use a bag most of the time! It would be great as a Mum bag or a diaper bag once you’re not carrying around a HUGE amount, just a lot

I love the pop of blue safety pins on the strap (my inner punk)
Being the quilter that I am I couldn’t resist the opportunity to quilt this baby Using a gorgeous rich red (Aurifil 2260 in 50wt) I quilted one main panel in wonky SLQ and the other in a feather and some pebbles. I really wanted the quilting to be free and natural rather than perfect and I’m so pleased with how it turned out. I used the same red Aurifil thread to top stitch all of the sections of the bag and I love the affect.

The 241 tote makes a great travel bag with it’s numerous pockets
I had fun using some contrasting blue zippers and matching kona lagoon whilst using some loud oranges and yellows for the side panels and pockets. In fact, all of the fabrics that I used for the exterior are favourites and I figured that this way I get to keep admiring them once I’ve used up all the rest in quilts and cushions.

pockets galore, key loop and a magnetic closure
I have a stack of interfacing but these days I much prefer to use wadding for bags to give structure. I used some scraps (100% cotton wadding) and a furnishing weight fabric for the lining. The lining isn’t the best match for the exterior but it does the job and saved me from dying of boredom whilst ironing on interfacing
I’m adding this tote to the Selfish Sewing Group on Flickr and I encourage you to pop over and consider joining in. Whilst I won’t use my 241 tote every day, it is my new go-to travel bag and I LOVE it! We should all spend a little time sewing for ourselves occasionally

Although Color Therapy wasn’t my first quilt it was the one that made me fall in love with quilting. It’s actually a pattern from the book, Scrap Republic, but a friend saw it as a work in progress and commented that I was enjoying some color therapy and he was right, hence the name.
 |
|
Color Therapy, August 2012
|
Color Therapy resided on my eldest son’s bed for a long time whilst I worked on his Rainbow I Spy quilt. It just covered the top of his single bed and he liked it but he was really happy when I finally finished his special quilt.
I was really happy to have Color Therapy returned to the sofa, we have a really ugly, stained sofa (who does cream, non-removable cushions for a young family???) and it looks a bazillion times better with a quilt on it. In fact it looks so good that I was immediately prompted to get back on the cushion bandwagon. Which is a really roundabout way of showing you my latest finish
I actually bought a plus quilt pattern a while ago and never got around to making it. I love the look of it but I just wasn’t sure about cutting each print into 5 squares. So I decided to play around with a cushion and cut one rectangle and two squares from each print. Et voila!
I love me some color and this cushion started as an excuse for me to get some more color therapy. I had just ordered a few yards of Kona Steel (long story, I thought I wanted Kona Steel, actually I wanted Bella Steel, now I have both!) which is a lovely dark grey. I SLQ with a gorgeous deep Aurifil red (2260 in 50wt) in the negative space and hand quilted just within each of the pluses with a verigated yellow (Aurifil 3920 in 12wt). I love all of the contrasts in this cushion cover. It’s so bright and fun and both my husband and I have decided that our next sofa will be a dark grey so we can enjoy this cushion
 |
| Close up of hand quilting |
Most of the prints came from my monthly Stash subscription from Pink Castle Fabrics, if you’re looking for a way to build your stash it’s a great option. I used a fun print on the back with a simple snap closure.
My other big finish this week was shared earlier in the week as part of the Kate Spain blog hop. This was actually the project that I thought I wanted Kona Steel for when in fact I needed Bella Steel (and I really need to start labeling my solids!).
 |
|
Starry Skies quilt for the Kate Spain Blog Hop
|
This quilt was a real reminder for me that I want each quilt to be the best it can be, not just finished. I’m glad I listened to that inner voice because I really do love this quilt and it was worth unpicking my first FMQing.
|
| Close up of quilting detail, Starry Skies quilt. |
Have you had a finish this week? Do you focus on the finish or the process? I’d love to hear your thoughts. I’m starting to get serious about this whole business thing and I’ve been thinking a lot about my process.
I’m linking up with TGIFF over at Blossom Heart Quilts this week and for the first time linking up with Needle and Thread Thursday at My Quilt Infatuation.


