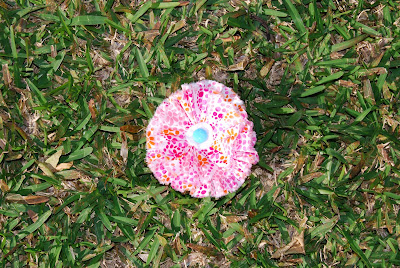
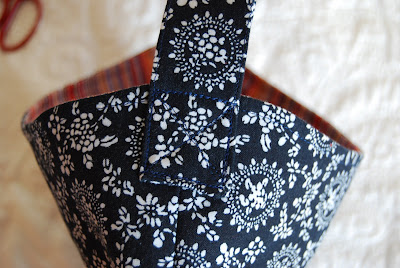
This week I made a reversible bucket hat for one of the boys’ friend’s birthdays (pluralitis!). I think it is lovely  The birthday boy has a younger sister so I made the reversible side out of a gender neutral print (it is one of my favourites) and added a detachable fabric flower.
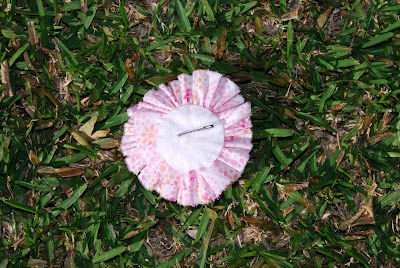
I’d tried a few fabric flower tutorials in the past and hadn’t settled on one that I loved. Until I found this one. So simple and it turned out really well! She glued hers but I don’t like the fabric glue that I have at the moment, so I stiched the whole thing.
Just to make it all tie together I made a button from the same fabric. I love making buttons! I warn you, its addictive!! I hope he likes it!
For months now I have been planning this blog, business, thing(!). I live in part of France and tossed around names that incorporated both English and French. Every thing I came up with I googled and it was taken already! Oh, the frustration! And then, from the dark recesses of my brain popped “Little Bobbin”. It’s cute, the spelling (of bobbin at least) is similar to the French word, it looks nice (hence my poorly photographed stitched title that used to be up there). I googled. I trawled IP search engines. I looked up registered business names. Nothing! I was so excited, finally a name that wasn’t already taken! Woohoo!
Oh. On Friday, google presented me with a very similar name of a business also selling hand sewn/made items. !&^(*&$#
What am I meant to do? I’m a nice person. I play nice. I love following other crafty blogs. I LURVE Little Bobbin as my business name. I’d even started a Pintrest account in this name and a Facebook business page as well as almost completed some business cards and designed labels. *(&*&^@#!$%#
What to I do??? I know that I’m not the first person to face this issue. There are HEAPS of similarly named blogs, businesses, groups and organisations out there. So I put on my thinking cap. Names, Names, Names…. Maybe I can change my name to Little Bobbin Sews or Sew Little Bobbin! or Petit Bobbin or Cute Little Bobbin. As Cute As A Bobbin. Sew Bobbin Cute. Cute Bobbin Sews. Sew It Bobbin Sew! Sweet Bobbin. Jolie Bobbin. Jolie Petit Bobbin. If I use a French word do I have to change Bobbin to the French Bobine?? You get my drift?
Coming up with a name that you like, a name that you think is good, suitable, appealing, works in two languages, fits with your product and isn’t already taken.
Heck!
So I slept on it. Guess what? We have a new name now.
I don’t want to start out knowing that someone has almost exactly the same name. I want to play nicely. So, I would like to introduce “Pretty Bobbins” to you. Not much has changed, just the name. I hope that you like it!
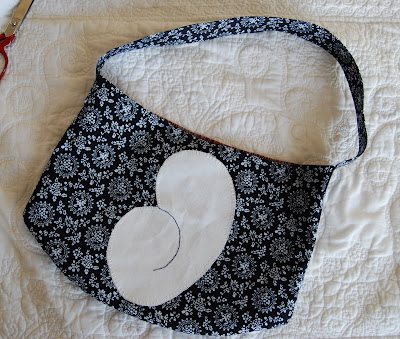
I’m so proud of this bag and I think I might have to make one for myself
I made this bag for my lovely sister-in-law’s birthday. She had a little boy last year and this year has started to train as a counselor for the Australian Breastfeeding Association. I’m really proud of her and I wanted to make a gift for her as a “grown-up” but which also celebrated this new stage of her life.
I designed the Mother-Baby silhouette myself but I’m sure I’ve seen similar ones out there. I wanted to keep it simple, recognisable but not too overt so that she feels comfortable using it anywhere.
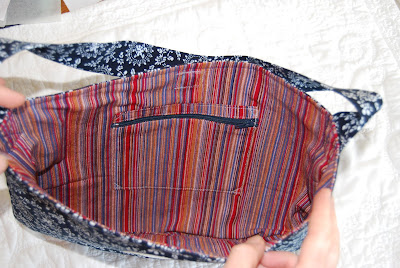
Both the lining and external fabrics are ones that I bought in China a few years ago. I used a stiff interfacing which worked well, I would have used a fusible wadding but didn’t have any.
I also put a zippered pocket in it and a magnetic closure.
I was going to sew the strap between the lining and exterior fabrics, but in the end I wasn’t all that focused and kind of forgot… So I just added it to the exterior, I think it looks quite good actually.
This bag was quite easy to make so I might revisit it and put together my first tutorial. Let me know if you’d like me to
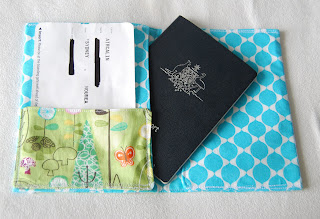
I love to travel and there is nothing like travelling in style. This can be hard to do when you have three children under 5 in tow…
But at least with these funky passport covers we can at least look the part when the kids aren’t screaming.
I’ve settled on two styles so far, but have drafted designs for another style that folds out and can fit in 3-6 passports. I’ve given a couple of these away to friends to try out for me and they were happy I’ve sold one so far, but am hoping I might be able to sell a few more. Let me know if you’re interested!
So, I think I mentioned that I want to turn my sewing into a business. I do have a day job (well, having kiddies has kept me out of the office recently, but I do have a career on hold) but I desperately want to turn my passion into a source of income. I can spend all day sewing and it feels like ten minutes have passed. Funnily enough the days in the office don’t pass that quickly…
Anyway, here in Noumea the cheque is a used as a form of payment every day. You can buy a can of soft drink and pay with a personal cheque. It is extremely convienient when you go to a cafe or restaurant with friends, everyone can pay their share without having to search for change. My cheque book languished in the bottom of my handbag for far too long getting ratty and scuffed. Then I thought, I need a cheque book cover. A really funky cheque book cover! Then I thought that just maybe people might pay me to make them… Then I sold my first one! Hooray!
I’ve only sold one so far, but it felt good and I hope that I might be onto something here… Let me know if you’re interested
What do you do the night before you go on a family holiday? Sew of course! That could be part of the reason that we left 6.5 hours later than planned… We had a great holiday and you can read all about it here if you’re interested.
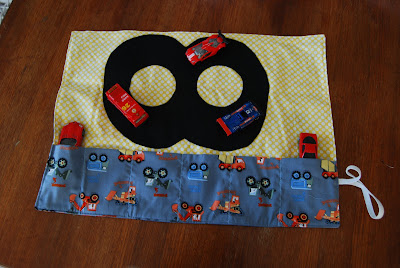
A few months ago I found some car fabric in an off-cut bin at a fabric shop. I had no idea what I was going to use it for, but having two boys I decided something would come up. Then a good friend was moving away so I whipped up a car roll for her 4 year old son. It was a hit! My boys immediately started asking that I make one for them, but I wanted some longer pieces of felt for the road (the photo above is the original car roll with the shorter track made from an A4 sized piece of felt. I used a number 8 from our rubber play mat as a template for the racetrack. The more recent car rolls below were cut from a larger piece of felt and I drew the racing track freehand). Anyway, the night before our holiday I decided to make one for each of my boys plus two for upcoming birthday gifts.

There are lots of tutorials for car rolls on the internet such as here, here and here. Mine is very similar to this one. I made mine based on the final size that I wanted. The pockets are big enough for the cars to sit in, but poke out a little so you can easily grab them (I made deeper pockets the first time which is good for storage, but they were a bit fiddly to get out. The mat area is 17″ x 11″. I had bought some black gingham with the idea of adding racing flags, but I had to get them finished so I could get on with packing. I decided to use elastic to secure the roll rather than ribbon or velcro or a button. I think it will last longer, but I guess we’ll see
Mr 2 recently turned 3. Like a lot of kids he spent most of the last twelve months perusing my birthday cake books trying to select the cake that he wanted for his third birthday. He chose a sword cake and we had the following conversation countless times in the lead up to his party:
“I’m having a sword party!”
“You can’t have a sword party, you can have a sword cake. How about a pirate party? Pirate’s have swords.”
“… … …”
“Mummy can make you some really cool pirate things!”
“… I want a sword cake.”
“OK, let’s have a pirate party with a sword cake.”
Ah, clever Mummy I hear you say. Well, true to my word I planned a pirate party complete with a sword cake
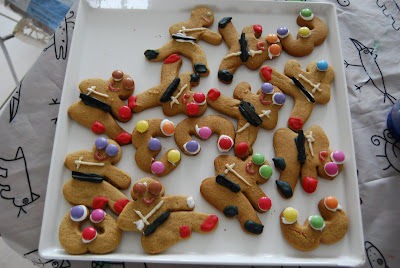
pirate ninja-breadmen
pirate vests for the boys and gold skirts for the girls (I ran out of maroon fabric and got creative with some gold satin pillow cases that I have been wanting to upcycle) along with pirate hats and telescopes (which turned into swords within the first five minutes!).
We had planned a treasure hunt complete with pirate maps in the garden, but it rained all day, so instead we played a fishing game. We held up a sheet across a doorway and the kids had to go fishing asking, “Mr Fishy, Mr Fishy what do you have for me?”. Mr Fishy would give them a funny surprise (anything you can hook on a plastic fishing rod; think whisk, socks, baby toys) but they all ended up with their bag party favours. The kids LOVED this game and I highly recommend it. We also played the classic “Musical Statues” and I set out a load of craft supplies and pirate themed pictures which allowed the kids to have some quiet time when needed.
The party was a sucess and I really enjoyed making the kid’s outfits. The pirate vests were based on a size 5 t-shirt, with a gold sash attached at the waist (slightly gathered to give shape), gold buttons (I LURVE making my own buttons!) and a pirate skull and crossed swords appliqued on. The hats and telescopes were made from black cardboard with pirate skull and crossed swords glued on. Let me know if you want more details on the costumes, they were really quick and easy to make. My enthusiasm was only slightly dampened when the birthday boy refused to put his costume on because he was having a sword party, not a pirate party! Nothing like being outsmarted by a three year old!
I have been thinking about and planning this blog for a while now. My other blog, Suburban Adventures, is about our family life in Noumea, New Caledonia. It started out simply as a open letter to friends back in 2009 and has morphed into something that is more public. I don’t get into the specifics about our family so much, and try to provide readers with more information on what life can be like in Noumea.
This blog, well, this blog is about my other passion. Creating with fabric. I LOVE coming up with an idea, drawing up the designs, putting it together and then knowing that someone (even if it is only me or my family) will use it. I’m hoping to start a business selling some of my creations. I’ve spent a long time thinking it through and have come to the realisation that we all need to start somewhere. So here I am!
So, I’ll stop boring you silly and will share a couple of photos with you.
This is my sewing machine (and yes, it uses very little bobbins!).
It belonged to my Nanny and I LOVE it. It could sew through slate. I have all of the original bits and pieces (including the manual and various feet), use it almost every day and have even tried to give it a bit of a home service. Every time I use it I think of my Nanny. I love that it has a history and look forward to teaching my kids to sew on it. I’m sure it will still be going strong in another 30 years!

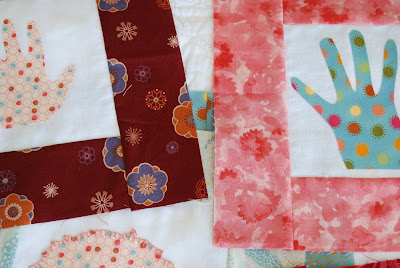
Here are some of my fabrics. I’m a bit of a hoarder and have collected fabric everywhere I have lived and traveled. For me, fabric is art. I have always loved looking at fabric and touching it. I remember trips to the fabric store with my Mum as a little girl, touching the lovely soft fabrics and marveling at the rainbow of colours. For me, the best part of any museum or gallery has always been any costumes on display. The amazing detail and effort that has gone into these pieces of art which are then actually worn by someone. Not just hung on the wall for a select few to admire. I look forward to sharing my adventures in fabric with you. And to give you a little preview, here is the current project that I’m working on It is a gift, so I can’t show too much ;P