April 2014 archive
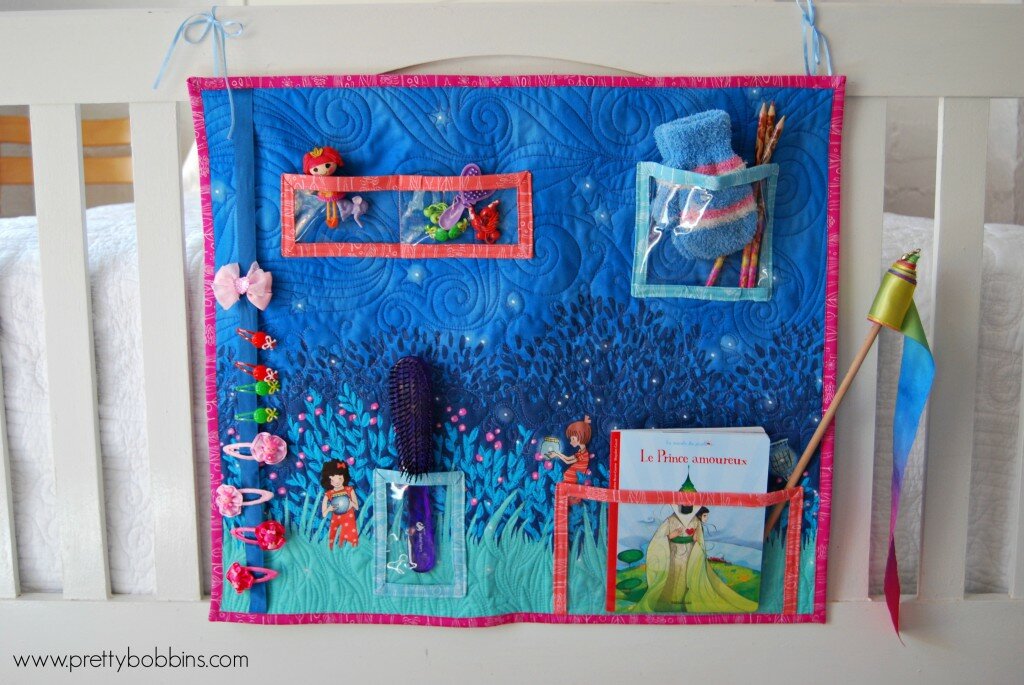
Hanging Organizer Tutorial fit for a wee princess!
When the super talented Sarah Jane put the call out for blogger to work with her new line, Wee Wander, I couldn’t help but put my hand up!

Today I’m sharing a tutorial for a Hanging Organizer. I have a lovely three year old daughter who certainly could do with a little help organizing her important and precious belongings and she just LOVES her pretty new organizer <3
Fit for a princess!
Let’s get started! You will need…
Supplies:
- 1 panel Wee Wander
- Backing fabric (32″ W x 29″ H)
- Wadding (28″ x 25″)
- Hanging sleeve (5′ x 23″)
- 1 piece clear vinyl 11″ x 15″ (I repurposed one of those clear zip bags that pillows and linen come in)
- 12″ x WOF (width of fabric) for binding OR purchase aprox 250″ premade double bias binding (you will have lots left over!)
- 60″ ribbon for clip strip and hanging
- 24″ long piece of dowel rod for hanging
- usual quilting supplies
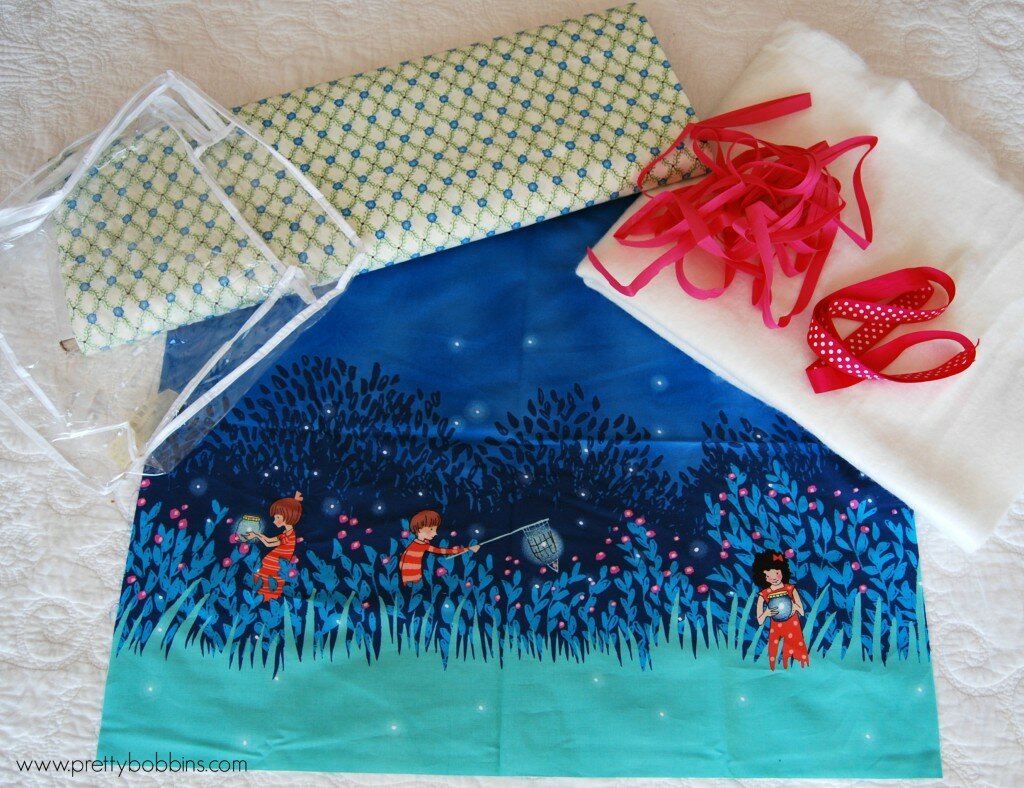
Gather your supplies
Prepare and quilt you Wee Wander panel for quilting. I cut backing to 32″ x 29″, wadding 28″ x 25″ and the panel to 21″ x 24″. I changed threads a few times and let Sara Jane’s whimsicle design dictate my quilting. TIP: I always find it best to quilt wall hangings quite densely so they sit nice and flat.
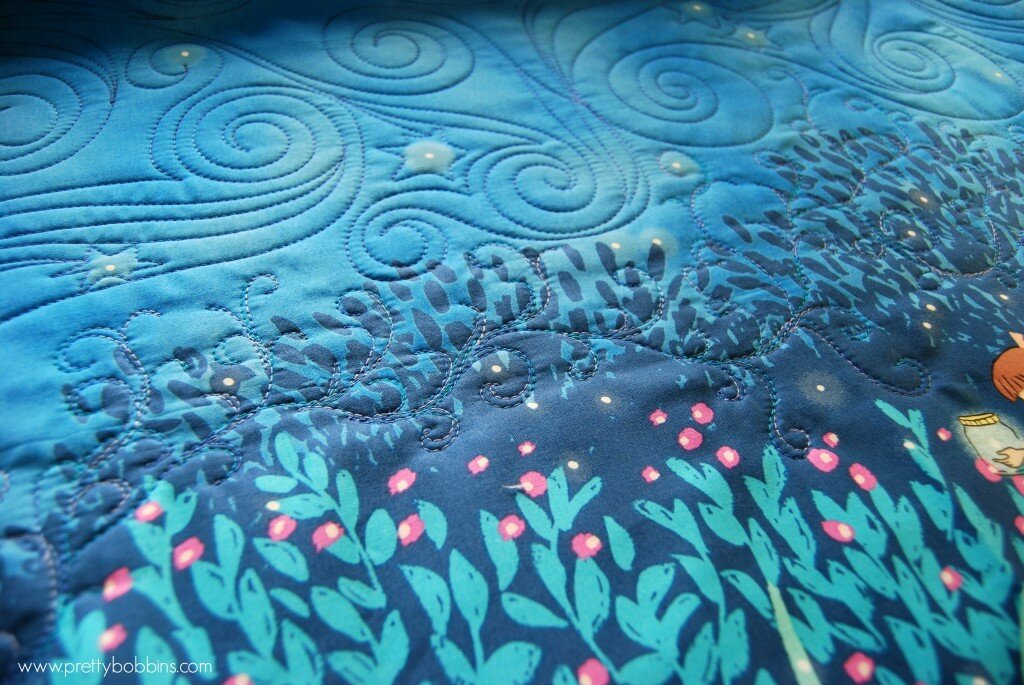
Quilt to your heart’s content!
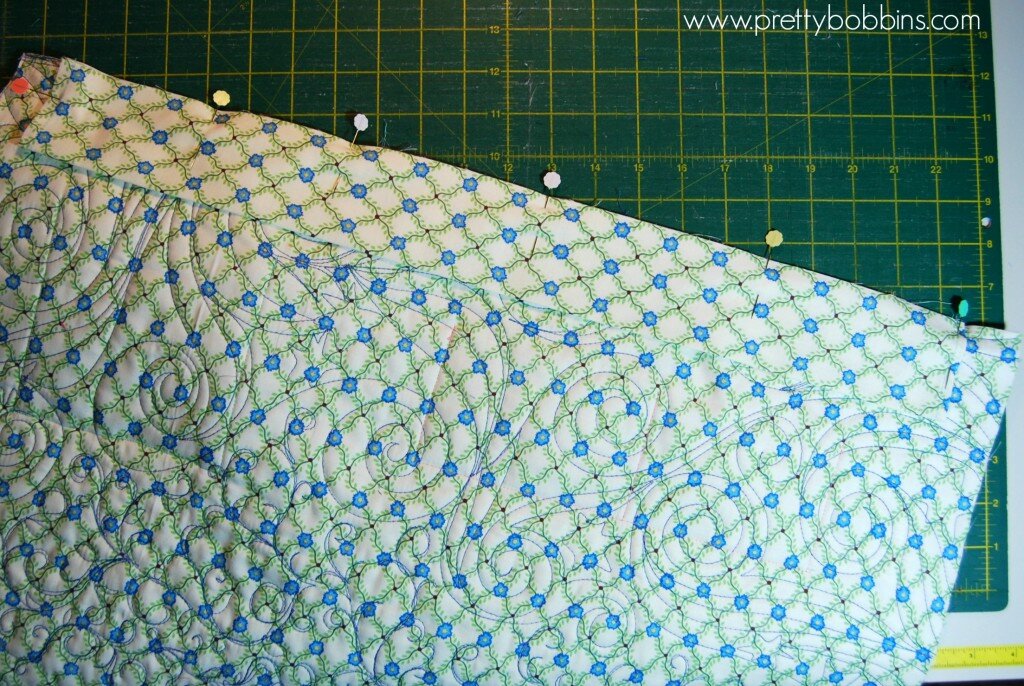
Once you have finished quilting your panel, trim it so it is nice and square, then set it aside.
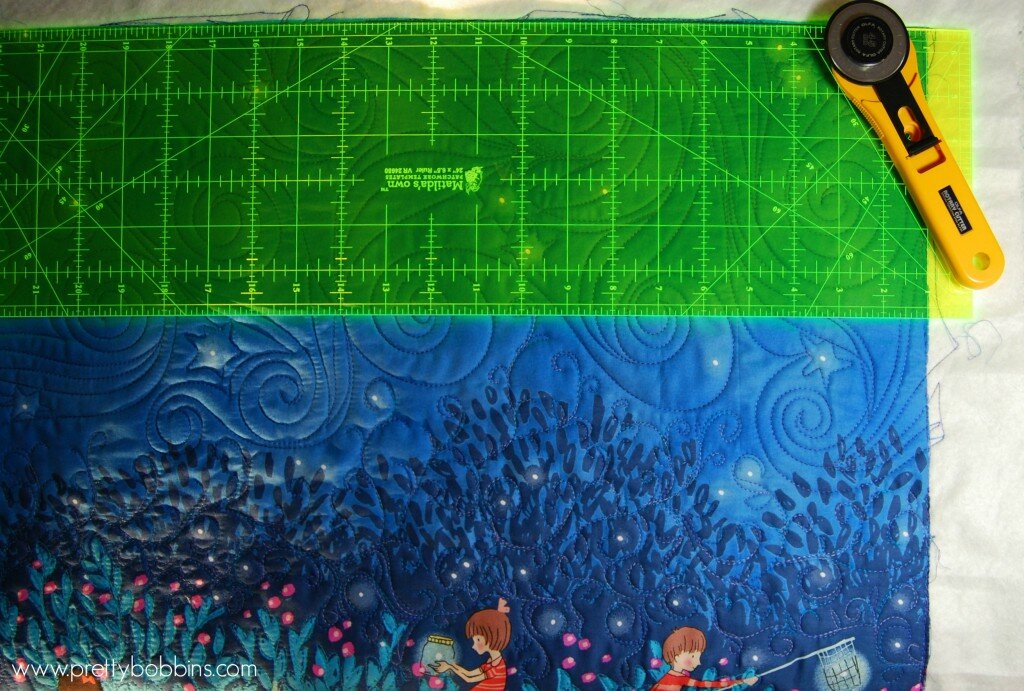
Trim your quilted panel
Prepare your binding. I wanted to feature a number of Sara Jane’s prints for the binding, but you can use pre-made double bias binding or make your own. You will need 105″ binding for the outside of the organiser and four smaller pieces for the plastic pockets:
- Pocket A 37″ of double fold binding
- Pocket B 36″ of double fold binding
- Pocket C 29″ of double fold binding
- Pocket D 43″ of double fold binding
Prepared your clear plastic/vinyl pockets. Cut one each of:
- Pocket A 3″ x 9.5″
- Pocket B 5″ x 7″
- Pocket C 5″ x 3.5″
- Pocket D 9.5″ x 6″
Bind all four sides of A, B and C. Bind three sides of D (leave one of the long sides raw).

Binding tips
Cut a 23″ length of ribbon for your clip strip. My ribbon is .75″ wide.
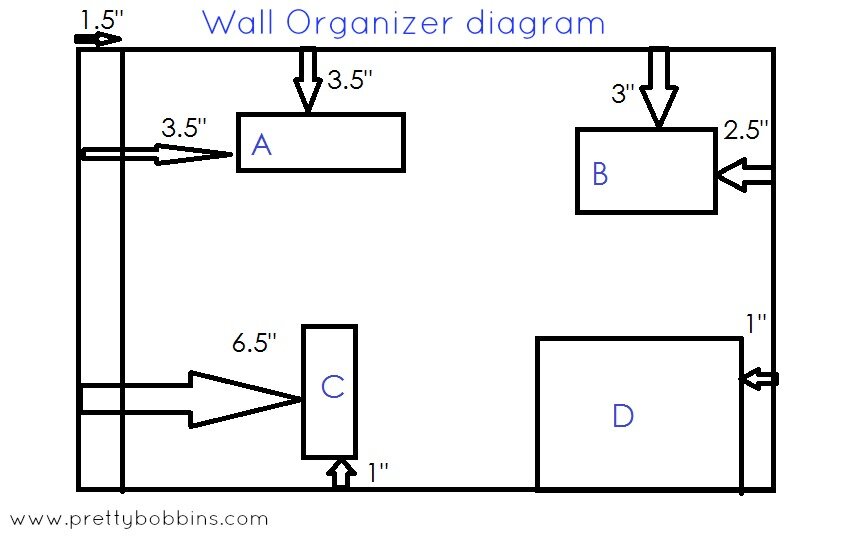
Place your pockets where you would like them. DO NOT PIN THEM!! I decided to fold the bottom two corners of pocket B in a little so that the pocket sits out and can take bigger objects. TIP: make sure that you don’t place your pockets directly over the parts of the panel that you would like to feature.
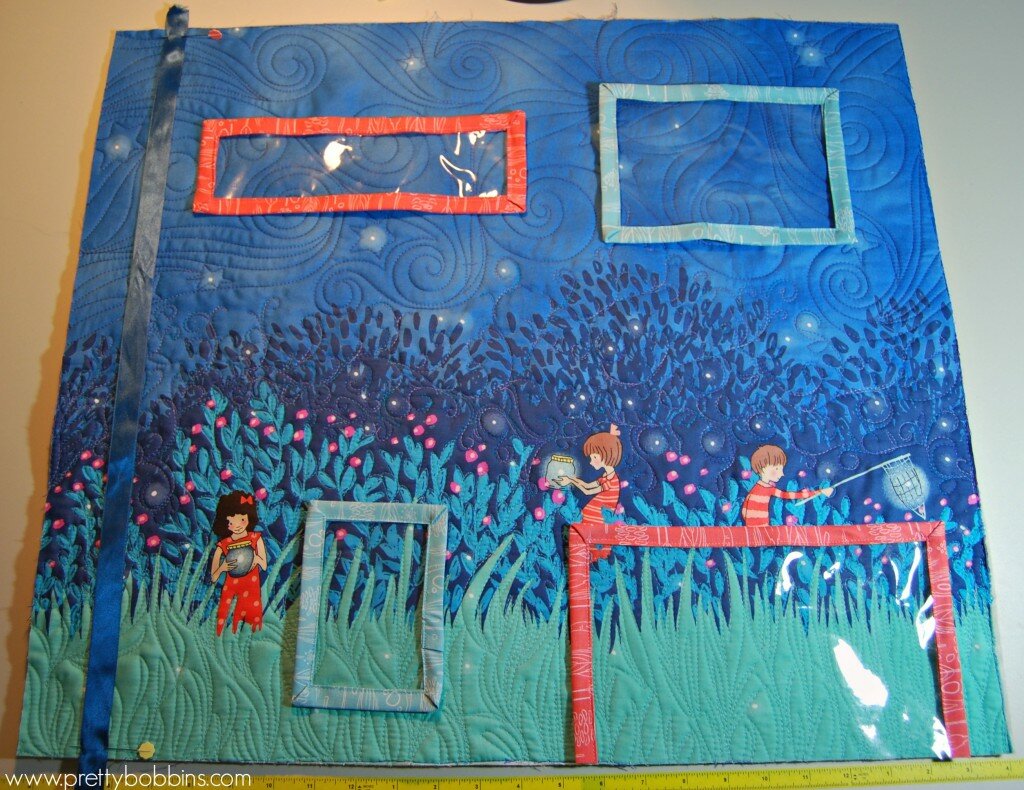
lay out pockets
Once you are happy with the placement of your ribbon and pockets you can pin them carefully within the found section. The pins will leave holes in the vinyl so please be careful 
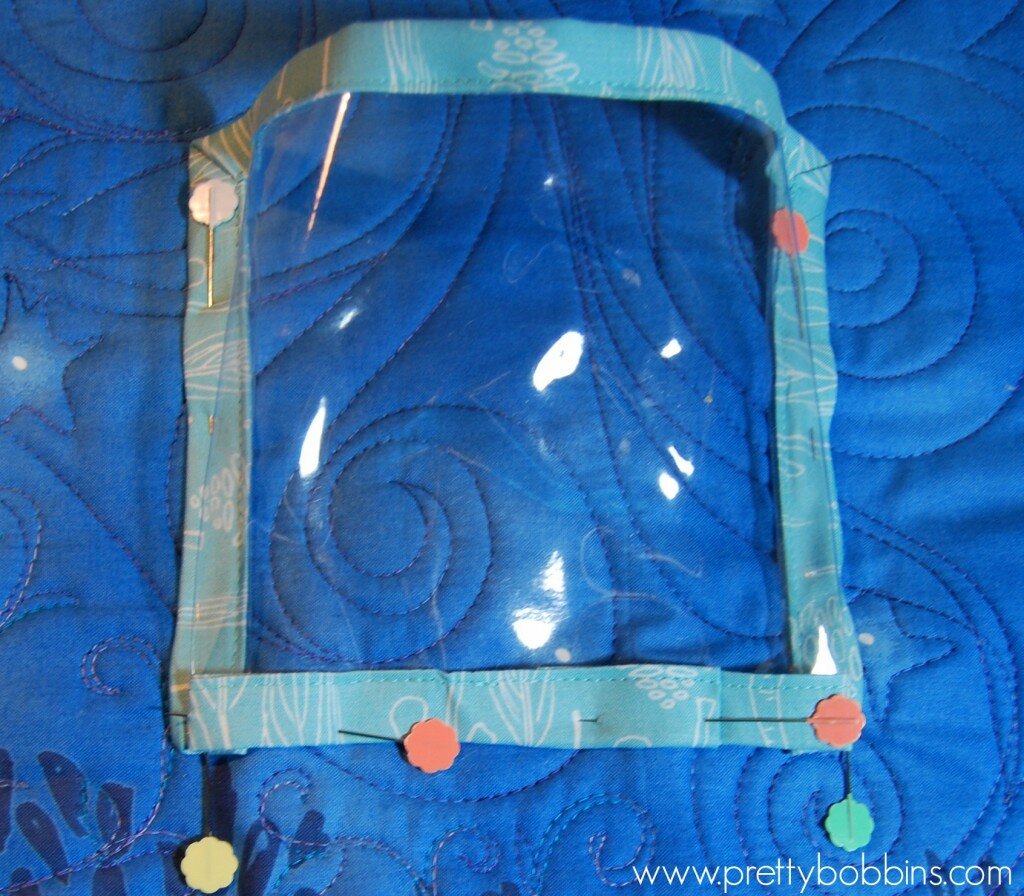
Pin your pockets on the binding so that you don’t mark the vinyl.
Sew your pockets in place. I used a walking foot as the bound vinyl is somewhat bulky.
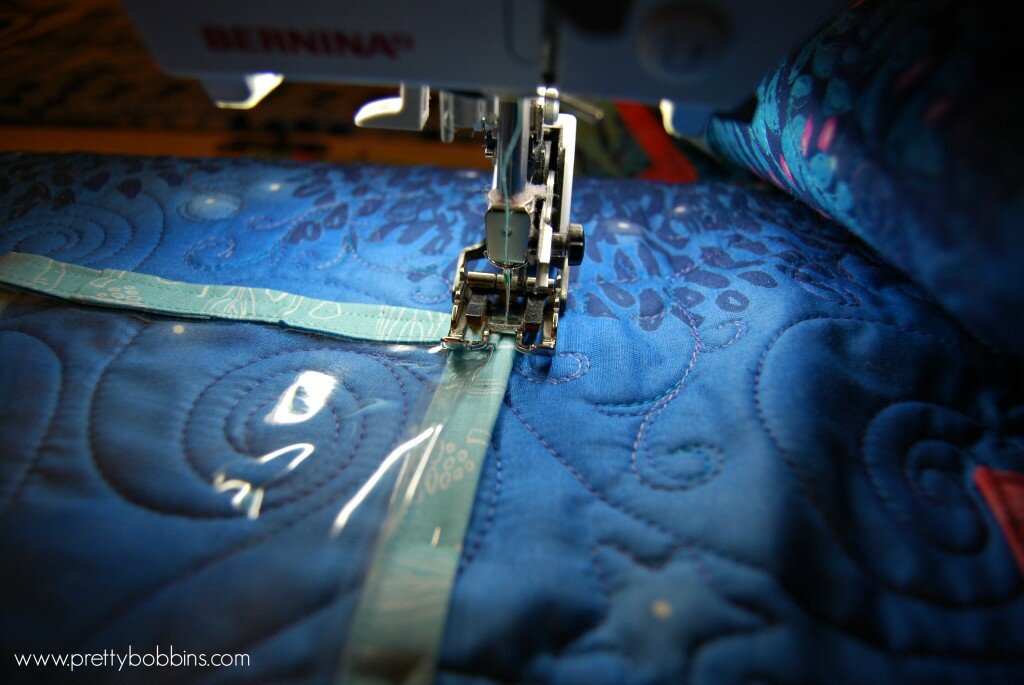
Sew pockets in place
Prepare your hanging sleeve. Take your 5″ x 23″ strip of fabric and fold both short ends in by 1/4″ and again by 1/4″ to conceal the raw edges. Sew in place, fold in half with wrong sides together and press. Center your hanging sleeve on the top back edge of your organiser (raw edges togethre) and sew in place within the 1/4″ seam allowance.
Apply binding. I applied my binding to the back and then machine stitched it down to the front. This is a quick,easy and neat way of binding. Crazy Mom Quilts has a great tutorial here.
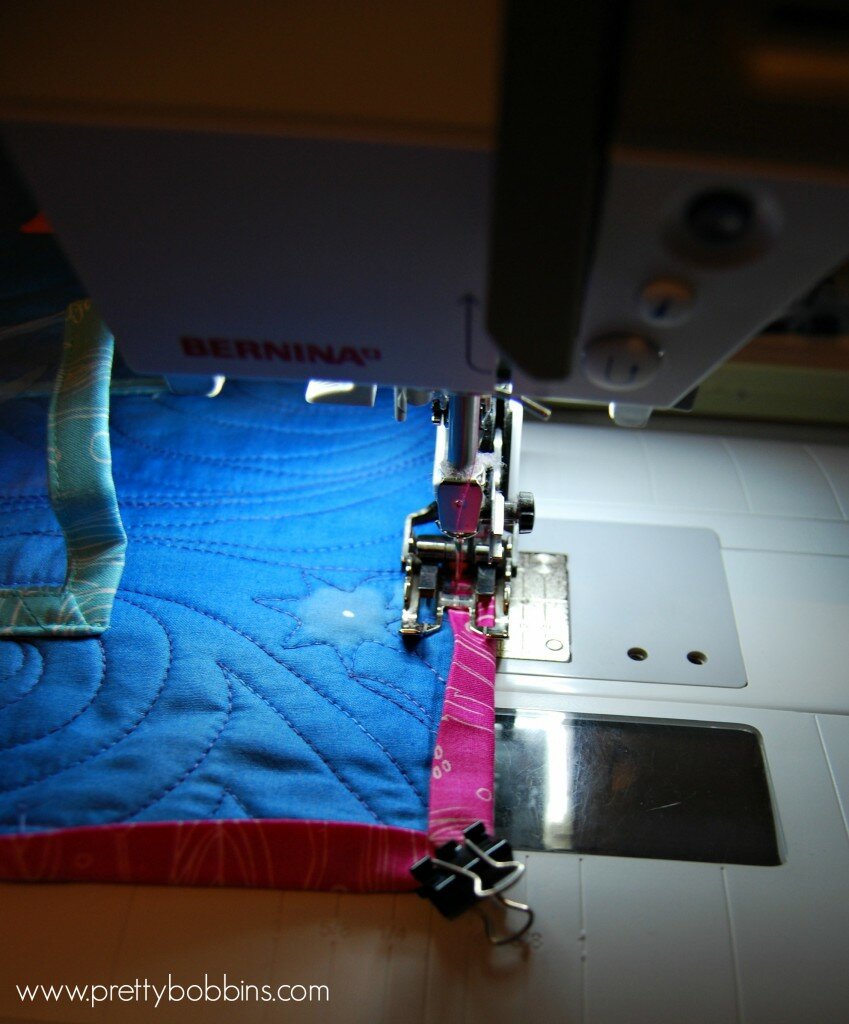
I applied my binding to the back and then machine stitched it in place on the front
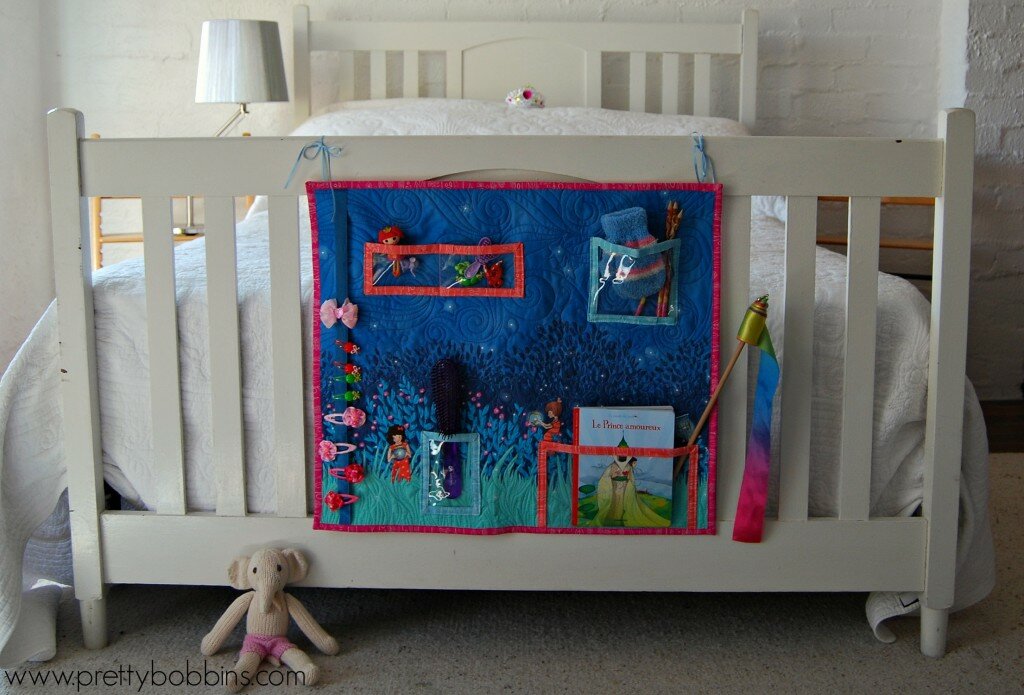
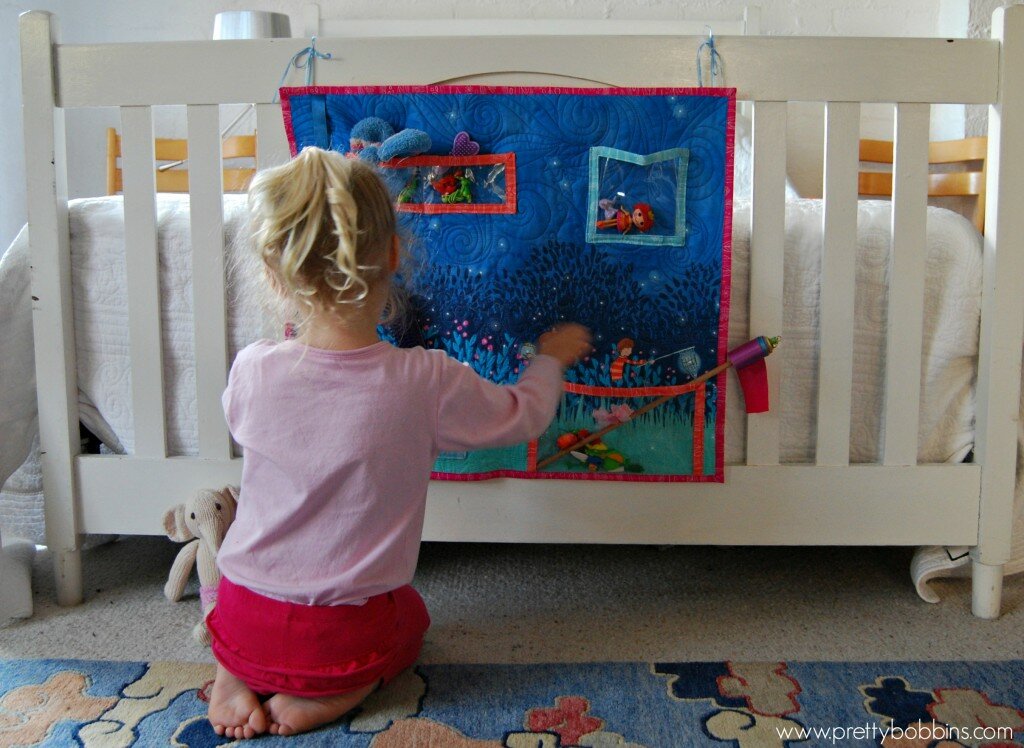
Use your remaining ribbon and dowel to hang your organiser in place. Fill with all your precious items <3

A place for everything and everything in it’s place <3
Then let your wee one re-organize to their heart’s content!
Thanks for stopping by and a big thank you to Sarah Jane for always producing such beautiful illustrations and for turning them into fabric that we can use and love! I’ve loved being part of this blog tour <3 You can find out more about Wee Wander here <3
In a few weeks I will be teaching the first of a few quilt classes featuring my pattern, Starry Skies, at HobbySew Beclonnen. It’s a fun quilt that is originally lap sized but can easily be enlarged. Read on for details and quilt candy <3
April was such a whirlwind of activity that I haven’t had a chance to blog about all the quilts I finished! Today I’d like to share Starry Skies (#2) with you (and subtly mention an upcoming class that I’m teaching  ). I also want to apologise that I didn’t post I Quilt last week, I spent Thursday night in ER with my son (he is OK, just a little glue holding his scalp together!)

I first made this quilt a year or so ago in a very different palette for a Kate Spain blog hop. I love the pink with the grey, but this time I wanted higher contrast.

Starry Skies #1
This quilt is great for imaginative quilting! You can really go anywhere. FIrst time around I mixed in some hand quilting and kind of did a shooting stars theme. This time I went for movement again, but more swirls and bubbles. It’s also a great one for using up scraps and gaining confidence with improv techniques. I’m going to talk a lot about colour play in the class as I feel this is an area where we can all always learn more

The texture is really quite fabulous (if I do say so myself…)

As pretty as this quilt looks in our house it is on display at HobbySew Belconnen tempting quilters to sign up to a one day workshop with me on the 24th of May. I’d love you to come along and spend the day piecing with me! You can call the lovely ladies at HobbySew on and book in It’s $60 for the day and you get cutting instructions to take home and get busy in advance of the class so we get the most out of the day.

If you’d like to find out about other upcoming classes you can see them here.

A big congratulations to Serena at Sew Giving! You were lucky number 9, chosen by a random number generator I will email you in a minute to get your details Yay Serena!!

Welcome to I Quilt at Pretty Bobbins! The last week has been a flurry of activity in the studio as I finished off a heap of quilts and have been getting ready to submit them to a quilt show Entry is due by tomorrow, but if you’re interested you can check it out here.

First up I finished binding “Dream in Colour”. You may remember it from way back last year… On second thought I may not have shared it before… It is pieced using scraps from a beautiful plus quilt (still haven’t finished that one…) and is meant to hang in my studio to remind me to take my vivid, colourful dreams and make them real and tangible.

Made with scraps and quilted with dense, wonky, SLQ
Then I bound my improv, self-reflective, arty-farty piece. I wrote about this quilt a few weeks back, it breaks all of the “rules” and I will be interested to hear feedback from the judges and people who visit the show.

Not the best photo I’m afraid..
I’m also entering the quilt that doesn’t have a name that I recently had in a local show. It mixes hand quilting, longarm quilting, improv piecing, needle-turn applique and goodness knows what else!

I’ve filled out entry forms for a couple of minis but then I remembered the Blessings Quilt and my lovely friend agreed that she was happy for me to enter it.

All in all I’ve entered seven quilts and I’ll be stitching on a heap of hanging sleeves if they’re all accepted! Which is a nice segway to my topic of this week; hanging sleeves. Do you have a favorite hanging sleeve method or tutorial? I used the directions from the Canberra Quilter’s recently, but I know many shows provide specific dimensions. If I am making a small wall quilt for my house, I generally just do a pocket in each corner and hang it with a piece of dowel. This method has the added bonus of avoiding handstitching
Next time I attach a hanging sleeve I am going to go with a D shape, similar to this tutorial by Tallgrass Prairie Studio.
I haven’t featured a quilter this week as I haven’t had the time to seek permission and my Dad arrived today and I really need to get out of the studio and spend some time with him Please add your link below and don’t forget to add the linky button or a link to my blog in your post or side bar. To those of you celebrating, have a lovely Easter and to those of you who aren’t, have a great weekend xx
An InLinkz Link-up
Welcome to Pretty Bobbins! Today is my day in Jennifer Sampou’s blog hop for her new line Shimmer. I am super excited to be involved and I have a lovely fabric giveaway for you <3
I was so excited when Jennifer first contacted me to be part of the Shimmer party, and had a lot of trouble deciding which prints to use, they’re all gorgeous! The sparkle of these prints is just fantastic and I really love the wavy line prints, very dynamic and ones I know that I’ll be using again and again.

We’re heading into winter here in Australia and I couldn’t resist making a sparkly, modern lap quilt to snuggle up under and reminisce about summer time. We have beautiful, clear skies in Autumn here in Canberra and photographing this quilt by the lake was a lot of fun. I love how the piecing looks like part of the skyline, totally coincidental but I’ll happily claim good design

I was inspired by Jennifer’s cushions (check out her lookbook!!) and backed it in a super soft, cream minky and it’s super soft and cuddly.

I really wanted to come up with a design that was modern and featured Jennifer’s gorgeous prints. The improv curves with set in contrasting blocks nicely highlight how well this line plays together. I must say, as a longarm quilter some metallic prints are very troublesome to work with, Jennifer’s line quilted BEAUTIFULLY without a tension issue anywhere in sight! If you want metallic highlights and lots of shimmer AND you love to quilt, then Shimmer is a must! As always I used my favourite thread, Aurifil 50wt in 2000, 2600 and 5004.

This lap quilt measures 38″ x 62″ and was made for cuddling <3

I still haven’t decided which way is up and which was is down (is it stormy seas or dark skies over snow?) but I love the subtle prints and tones.

I had a heap of fun finding all the background shimmer that I could. I can’t lie, this quilt was fun from beginning to end

So now that you’re dying to get your hands on some Shimmer I can happily tell you that there is lots on offer! It will be hitting stores soon, but in the meantime you can win some right here at Pretty Bobbins and at each of the other stops on the blog hop (schedule below)!!

All you have to do is leave me a comment on this post before 18 April (I’m sticking to a US timezone for this giveaway) and a charm pack of Shimmer could be heading your way! I will use a random number generator to pick a winner, but if you like you can let me know what your favourite charm square project is
Bon chance!
And if a charm pack isn’t enough Shimmer for you, you can head over to Jennifer’s blog for a chance to win a fat quarter bundle of the entire Shimmer line!! To enter the giveaway, new readers should sign up on Jennifer’s mailing list and comment on her blog before the end of the hop. Be sure to comment about your favorite projects and why. Existing followers are automatically eligible to win.

BLOG HOP Schedule:
April 1-21.
April 1- Robert Kaufman/Jennifer Sampou- announce blog
April 2- Janice Ryan- Better off Thread
April 3- Alissa Haight Carlton- Handmade by Alissa
April 4- Julie Herman- JayBird Quilts
April 5- Natalie Barnes- Beyond the Reef
April 6- Stash Books- C&T Publishing
April 7- Amanda Jean Nyberg- Crazy Mom Quilts
April 8- Lee Heinrich- Freshly Pieced
April 9- Cheryl Arkinson- Naptime Quilter
April 10-Christina Cameli- A Few Scraps
April 11-Elizabeth Hartman- Oh Fransson
April 12-Faith Jones-Fresh Lemon Quilts
April 14- Katie Blakesley- Swim Bike Quilt
April 15-Amy Smart-Diary of a Quilter
April 16- Laura Nownes, Jennifer Rounds, Pati Fried, Darra Williamson- See How We Sew
April 17-Holly DeGroot- Bijou Lovely
April 18-Jennifer Sampou-Wrap Up
April 21-Jennifer Sampou- Announce Winner of Giveaway FQ Pack of entire ShimmerCollection.
If you need some more Shimmer in your life you can check out Shimmer on the Robert Kaufman Website

And if all of that isn’t enough, The Cotton Patch (CA, USA) is taking pre-orders of Shimmer.
I’m late, I’m late, for a very important date! No time to say hello, goodbye, I’m late, I’m late, I’m late!! I’ve loved those lines from Alyce in Wonderland ever since I first read it as a child. I’m very sorry that I’m late with I Quilt linky this week, I’ve been super busy quilting, but I do hope you link up your quilty process
Over the past week I have finished a couple of quilts

Starry Skies class sample. I love this version more than the original!!
quilted a few others

Carpentar’s Star quilt by Tracy
taught machine binding at Canberra Quilters Modern Interest Group and handed over a a number of class samples (come join me if you’re local!).

Sorry for the terrible iPhone photo, totally out of focus but exciting to see my work hanging in store at Hobbysew Belconnen
I have been pondering my business, how to manage competing deadlines (every second enquiry I get is from someone who needs their quilt quilted yesterday), how to best get my name out there, how to ensure that I continue to get to do fun stuff and enjoy this quilty gig and when to say no. This whole quilty thing is a continual learning process. I feel like I’m good at what I do but there is still so much to learn and achieve!

Improv LV cushion secret Birthday swap gift for Ms Midge
I also had two quilts on display for the first time at a local show which was super exciting. I was lucky enough to get to help hang many of the quilts in the show and learnt so much from that experience. Plus it was a heap of fun!

Me with my quilt hanging in the Queanbeyan Quilter’s Biennial Show
So that’s why I’m a little late with the linky party
 Used with permission from http://www.schnigschnag-quiltsandmore.blogspot.com/caption
I did ask the lovely Nadel and Falzbein if I could feature a few of her photos but didn’t hear back. Even without photos of her amazing work I strongly encourage you to pop over to her blog and check out her work. Her yellow and white chevron quilt last week just made my day! It’s beautiful!!! It looks like she is moving her blog, so head over and visit her new site here She has a google translate button on the right hand side, but the quilty candy is delightful even without the words
 Used with permission from http://www.schnigschnag-quiltsandmore.blogspot.com/caption
So that’s it folks! Please link up your quilty process xx
An InLinkz Link-up
Welcome to I Quilt linky party! This week I’ve been brave and got my improv quilting on If you’re new, please feel free to join in the fun and link up your quilty process. Don’t forget to visit three other linkers and add a link to my blog or button to your sidebar or post
This week I am featuring the lovely Serena from Sew Giving. I’m not sure when I first ‘met’ Serena, but I love following her quilting and sewing adventures. She sews the cutest items for her two little girls and seriously looks like she is having fun being a crafty gal, Mummy and farmer. Her deer cushion with the 3D pinwheel has to be about the cutest thing I’ve ever seen!!

Image used with permission from Sew Giving
Last week Serena shared her first foray into free motion quilting. I love a quilty gal who shares! Such an awesome effort, the flowers in the border look perfect, I’m pretty certain that my first attempts at FMQ were nowhere near that neat!! You have to check out her post for the dancing elephants on the binding! Seriously good planning to get those buddies to line up LOL

Image used with permission from Sew Giving
This week Serena has shared her experience straight line quilting on her new machine compared to her old machine. Serena, I’m guessing that the walking foot on your old machine was not up to scratch. I also find that I get the best results SLQ if I consistently start and stop on the same sides, rather than going in one direction and then back in the other. If you go back and forwards it can increase the drag and give that kind of pulled/tugged look on the quilting. Not that you need any advice now, your most recent SLQ is PERFECT!! Well done xx

Image used with permission from Sew Giving
This week I have been working up a frenzy. I have so many commitments that need to be met over the next ten days that I am really having to work super hard and yet not burn out. I’ve been stitching til midnight most nights and this morning I woke at 5am because I realised that my domain name was set to expire and despite months of warnings I still hadn’t sorted it out! I ran down to the studio and was super relieved to find that I had set it all to auto renew so I still own my blog LOL *phew* Could have done with another hour or two of sleep though…

Of course in the midst of all the deadlines I figured that I deserved a treat so I pulled out an old WIP and decided to get stuck into it. This WIP is almost a year old. It is a really introspective piece and kind of a self portrait in an abstract kind of way (too arty? LOL) I guess I had been thinking about it in the back of my mind but I was a little hesitant as it was half quilted and I of course wanted to finish it on the longarm.

This is where I got up to in May 2013 on the Bernina and where I started this week on the longarm.
Anyway, I decided to forget about the rules and I loaded it onto the longarm half quilted and pin basted. I removed the pins closes to the top edge and thread basted it in place and then did the same for the sides. I only removed the pins as I moved onto each section. I think if I had removed the pins earlier I would have ended up with an uneven mess. Funnily enough I backed this quilted with an unused IKEA sheet. Man, quilting sheets is a right pain. I’ve done it many times and I don’t recommend it. I totally killed the needle on the longarm quilting this beast, but it was certainly much easier than I’ve found machine quilting sheets on the domestic machine.

The grey essex linen blend is quilted with 50wt Aurifil on my longarm. The white with 40wt Aurifil on the domestic Bernina.
I felt like a total kick-butt rebel quilting this baby. Breakin’ the rules man and going nuts! ;) But seriously, it was fun to quilt and it was a good experiment to see not only how to take a partially quilted piece and finish it on the longarm, but to see my growth as a quilter. Pretty much all of the grey area was quilted on the longarm and a small section of the white area. I’m hoping to enter this into a few shows and I really look forward to people’s reactions. I think it’s OK to break the rules as long as you’ve mastered the techniques. I wonder how other’s will feel about me breaking the rules… I hope the quilt police are kind

I had so much fun creating texture and I really had no plan of what I was doing or where I was going. I kept kind of thinking “over fertilised”, it felt like an alien jungle with too much growth and very organic and unplanned.

I plan to bind it in the next few weeks and take proper photos, but the above picture gives you a good idea of how I have grown as a quilter in the past year. The white was done on the Bernina after I’d been free motion quilting for about a year. The grey is done after about two years quilting and three months on the longarm. I must say, I’m pretty happy with how well the longarming is going

So that’s it from me for this week. Tomorrow night I will be with the Queanbeyan Quilters for the launch of their exhibition, so if you’re local and at the event, please say hi! I hope to pop back to the exhibition again over the weekend, but it will depend on other commitments. You can find all the details here. There are two amazing raffle quilts, so pop in and buy some tickets if you can
So that’s it quilty folks. Be brave and break some quilty rules, you never know where you’ll end up and it might just be awesome! Thanks for linking up and please remember to visit three of your fellow linkers, we all love comments <3
An InLinkz Link-up
