Archive of ‘Blog Hop’ category
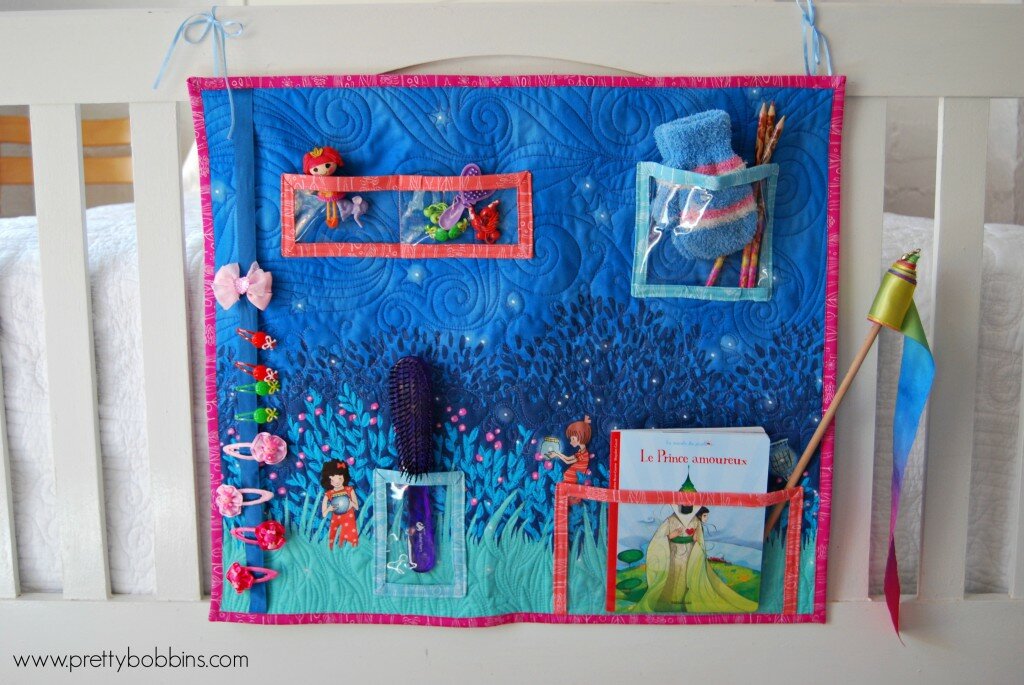
Hanging Organizer Tutorial fit for a wee princess!
When the super talented Sarah Jane put the call out for blogger to work with her new line, Wee Wander, I couldn’t help but put my hand up!

Today I’m sharing a tutorial for a Hanging Organizer. I have a lovely three year old daughter who certainly could do with a little help organizing her important and precious belongings and she just LOVES her pretty new organizer <3
Fit for a princess!
Let’s get started! You will need…
Supplies:
- 1 panel Wee Wander
- Backing fabric (32″ W x 29″ H)
- Wadding (28″ x 25″)
- Hanging sleeve (5′ x 23″)
- 1 piece clear vinyl 11″ x 15″ (I repurposed one of those clear zip bags that pillows and linen come in)
- 12″ x WOF (width of fabric) for binding OR purchase aprox 250″ premade double bias binding (you will have lots left over!)
- 60″ ribbon for clip strip and hanging
- 24″ long piece of dowel rod for hanging
- usual quilting supplies
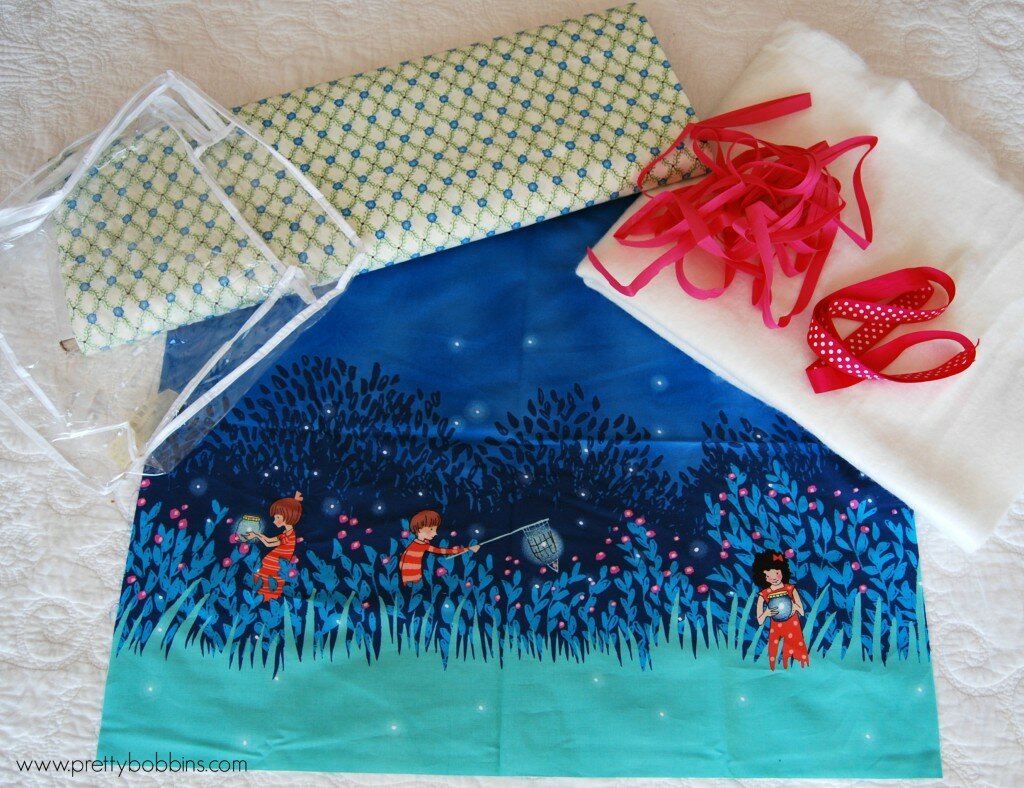
Gather your supplies
Prepare and quilt you Wee Wander panel for quilting. I cut backing to 32″ x 29″, wadding 28″ x 25″ and the panel to 21″ x 24″. I changed threads a few times and let Sara Jane’s whimsicle design dictate my quilting. TIP: I always find it best to quilt wall hangings quite densely so they sit nice and flat.
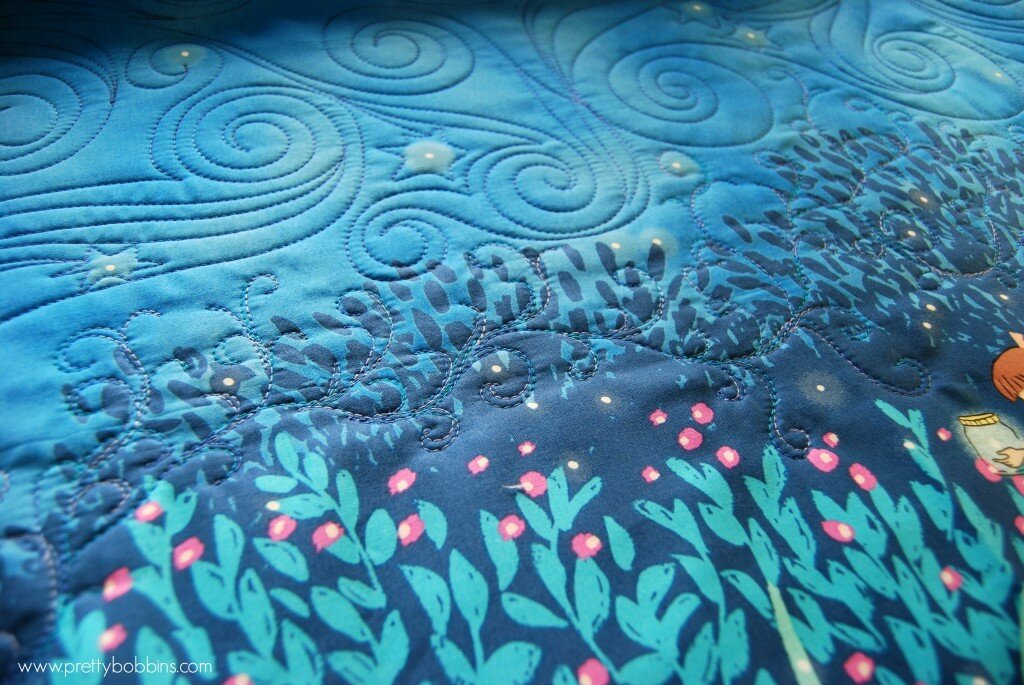
Quilt to your heart’s content!
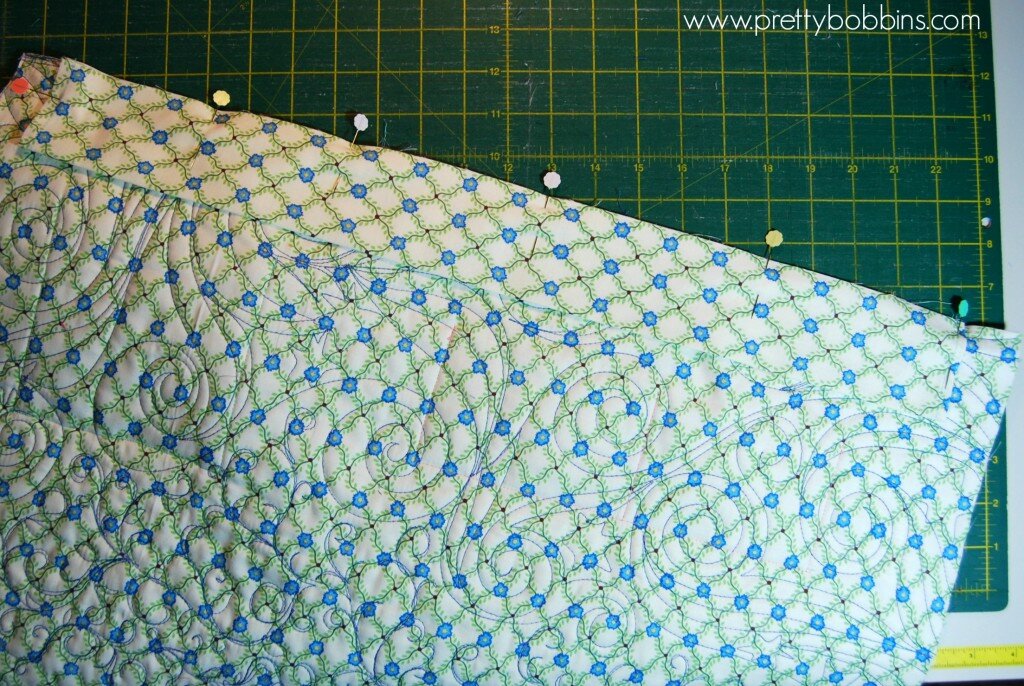
Once you have finished quilting your panel, trim it so it is nice and square, then set it aside.
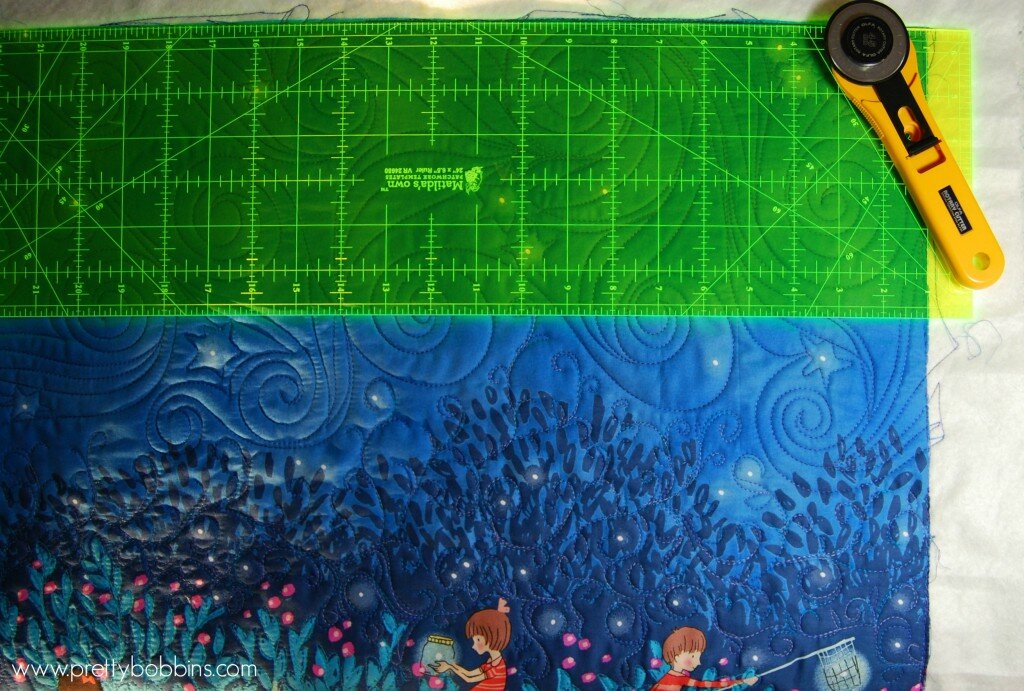
Trim your quilted panel
Prepare your binding. I wanted to feature a number of Sara Jane’s prints for the binding, but you can use pre-made double bias binding or make your own. You will need 105″ binding for the outside of the organiser and four smaller pieces for the plastic pockets:
- Pocket A 37″ of double fold binding
- Pocket B 36″ of double fold binding
- Pocket C 29″ of double fold binding
- Pocket D 43″ of double fold binding
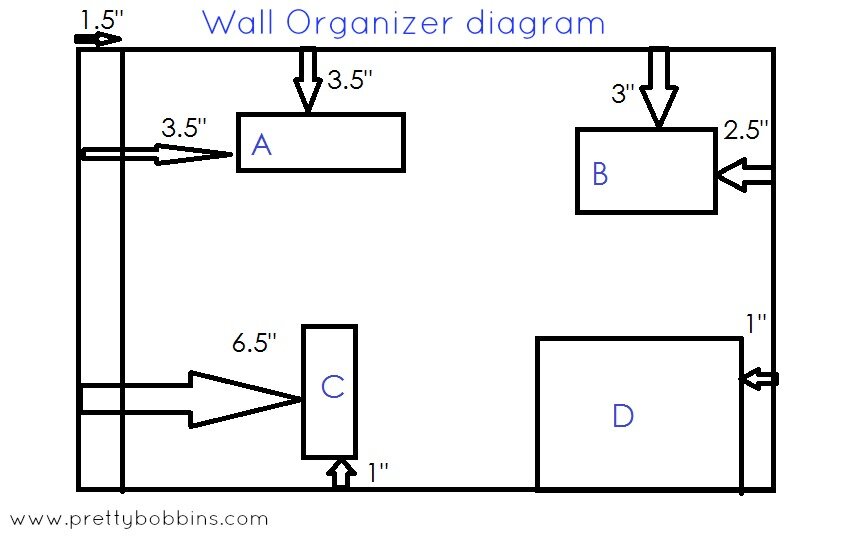
Prepared your clear plastic/vinyl pockets. Cut one each of:
- Pocket A 3″ x 9.5″
- Pocket B 5″ x 7″
- Pocket C 5″ x 3.5″
- Pocket D 9.5″ x 6″
Bind all four sides of A, B and C. Bind three sides of D (leave one of the long sides raw).

Binding tips
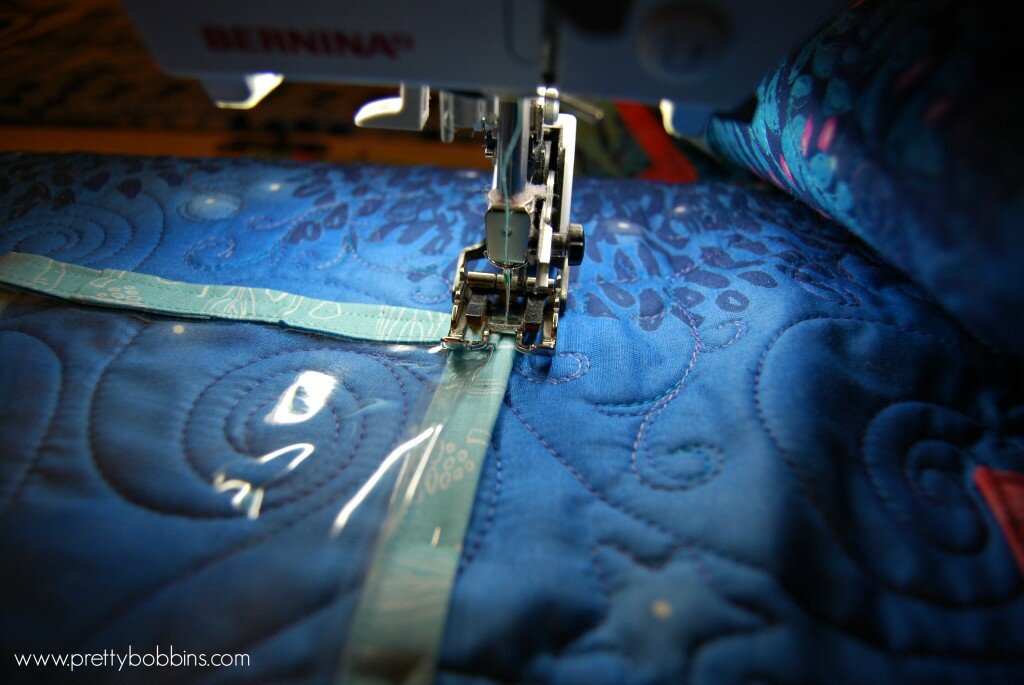
Cut a 23″ length of ribbon for your clip strip. My ribbon is .75″ wide.
Place your pockets where you would like them. DO NOT PIN THEM!! I decided to fold the bottom two corners of pocket B in a little so that the pocket sits out and can take bigger objects. TIP: make sure that you don’t place your pockets directly over the parts of the panel that you would like to feature.
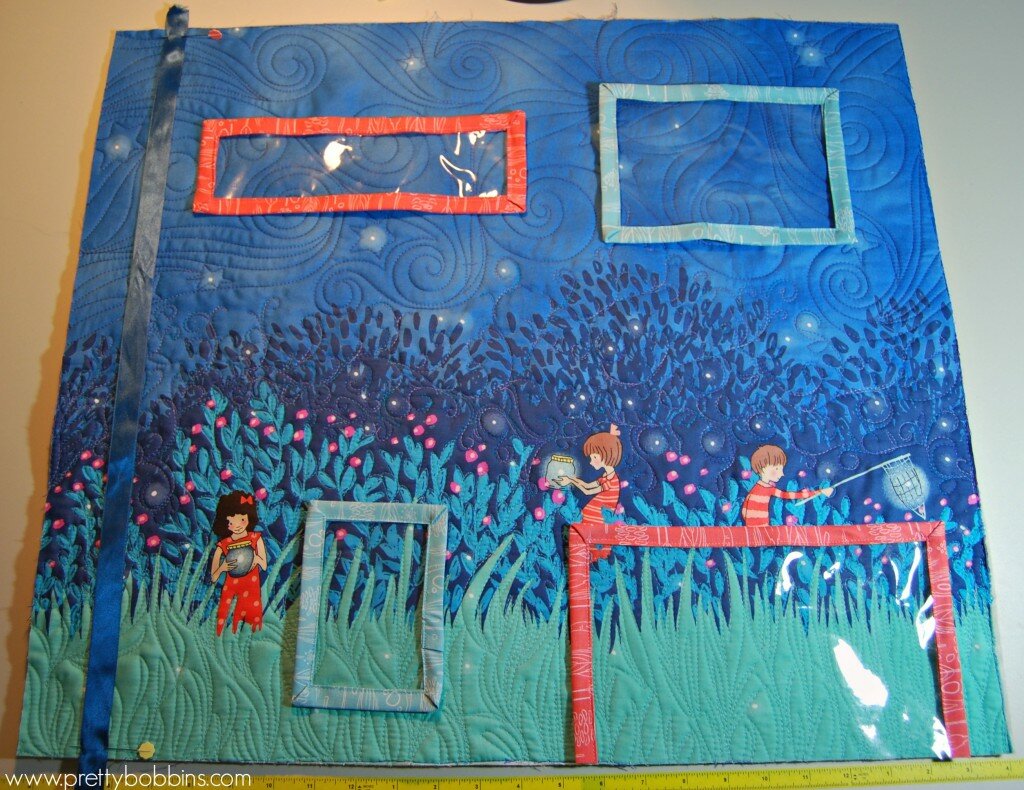
lay out pockets
Once you are happy with the placement of your ribbon and pockets you can pin them carefully within the found section. The pins will leave holes in the vinyl so please be careful 
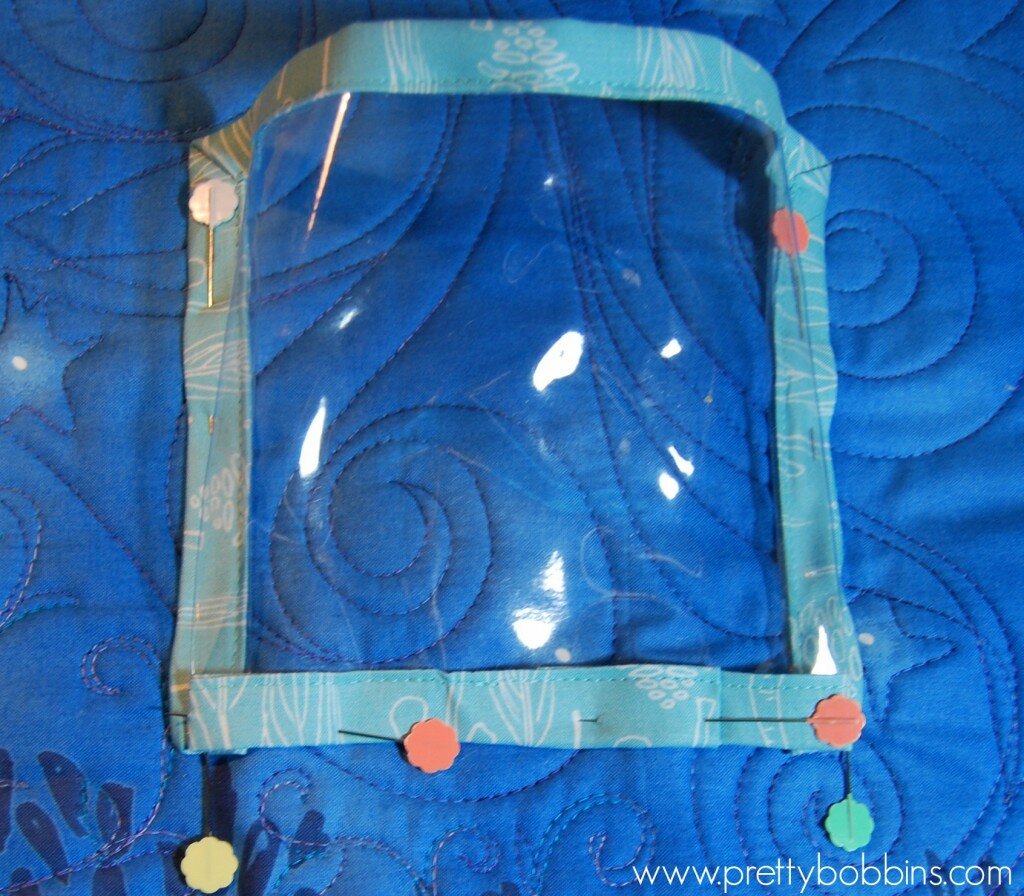
Pin your pockets on the binding so that you don’t mark the vinyl.
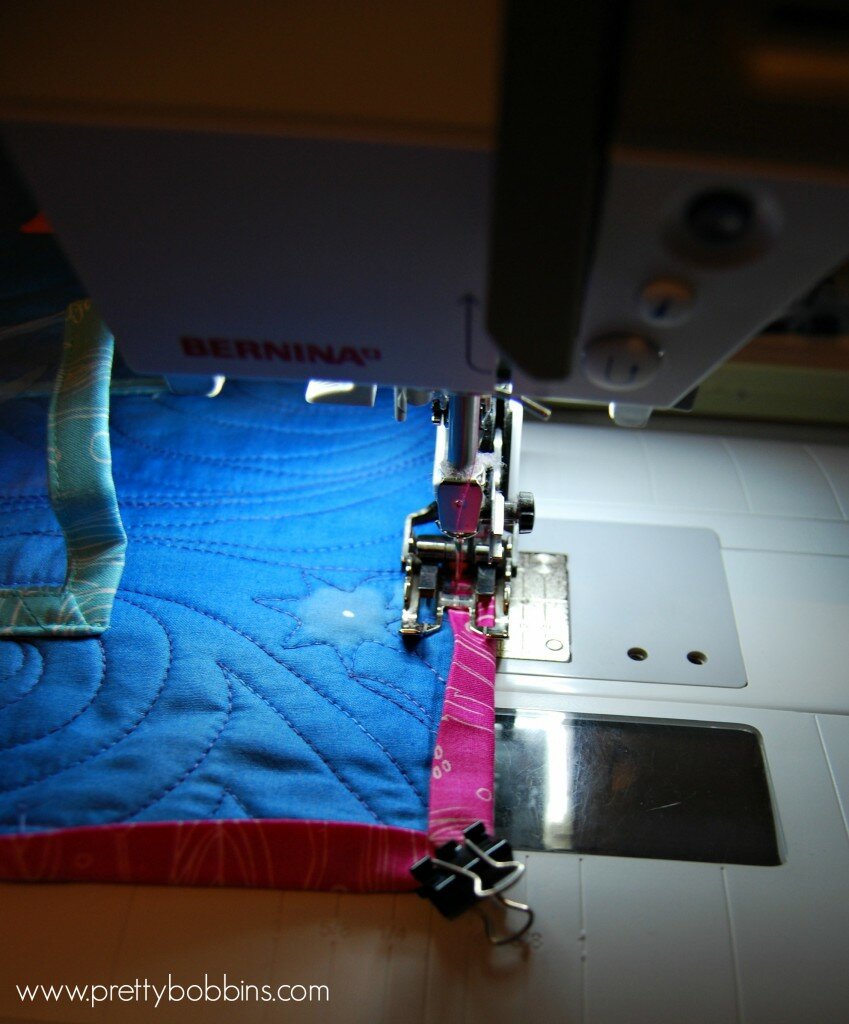
Sew your pockets in place. I used a walking foot as the bound vinyl is somewhat bulky.
Sew pockets in place
Prepare your hanging sleeve. Take your 5″ x 23″ strip of fabric and fold both short ends in by 1/4″ and again by 1/4″ to conceal the raw edges. Sew in place, fold in half with wrong sides together and press. Center your hanging sleeve on the top back edge of your organiser (raw edges togethre) and sew in place within the 1/4″ seam allowance.
Apply binding. I applied my binding to the back and then machine stitched it down to the front. This is a quick,easy and neat way of binding. Crazy Mom Quilts has a great tutorial here.
I applied my binding to the back and then machine stitched it in place on the front
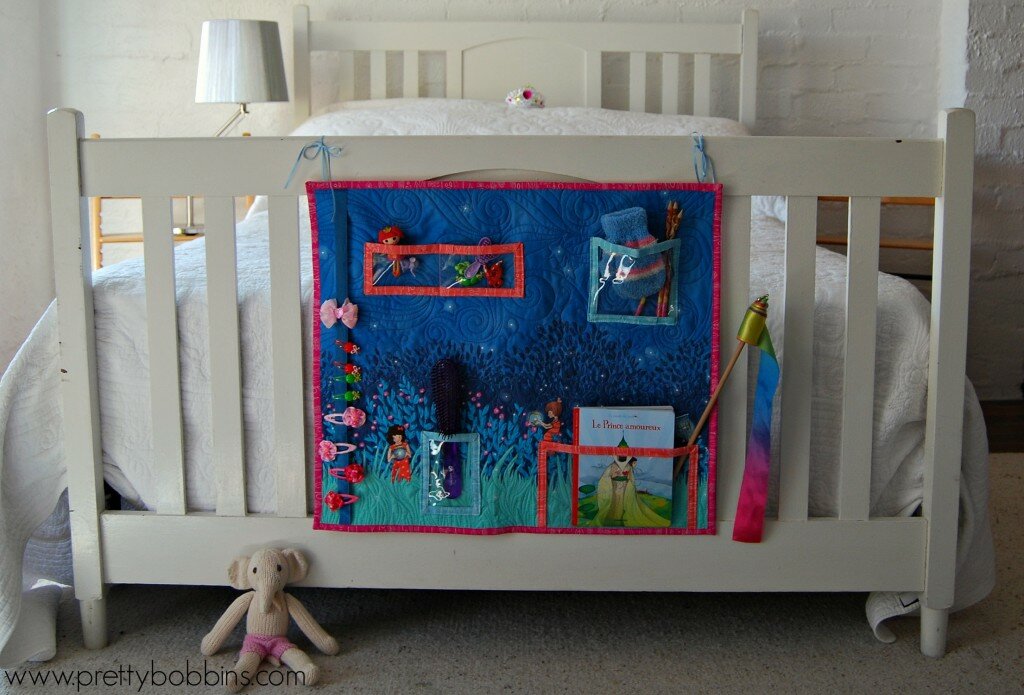
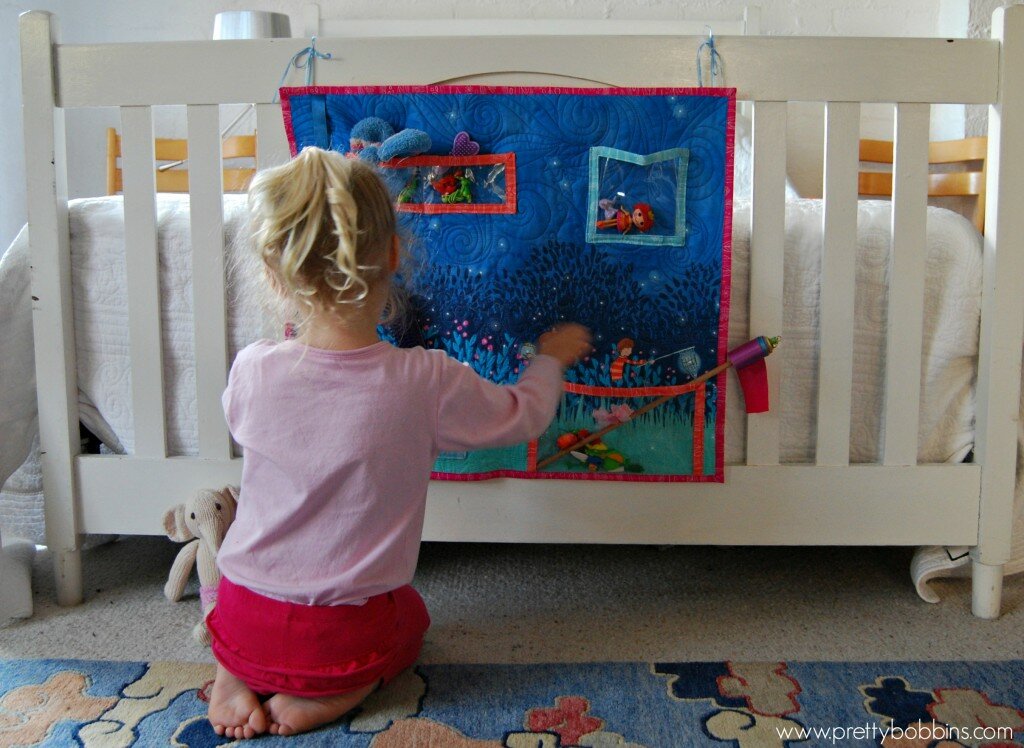
Use your remaining ribbon and dowel to hang your organiser in place. Fill with all your precious items <3

A place for everything and everything in it’s place <3
Then let your wee one re-organize to their heart’s content!
Thanks for stopping by and a big thank you to Sarah Jane for always producing such beautiful illustrations and for turning them into fabric that we can use and love! I’ve loved being part of this blog tour <3 You can find out more about Wee Wander here <3
Welcome to Pretty Bobbins! Today is my day in Jennifer Sampou’s blog hop for her new line Shimmer. I am super excited to be involved and I have a lovely fabric giveaway for you <3

I was so excited when Jennifer first contacted me to be part of the Shimmer party, and had a lot of trouble deciding which prints to use, they’re all gorgeous! The sparkle of these prints is just fantastic and I really love the wavy line prints, very dynamic and ones I know that I’ll be using again and again.

We’re heading into winter here in Australia and I couldn’t resist making a sparkly, modern lap quilt to snuggle up under and reminisce about summer time. We have beautiful, clear skies in Autumn here in Canberra and photographing this quilt by the lake was a lot of fun. I love how the piecing looks like part of the skyline, totally coincidental but I’ll happily claim good design 

I was inspired by Jennifer’s cushions (check out her lookbook!!) and backed it in a super soft, cream minky and it’s super soft and cuddly.

I really wanted to come up with a design that was modern and featured Jennifer’s gorgeous prints. The improv curves with set in contrasting blocks nicely highlight how well this line plays together. I must say, as a longarm quilter some metallic prints are very troublesome to work with, Jennifer’s line quilted BEAUTIFULLY without a tension issue anywhere in sight! If you want metallic highlights and lots of shimmer AND you love to quilt, then Shimmer is a must! As always I used my favourite thread, Aurifil 50wt in 2000, 2600 and 5004.

This lap quilt measures 38″ x 62″ and was made for cuddling <3

I still haven’t decided which way is up and which was is down (is it stormy seas or dark skies over snow?) but I love the subtle prints and tones.

I had a heap of fun finding all the background shimmer that I could. I can’t lie, this quilt was fun from beginning to end

So now that you’re dying to get your hands on some Shimmer I can happily tell you that there is lots on offer! It will be hitting stores soon, but in the meantime you can win some right here at Pretty Bobbins and at each of the other stops on the blog hop (schedule below)!!

All you have to do is leave me a comment on this post before 18 April (I’m sticking to a US timezone for this giveaway) and a charm pack of Shimmer could be heading your way! I will use a random number generator to pick a winner, but if you like you can let me know what your favourite charm square project is

Bon chance!
And if a charm pack isn’t enough Shimmer for you, you can head over to Jennifer’s blog for a chance to win a fat quarter bundle of the entire Shimmer line!! To enter the giveaway, new readers should sign up on Jennifer’s mailing list and comment on her blog before the end of the hop. Be sure to comment about your favorite projects and why. Existing followers are automatically eligible to win.

BLOG HOP Schedule:
April 1-21.
April 1- Robert Kaufman/Jennifer Sampou- announce blog
April 2- Janice Ryan- Better off Thread
April 3- Alissa Haight Carlton- Handmade by Alissa
April 4- Julie Herman- JayBird Quilts
April 5- Natalie Barnes- Beyond the Reef
April 6- Stash Books- C&T Publishing
April 7- Amanda Jean Nyberg- Crazy Mom Quilts
April 8- Lee Heinrich- Freshly Pieced
April 9- Cheryl Arkinson- Naptime Quilter
April 10-Christina Cameli- A Few Scraps
April 11-Elizabeth Hartman- Oh Fransson
April 12-Faith Jones-Fresh Lemon Quilts
April 14- Katie Blakesley- Swim Bike Quilt
April 15-Amy Smart-Diary of a Quilter
April 16- Laura Nownes, Jennifer Rounds, Pati Fried, Darra Williamson- See How We Sew
April 17-Holly DeGroot- Bijou Lovely
April 18-Jennifer Sampou-Wrap Up
April 21-Jennifer Sampou- Announce Winner of Giveaway FQ Pack of entire ShimmerCollection.
If you need some more Shimmer in your life you can check out Shimmer on the Robert Kaufman Website

And if all of that isn’t enough, The Cotton Patch (CA, USA) is taking pre-orders of Shimmer.

Welcome to Pretty Bobbins! I’m stop number two on the Cushion for Christmas bloghop and today I’m sharing a QAYG cushion tutorial. The lovely Ms Midge came up with the great idea to feature cushions that can be made in a day – the ideal Christmas gift! Speaking of Ms Midge, I’m pretty sure she is freaking out right about now as my modem died over night and I have been offline for over 24 hours leading up to my stop on the hop… Amazing how long the battery lasts on my iPad when there is no wifi in the house

I am sharing a cushion that I made yesterday morning. I didn’t time myself but I started after breakfast and finished before lunch, so it is definitely do-able in a day I am familiar with the techniques though, so it might take a beginner a bit longer I find the key to the Quilt As You Go (QAYG) method is to be organised. I set up my machine, ironing station, cutting mat and fabrics (in order) within reaching distance. I used a 16″ cushion insert. I pieced together cotton wadding and cut backing both at 18″ square.

Now my QAYG cushion is technically not QAYG as I didn’t quilt the sections other than to sew them in place. Usually with QAYG you will sew your strip down as I describe below, flip it right side up, then quilt it in place. I have done this and it does look rather lovely but I find it to be an unreasonably time consuming and thread hungry method. So I cheat a little Below you can see a lovely QAYG iPad pouch I made last year. I keep meaning to FMQ over a cushion that I’ve made using my cheats QAYG method but I always love the end result too much to add any extra quilting The choice is yours


I started with a reasonable sized scrap off center and then added a piece that covered the width and over hang 1/4″ each side. I cut all my pieces 1.5″ wide and worked out the length as I went along. The key being to ensure that each piece overhangs by 1/4″ at both ends.

I used my walking foot which has 1/4″ marked on it and I secured my stitches by going back and forth a few times at each end. I didn’t use any pins, I just lay my wadding on my backing and they stayed in place while I was working. After sewing each strip in place I trimmed back any overhang from the previous piece to the 1/4″ seam allowance. After trimming I ironed the most recent piece flat. Ironing after adding each strip will give you the best outcome.

I was trying to be clever with colour and laid all of my prints out in order and then checked as I went along. I didn’t quite get the affect that I was aiming for but I’m still really happy with the cushion.

After finishing the teals I laid out the purples. So pretty

I found it easiest to use my ruler to measure the required size of the next strip. You need to ensure that you strip has 1/4″ seam allowance from any raw edges.

In the above example the strip would need to be 7.25″ x 1.5″
I started to fall in love with this cushion when I was about half way through adding the purples

There’s something about pink that I love. In hindsight I should have gone teal, pink then purple but in the end I added the pinks starting from light to dark (both purple and teal were added lightest to darkest).

I realised after adding a few pinks that I didn’t have enough to continue with only 1.5″ strips so I laid out my remaining pieces to finalised the placement. I started with an 18″ square piece with the intention of a finished 15″ cushion cover.

After adding all of my pins I trimmed back my mini to 16″ (width) x 17″ (height) and cut a backing piece the same size.

I decided on a zipper closure in the bottom seam and I always like to add an extra inch for this purpose. I don’t have access to my overlocker/serger at the moment so I used a flatlock stitch on my sewing machine along the bottom edge (17″ edge – important if your prints are directional).
Lay both your backing fabric and mini right sides together and stitch 1/2″ in from the edge. This will be where you insert your zipper. You want approximately 1.5″ at both ends in your normal stitch length and the area in between in the longest stitch length possible. You can sew these three areas separately, but I’m lazy and just secure my stitches and adjust my stitch length without trimming

After timming your threads press the seam open. Because we’re making a cushion cover that involves quilting I always fuss with the pressing. You want a nice straight and flat seam

Select a zipper longer that the width of your cushion (I think I used a 21″ zipper) and pin in place so that the teeth are ligned up to where the front and backing meet. I use pins to remind me where my basting stitches begin/end. Grab your zipper foot and sew your zipper in place. Don’t forget to make sure that the tab is within the sewn area. I cross over the zipper just outside of the basting stitches and sew back and forth a few times.

Trim your zipper ends and secure with a few stitches. Next you want to grab your seam ripper and carefully rip out those basting stitches. I usually use tweezer to grab the tiny threads left afterwards.

Then you want to sew your cushion cover together. Make sure you leave the zipper open so that you can turn it right side out. I like to use a 1/4″ seam allowance, first with a straight stitch and then with the serger or a zigzag stitch to prevent fraying.
Et voila! You have a brand new cushion ready for Christmas!

I used a lovely Kate Spain fat quarter (from her line Good Fortune) for the back. LOVE.

I hope you have found my tutorial helpful. For me, as always, this was an exercise in colour play as much as it was in quilting and whilst I didn’t end up with exactly the affect I was after, I do love it In case you’re wondering, yes, it will be a Christmas present for a very special friend
Don’t forget to head over to Ms Midge on the 14th of December to link up your cushions. You can find all of the details here and links to the other fabulous bloggers below. I can’t wait to see what everyone has been up to!
Sunday 1st December – Ms Midge
Tuesday 3rd December – Kristy at Quiet Play
& Ms Midge
Wednesday 4th December – Joshua at Molli Sparkles
Thursday 5th December -Rachel at Little White Dove
Friday 6th December – Fiona at Finding Fifth
Saturday 7th December – Abby at Things For Boys
Sunday 8th December – Lauren at Molly & Mama Makes
Monday 9th December – Jodi at Tickle & Hide
Tuesday 10th December – Adrianne at On The Windy Side
& Ms Midge
Wednesday 11th December – Alyce at Blossom Heart Quilts
Thursday 12th December – Gina at Party of Eight
Friday 13th December – Jane at Quilt Jane
Saturday 14th December – Round up of Blog Hop and link up YOUR projects at Ms Midge!
Wednesday 18th December – Winners Announced at Ms Midge!
 |
| Patterns Only - $20 Voucher |
 |
| The Oz Material Girls - $20 Voucher |
 |
| Fat Quarter Shop - $50 Voucher! |
 |
| Polka Dot Tea - Fabric Bundle! |
 |
| Intrepid Thread - $25 Voucher! |
 |
| Blossom Heart Quilts - Ornamental Quilt Pattern! |
 |
| Quiet Play - Winner’s choice of 3 Paper Piecing Patterns! |
Let the cushion madness begin!
It’s the 25th of November and in case you needed reminding, Christmas is just around the corner!!!! Eeeek! I’m joining the wonderful Ms Midge and a host of other talented bloggers in December for the “A Cushion For Christmas” blog hop. You may have noticed that I have a thing for cushions (or pillows, depending on where you live in the world. I’m talking the decorative type, not the ones you sleep on.) and I’m really excited to see what everyone comes up with.

A few of my all time favourite cushions that I’ve made <3
Ms Midge will be kicking off on December 1st followed by little old me on the 2nd. You can see the full schedule below and Midge has promised to post tips and tutorials during the hop to get you started. There will also be a linky party and some fun prizes at the end!

I can’t wait to decorate my new house with these pretties! I miss them…
If you’d like to join in, you can find the code for the button at Ms Midge and feel free to add it to your blog sidebar. If you don’t have a blog you can join in by emailing your finished projects to Ms Midge (details on her blog). There is also a Flickr group for you to join HERE.
asdf
Sunday 1st December – Midge at Ms Midge
Tuesday 3rd December – Kristy at Quiet Play
Wednesday 4th December – Joshua at Molli Sparkles
Thursday 5th December – Alyce at Blossom Heart Quilts
Friday 6th December – Fiona at Finding Fifth
Saturday 7th December – Abby at Things For Boys
Sunday 8th December – Lauren at Molly & Mama Makes
Monday 9th December – Jodi at Tickle & Hide
Tuesday 10th December – Adrianne at On The Windy Side
Wednesday 11th December – Rachel at Little White Dove
Thursday 12th December – Gina at Party of Eight
Friday 13th December – Jane at Quilt Jane
Saturday 14th December – Round up of Blog Hop and link up YOUR projects at Ms Midge!
A big shout out to the fab sponsors of the hop -
|
| Patterns Only |
|
| The Oz Material Girls |
|
| Fat Quarter Shop - $50 Voucher! |
|
| Polka Dot Tea - Fabric Bundle! |
|
| Intrepid Thread - $25 Voucher! |
|
| Blossom Heart Quilts - Quilt Patterns! |
|
| Quiet Play - Paper Piecing Patterns! |
Now I have to get back to my moving lists and then get onto making my cushion. I’m going to be focussing on fun colours and the Quilt As You Go (QAYG) technique <3
Welcome to my day of the Kate Spain blog hop hosted by the lovely Alyce of Blossom Heart Quilts. If you are new to Pretty Bobbins, please check out my Photo Gallery where you can see most of my finishes. I’m a bit of an Instagram fiend, so feel free to follow me over there too for lots of in-progress pics You’ll find all of my social media links just to your right —>
I’m not sure when I first happened upon Kate Spain’s gorgeous prints, but I do know what drew me to them. I love the colours that she uses, the prints themselves are beautiful and the palette is always stunning. When Alyce contacted me about the hop I had one lonely wonky star on my design wall and a hankering to create a beautiful quilt using some of my favourite prints. Perfect timing really
I see every quilt as an opportunity to get my FMQ on and have some fun. I originally started quilting Starry Skies with a pale pink in a swirl design but it wasn’t quite right so I ripped it out and came up with a design inspired by the final fight scene in Mulan where the baddy zooms off on a firecracker and the screen is enveloped in swirly clouds and zooming streaks of rockets (Mulan is a favourite movie around here at the moment).
I really had a lot of fun pairing my favourite Kate Spain prints with some stash favourites. Looking at this quilt makes me happy, it’s a good thing to capture so many favourite prints in one quilt to keep forever and the Bella Steel really makes them pop.
I used a lovely soft grey Robert Kaufman flannel on the back which was a dream to quilt. I find that flannel moves around on the machine so much better when FMQing but clings to the wadding; win-win!
I machine quilted Starry Skies with Aurifil 2605 in 50wt and hand quilted around the stars in some of Aurifil’s gorgeous verigated threads in 12wt (3770, 4662, 3840, 4660). I much prefer Aurifil’s 12 wt to Perlé 8 which is what I previously used for hand quilting. Has anyone tried the new Aurifil floss? I’d love to hear your thoughts
 |
| I love these Good Fortune Dragon Flies! |
Putting this quilt together I really was impressed with how well Kate’s different lines go together.
 |
| Here you can see prints from Terrain, Good Fortune and Cuzco. |
Are you sick of the photos yet? I really do love this quilt The pattern will be available in my craftsy store soon.
My nearly 3 year old daughter claimed this quilt as hers and happily slept under it for the first time last night. I had planned to either sell it or use it as a lap quilt, but at 41″ x 58″ it fits her toddler bed nicely. Can you believe it lost 2″ width and 4″ length after washing and drying, even after pre-washing and drying the flannel?!
We had a stunning sky yesterday when photographing the quilt and tried our best to capture it.
I think these clouds might just inspire some more FMQ!
This quilt was pieced and quilted by me on my Bernina 440QE.
Size: 41″ x 58″
Materials: Prints from Terrain, Cuzco and Good Fortune as well as some stash favourites, Moda Bella Steel and Berrylicious (binding).
Thread: Aurifil 50wt 2605 and 3770, 4662, 3840, 4660 in 12wt.
So if you’ll excuse me I’m just going to go enjoy this little scene again, nothing like Mummy made quilts :)
 |
| L-R: Rainbow I Spy quilt, Starry Skies quilt, Kitchen Windows |
We’re nearly at the end of the Kate Spain blog hop, but there is still lots of fun to be had. You can link up any Kate Spain projects you have made prior to the hop here (there are some great prizes on offer!). Or, if you’ve been inspired by the fantastic hoppers, you can link up any Kate Spain project made during the hop on June 28 at Blossom Heart Quilts (the linky will be open for a week). And all those questions you’ve been dying to ask Kate, please add them to the comments of this post so that Alyce can get some answers for you
Thanks so much Alyce for organising such a gorgeous blog hop and a huge thank you to the generous sponsors who have donated some great prizes! Scroll down for links and dates of all the hoppers!
Mystery prize from Kate Spain
Serenade layer cake
In From The Cold fat quarter bundle
Sunnyside Up 16pce fat eighth bundle
$20 gift voucher
$25 gift voucher
$25 gift voucher
Fandango 12 pce fat quarter bundle thanks to Red Coconut
Monday June 3rd - Interview with Kate Spain
Tuesday June 4th - Interview Part 2 and Jane at QuiltJane
Wednesday June 5th – Christa at Christa Quilts
Thursday June 6th – Kimberly at Fat Quarter Shop
Friday June 7th – Laura at Quokka Quilts
Monday June 10th – Chrissy at Sew Lux
Wednesday June 12th – Julie at The Intrepid Thread
Thursday June 13th – Kristy at Quiet Play
Friday June 14th - Link up your favourite Kate Spain project! and Lynne at Lily’s Quilts
Monday June 17th – Alyce at Blossom Heart Quilts
Tuesday June 18th – Heidi at Fabric Mutt
Wednesday June 19th – Melissa at Ms Midge
Thursday June 20th – Jess at The Elven Garden
Friday June 21st – Janice at Better Off Thread
Monday June 24th – Diane at From Blank Pages…
Tuesday June 25th – Me! Pretty Bobbins
Wednesday June 26th – Kara at Me And Elna
Thursday June 27th – Readers’ Q&A with Kate Spain at Blossom Heart Quilts
Friday June 28th - Link up your blog hop projects!
Sorry for the silence around here, I’m just back from a week break and it was so chaotic before we left that I didn’t have time to schedule any posts. I’m planning to post tomorrow about our trip and link up for Sunday Stash with a few little textile goodies that I purchased in Vanuatu. I’ll also share the highlights of our eventful trip.
The lovely Alyce was kind enough to swap hop days with me on the Kate Spain blog hop. Our flights back to Nouméa were cancelled and I’ve been sick and I really, really, really need a few extra days to give my hop project the love it deserves So make sure you pop by Alyce’s blog on Monday and then back here on the 25th I’ll post the list of all the hoppers at the bottom of this post, some of my favourite bloggers are involved!
But right now is the time to link up projects that you have using Kate Spain’s prints prior to the hop. Head over to Blossom Heart Quilts for the link party. There are some beautiful projects already linked up, so make sure you head on over
I’m generally not one to make a project from a single line of fabric. I am one to buy an entire line of fabric though Yes, I am saving a FQ bundle of Good Fortune for a rainy day and I have a charm pack of Cuzco here waiting for just the right project. Late last year I was lucky enough to win some FQs of Kate Spain’s Christmas line, Joy. I featured it in my curves class project earlier this year and I’m looking forward to hanging it on the wall this coming Christmas.
How cute is that Kate Spain Christmas tree?
Possibly my favourite Kate Spain project in my sewing room is not by me, but by the lovely Kristy of Quiet Play Kristy made me this beautiful quilted canvas for my Birthday earlier this year, it sits right above my sewing machine and I love it.
The lovely Marieka also cottoned onto my love of Kate Spain’s prints and made me a beautiful sewing machine cover for our Secret Santa last year.
Even the back is pretty!
But right now I’m going to head back to my hop WIP which features prints from Cuzco, Good Fortune and Terrain. I’ve just finished handquilting and I’m really excited about this lap quilt that my daughter has claimed
Don’t forget the linky on the 28th of June for any finished project you have made uding the hop (this June) using Kate Spain’s fabrics. It doesn’t need to be a quilt, I just can’t resist
Blog Hop Stops:
Monday June 3rd - Interview with Kate Spain
Tuesday June 4th - Interview Part 2 and Jane at QuiltJane
Wednesday June 5th – Christa at Christa Quilts
Thursday June 6th – Kimberly at Fat Quarter Shop
Friday June 7th – Laura at Quokka Quilts
Monday June 10th – Chrissy at Sew Lux
Wednesday June 12th – Julie at The Intrepid Thread
Thursday June 13th – Kristy at Quiet Play
Friday June 14th - Link up your favourite Kate Spain project! and Lynne at Lily’s Quilts
Over the next two weeks you can find ideas and inspiration here:
Monday June 17th – Alyce at Blossom Heart Quilts
Tuesday June 18th – Heidi at Fabric Mutt
Wednesday June 19th – Melissa at Ms Midge
Thursday June 20th – Jess at The Elven Garden
Friday June 21st – Janice at Better Off Thread
Monday June 24th – Diane at From Blank Pages…
Tuesday June 25th – Gemma at Pretty Bobbins
Wednesday June 26th – Kara at Me And Elna
Thursday June 27th – Readers’ Q&A with Kate Spain at Blossom Heart Quilts
Friday June 28th - Link up your blog hop projects!
I like pretty fabric. I remember visiting fabric stores with my Mum when I was little and touching all the pretty fabrics. I used to love diving into her stash, looking at all the pretty prints imagining what they might become (funny story, she used to make gym gear in the 90s and our cat decided her lycra stash was a good snack!). The only bit I didn’t enjoy was the pattern selection. I wanted a dress that was exactly the same as the one in the shop, then we finally would choose a pattern that I liked but I wanted exactly the fabric on the pattern cover. Ah, I now get the joy of experiencing this all over again, this time I’m the parent LOL
 |
| Some Kate Spain yardage that I’m hoarding. |
Anyway, as I was saying, I do love me some pretty prints and you may have noticed that button up there I have a thing for Kate Spain. I really do. I love her prints in the kind of way that I wish I’d bought more of each line before it became hard to find. I am down to my last lonely scrap of pink and orange leaves from the Terrain line (see tree below). It’s at the point where I might cry when I use it that final time…
 |
| Paper Pieced New Caledonian house with a pretty Kate Spain tree |
But getting back to the point I am super excited to join Alyce and a heap of fantastic bloggers in announcing a Kate Spain blog hop! You can find Alyce’s post with all of the details here. The hop runs from June 3-28 with two linkys at Blossom Heart Quilts and lots of prizes up for grabs.
 |
My Good Fortune FQ bundle, I’ve only just started using it, I would take it out to photograph,
but then it wouldn’t be so perfectly folded. Did I mention I have a thing for Kate Spain?
|
On the 14th of June you can link up your favourite project that you’ve made of (mostly) Kate Spain prints and on the 28th link up any finished project that you have made during the hop with Kate’s prints.
 |
| How pretty is this Peacock?! |
I have a fun project that I am going to share with you on the 17th, so make sure you pop back I’m using some Cuzco, Terrain and Good Fortune, I love how they mix and match so well!
 |
| I couldn’t resist a charm pack of Cuzco <3 |
A massive thank you to the Blog Hop sponsors who are providing some brilliant prizes for the link ups!
Mystery prize from Kate Spain
Serenade layer cake
In From The Cold fat quarter bundle
Cuzco mini fat quarter bundle
$20 gift voucher
In From The Cold jelly roll
Here’s the schedule, so make sure you’re following via Facebook or subscribed via the sidebar options to keep in the loop of where to go each day!
Monday June 3rd – Interview with Kate Spain at Blossom Heart Quilts
Tuesday June 4th – Jane at QuiltJane
Wednesday June 5th – Christa at Christa Quilts
Thursday June 6th – Kimberly at Fat Quarter Shop
Friday June 7th – Laura at Quokka Quilts
Monday June 10th – Chrissy at Sew Lux
Tuesday June 11th – Lynne at Lily’s Quilts
Wednesday June 12th – Julie at The Intrepid Thread
Thursday June 13th – Kristy at Quiet Play
Friday June 14th - Link up your favourite Kate Spain project!
Monday June 17th – Me!! at Pretty Bobbins
Tuesday June 18th – Heidi at Fabric Mutt
Wednesday June 19th – Melissa at Ms Midge
Thursday June 20th – Jess at The Elven Garden
Friday June 21st – Janice at Better Off Thread
Monday June 24th – Diane at From Blank Pages…
Tuesday June 25th – Alyce at Blossom Heart Quilts
Wednesday June 26th – Kara at Me And Elna
Thursday June 27th – Readers’ Q&A with Kate Spain at Blossom Heart Quilts
Friday June 28th - Link up your blog hop projects!