Archive of ‘Fabric’ category
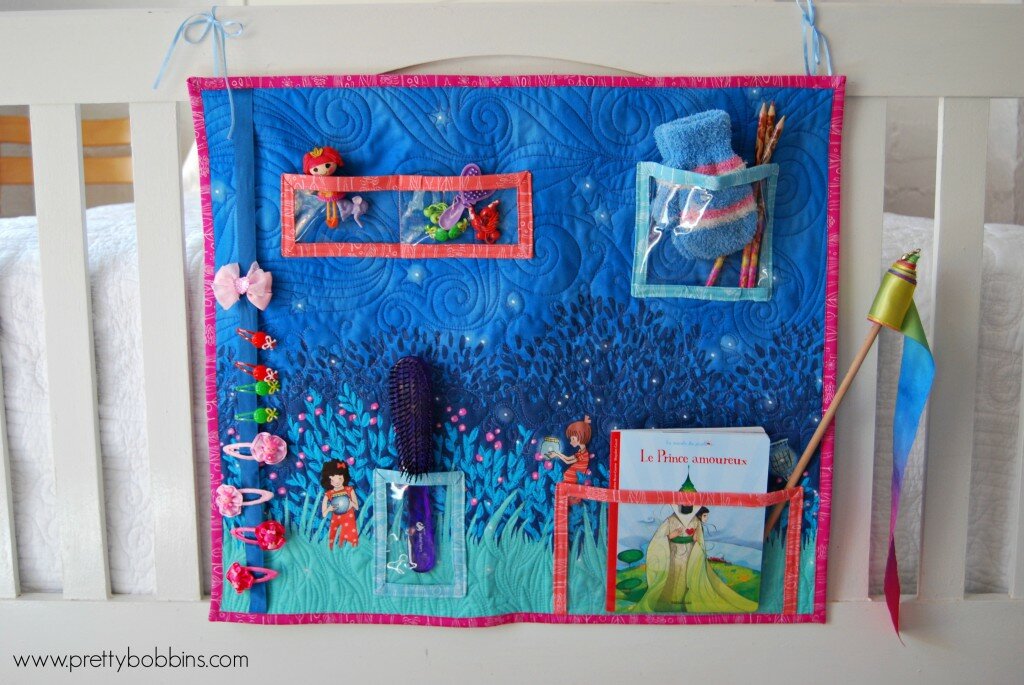
Hanging Organizer Tutorial fit for a wee princess!
When the super talented Sarah Jane put the call out for blogger to work with her new line, Wee Wander, I couldn’t help but put my hand up!

Today I’m sharing a tutorial for a Hanging Organizer. I have a lovely three year old daughter who certainly could do with a little help organizing her important and precious belongings and she just LOVES her pretty new organizer <3
Fit for a princess!
Let’s get started! You will need…
Supplies:
- 1 panel Wee Wander
- Backing fabric (32″ W x 29″ H)
- Wadding (28″ x 25″)
- Hanging sleeve (5′ x 23″)
- 1 piece clear vinyl 11″ x 15″ (I repurposed one of those clear zip bags that pillows and linen come in)
- 12″ x WOF (width of fabric) for binding OR purchase aprox 250″ premade double bias binding (you will have lots left over!)
- 60″ ribbon for clip strip and hanging
- 24″ long piece of dowel rod for hanging
- usual quilting supplies
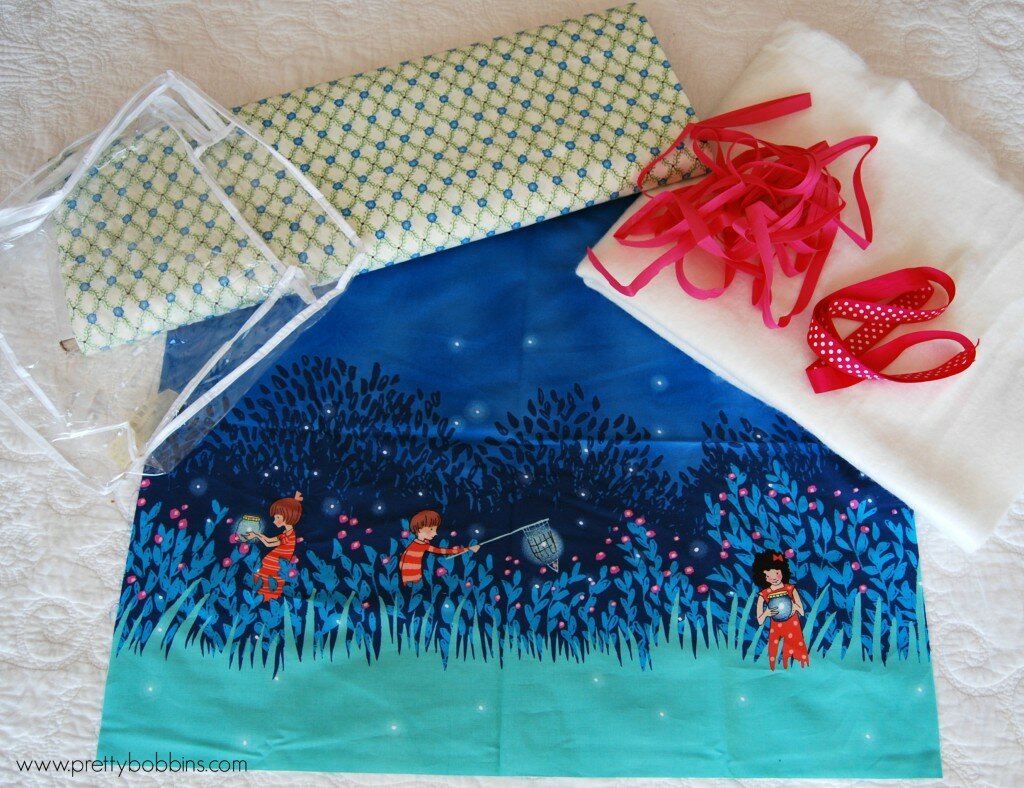
Gather your supplies
Prepare and quilt you Wee Wander panel for quilting. I cut backing to 32″ x 29″, wadding 28″ x 25″ and the panel to 21″ x 24″. I changed threads a few times and let Sara Jane’s whimsicle design dictate my quilting. TIP: I always find it best to quilt wall hangings quite densely so they sit nice and flat.
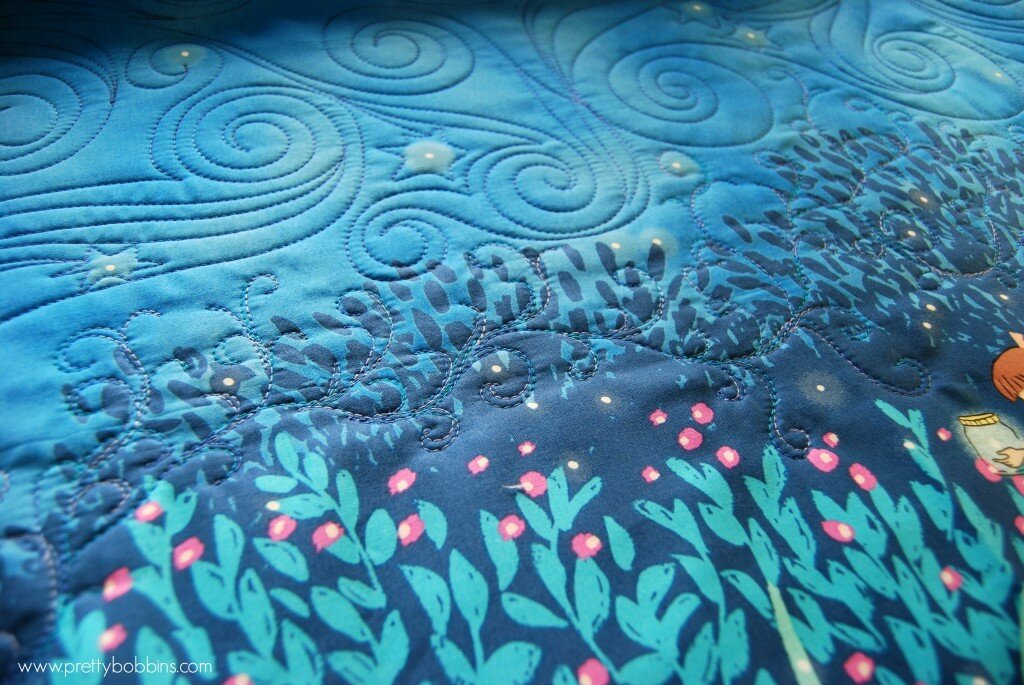
Quilt to your heart’s content!
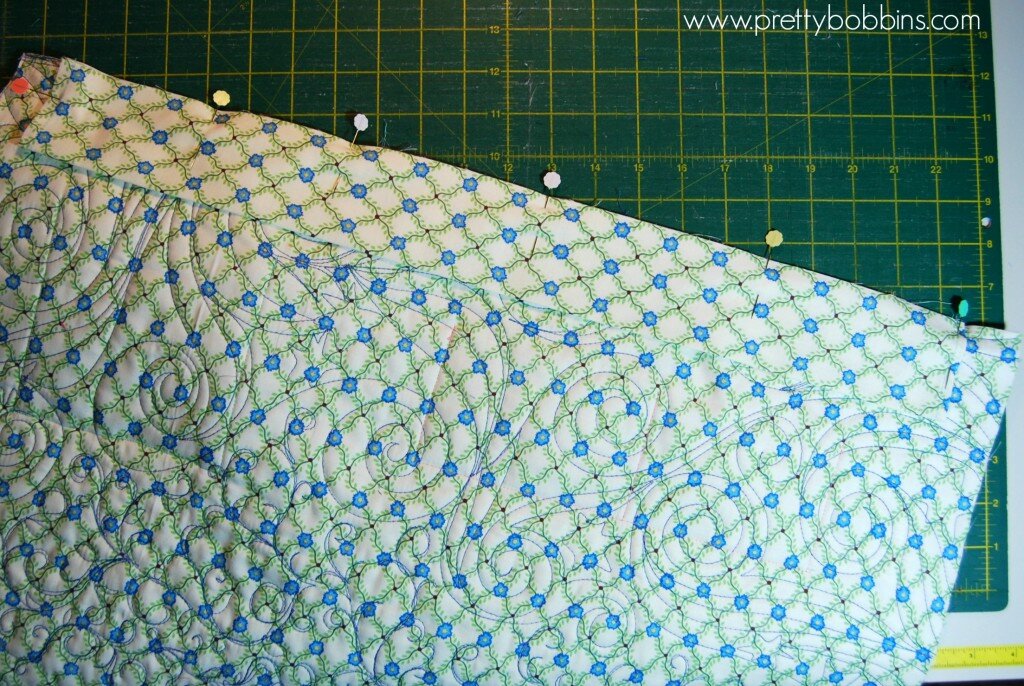
Once you have finished quilting your panel, trim it so it is nice and square, then set it aside.
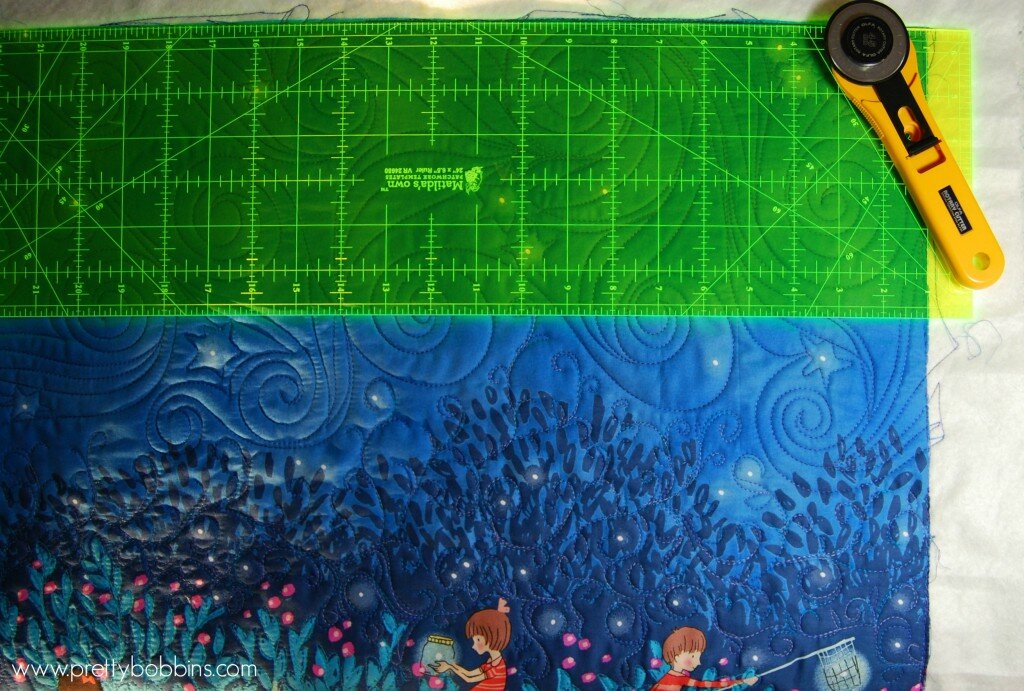
Trim your quilted panel
Prepare your binding. I wanted to feature a number of Sara Jane’s prints for the binding, but you can use pre-made double bias binding or make your own. You will need 105″ binding for the outside of the organiser and four smaller pieces for the plastic pockets:
- Pocket A 37″ of double fold binding
- Pocket B 36″ of double fold binding
- Pocket C 29″ of double fold binding
- Pocket D 43″ of double fold binding
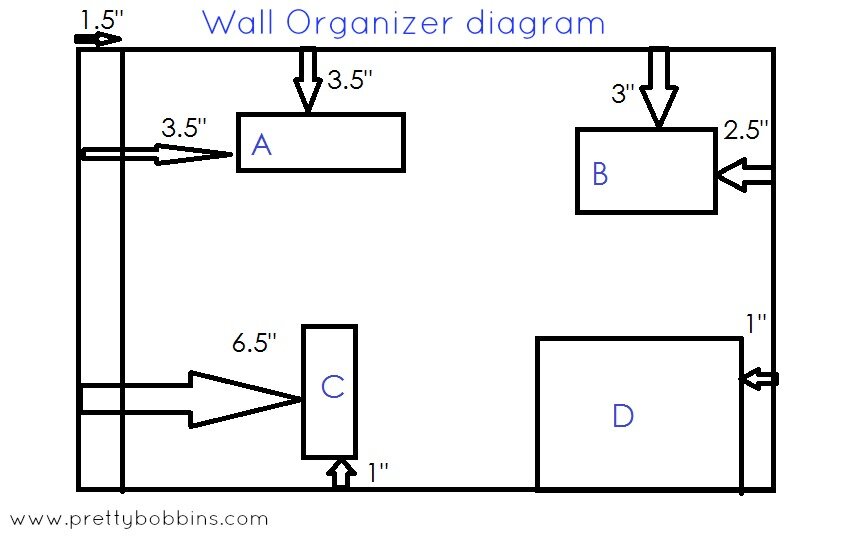
Prepared your clear plastic/vinyl pockets. Cut one each of:
- Pocket A 3″ x 9.5″
- Pocket B 5″ x 7″
- Pocket C 5″ x 3.5″
- Pocket D 9.5″ x 6″
Bind all four sides of A, B and C. Bind three sides of D (leave one of the long sides raw).

Binding tips
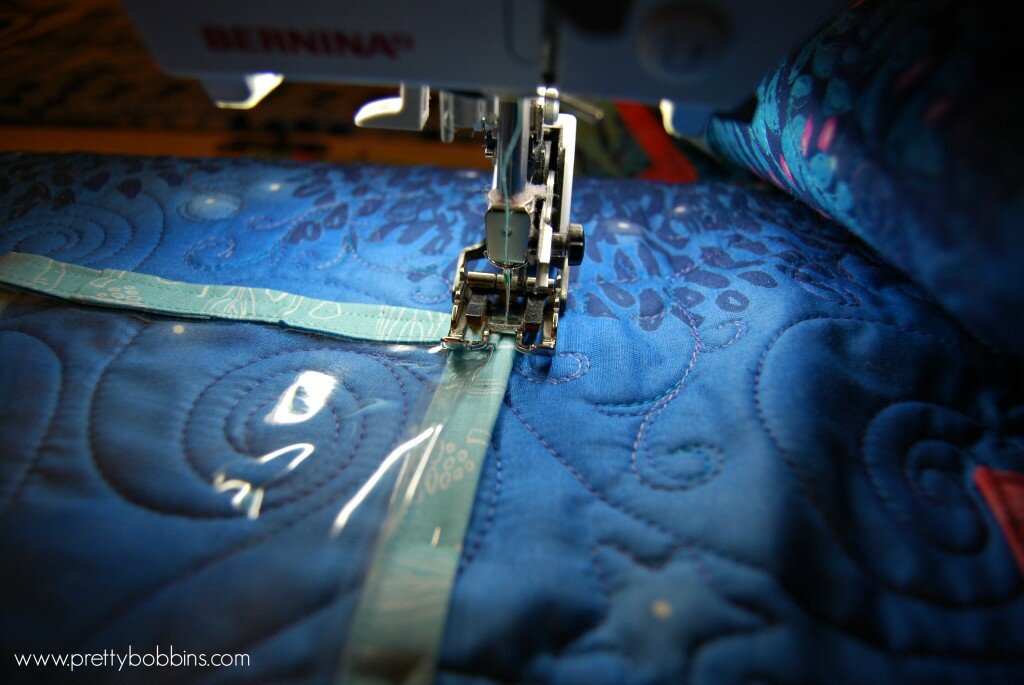
Cut a 23″ length of ribbon for your clip strip. My ribbon is .75″ wide.
Place your pockets where you would like them. DO NOT PIN THEM!! I decided to fold the bottom two corners of pocket B in a little so that the pocket sits out and can take bigger objects. TIP: make sure that you don’t place your pockets directly over the parts of the panel that you would like to feature.
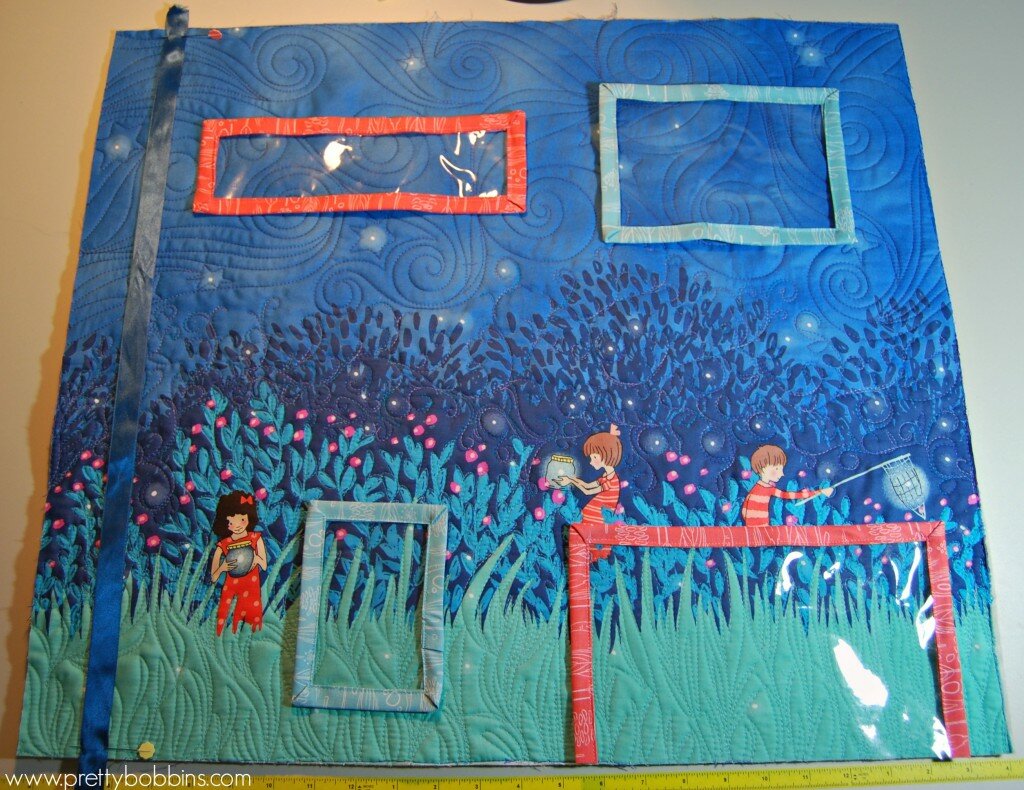
lay out pockets
Once you are happy with the placement of your ribbon and pockets you can pin them carefully within the found section. The pins will leave holes in the vinyl so please be careful 
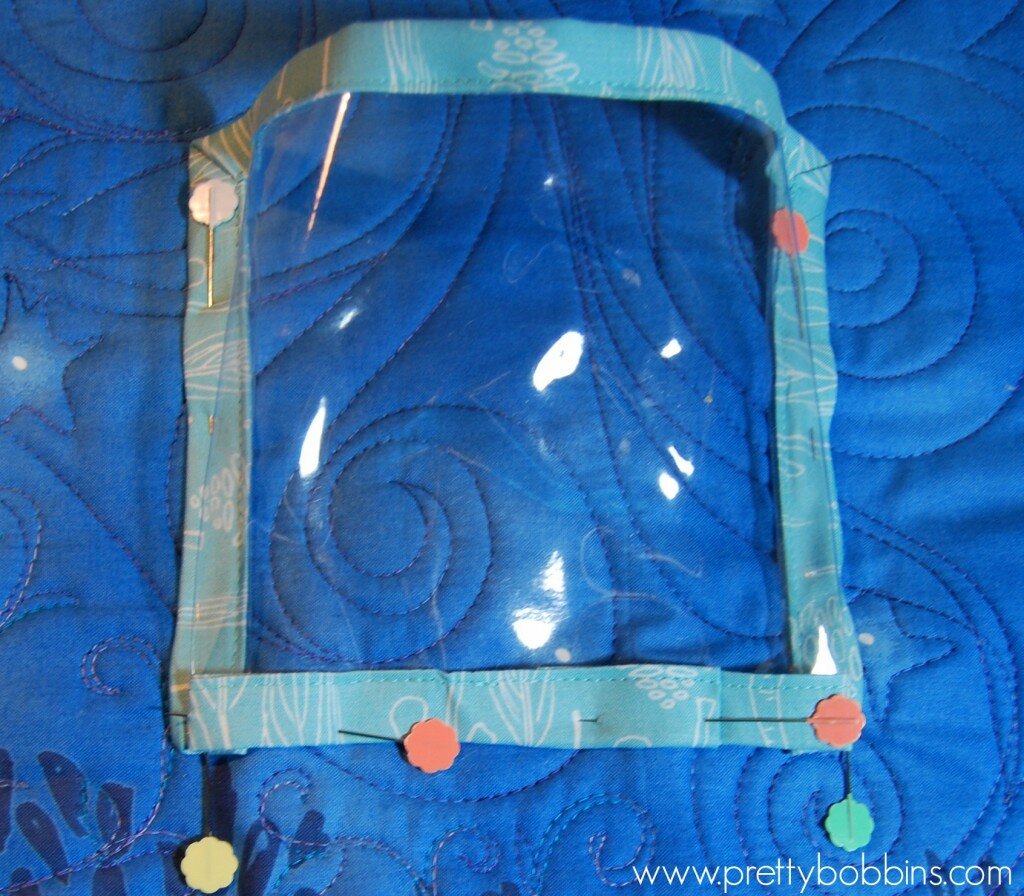
Pin your pockets on the binding so that you don’t mark the vinyl.
Sew your pockets in place. I used a walking foot as the bound vinyl is somewhat bulky.
Sew pockets in place
Prepare your hanging sleeve. Take your 5″ x 23″ strip of fabric and fold both short ends in by 1/4″ and again by 1/4″ to conceal the raw edges. Sew in place, fold in half with wrong sides together and press. Center your hanging sleeve on the top back edge of your organiser (raw edges togethre) and sew in place within the 1/4″ seam allowance.
Apply binding. I applied my binding to the back and then machine stitched it down to the front. This is a quick,easy and neat way of binding. Crazy Mom Quilts has a great tutorial here.
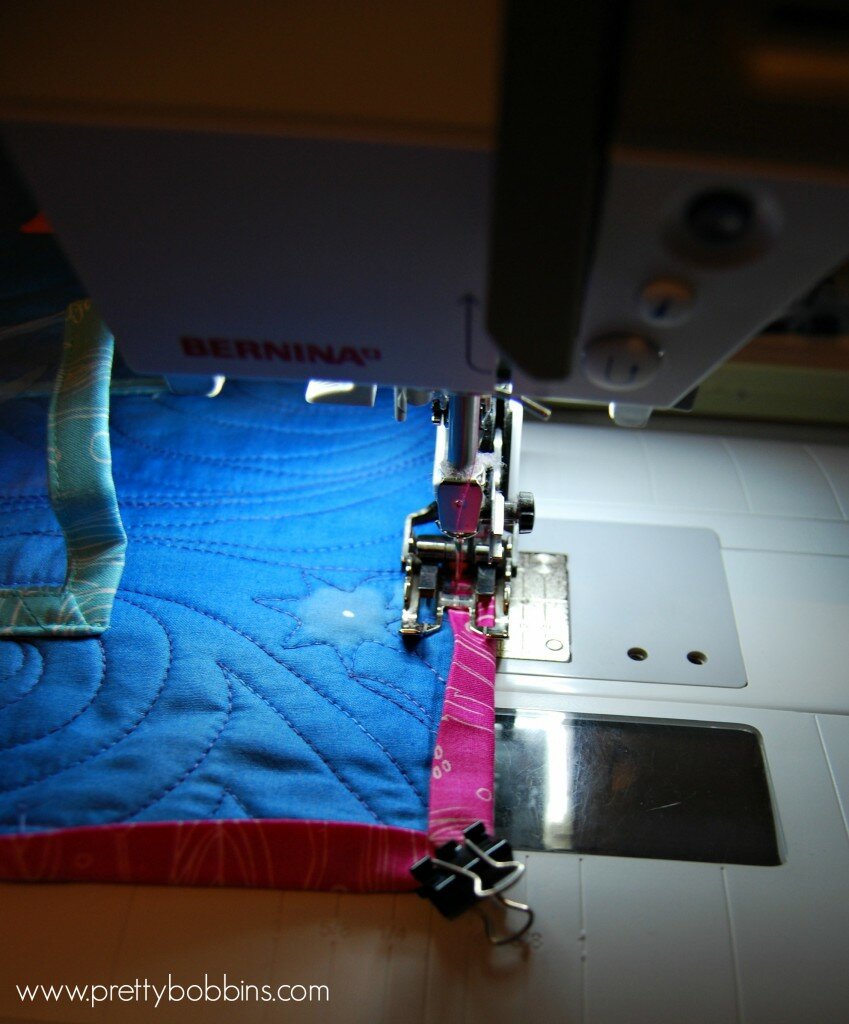
I applied my binding to the back and then machine stitched it in place on the front
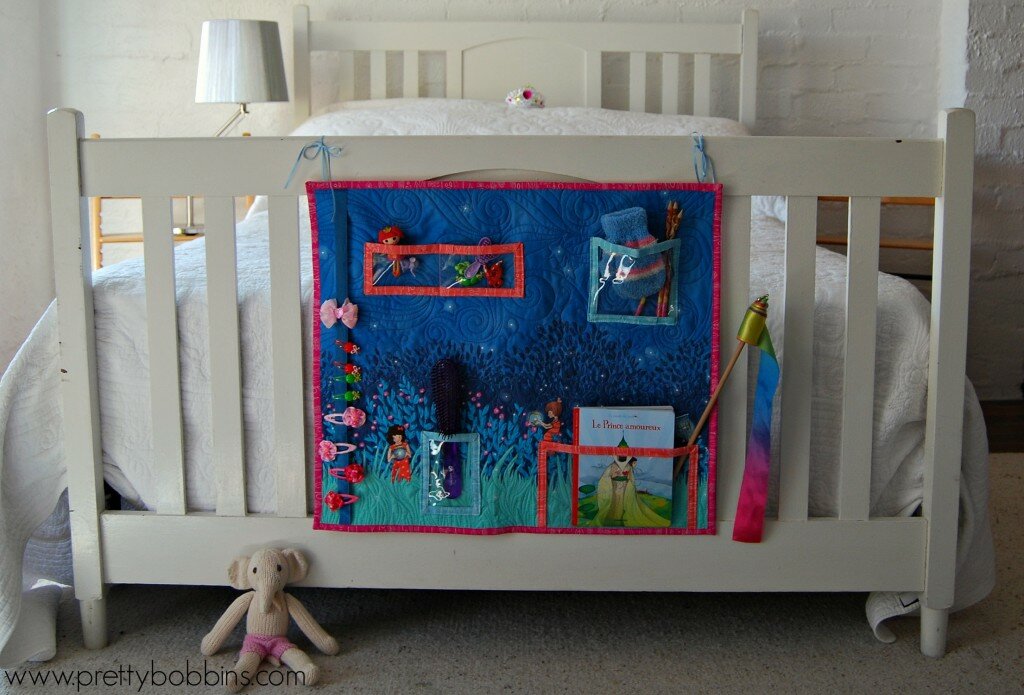
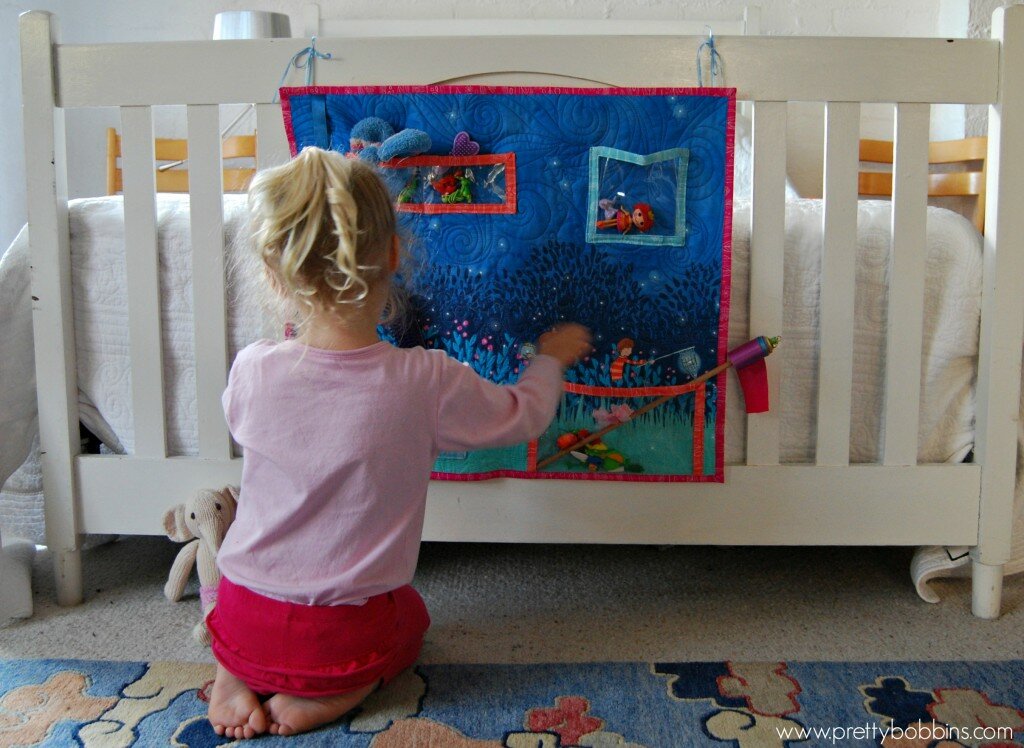
Use your remaining ribbon and dowel to hang your organiser in place. Fill with all your precious items <3

A place for everything and everything in it’s place <3
Then let your wee one re-organize to their heart’s content!
Thanks for stopping by and a big thank you to Sarah Jane for always producing such beautiful illustrations and for turning them into fabric that we can use and love! I’ve loved being part of this blog tour <3 You can find out more about Wee Wander here <3
Welcome to I Quilt at Pretty Bobbins! The last week has been a flurry of activity in the studio as I finished off a heap of quilts and have been getting ready to submit them to a quilt show Entry is due by tomorrow, but if you’re interested you can check it out here.

First up I finished binding “Dream in Colour”. You may remember it from way back last year… On second thought I may not have shared it before… It is pieced using scraps from a beautiful plus quilt (still haven’t finished that one…) and is meant to hang in my studio to remind me to take my vivid, colourful dreams and make them real and tangible.

Made with scraps and quilted with dense, wonky, SLQ
Then I bound my improv, self-reflective, arty-farty piece. I wrote about this quilt a few weeks back, it breaks all of the “rules” and I will be interested to hear feedback from the judges and people who visit the show.

Not the best photo I’m afraid..
I’m also entering the quilt that doesn’t have a name that I recently had in a local show. It mixes hand quilting, longarm quilting, improv piecing, needle-turn applique and goodness knows what else! 

I’ve filled out entry forms for a couple of minis but then I remembered the Blessings Quilt and my lovely friend agreed that she was happy for me to enter it.

All in all I’ve entered seven quilts and I’ll be stitching on a heap of hanging sleeves if they’re all accepted! Which is a nice segway to my topic of this week; hanging sleeves. Do you have a favorite hanging sleeve method or tutorial? I used the directions from the Canberra Quilter’s recently, but I know many shows provide specific dimensions. If I am making a small wall quilt for my house, I generally just do a pocket in each corner and hang it with a piece of dowel. This method has the added bonus of avoiding handstitching
Next time I attach a hanging sleeve I am going to go with a D shape, similar to this tutorial by Tallgrass Prairie Studio.
I haven’t featured a quilter this week as I haven’t had the time to seek permission and my Dad arrived today and I really need to get out of the studio and spend some time with him Please add your link below and don’t forget to add the linky button or a link to my blog in your post or side bar. To those of you celebrating, have a lovely Easter and to those of you who aren’t, have a great weekend xx
An InLinkz Link-up
Welcome to Pretty Bobbins! Today is my day in Jennifer Sampou’s blog hop for her new line Shimmer. I am super excited to be involved and I have a lovely fabric giveaway for you <3

I was so excited when Jennifer first contacted me to be part of the Shimmer party, and had a lot of trouble deciding which prints to use, they’re all gorgeous! The sparkle of these prints is just fantastic and I really love the wavy line prints, very dynamic and ones I know that I’ll be using again and again.

We’re heading into winter here in Australia and I couldn’t resist making a sparkly, modern lap quilt to snuggle up under and reminisce about summer time. We have beautiful, clear skies in Autumn here in Canberra and photographing this quilt by the lake was a lot of fun. I love how the piecing looks like part of the skyline, totally coincidental but I’ll happily claim good design

I was inspired by Jennifer’s cushions (check out her lookbook!!) and backed it in a super soft, cream minky and it’s super soft and cuddly.

I really wanted to come up with a design that was modern and featured Jennifer’s gorgeous prints. The improv curves with set in contrasting blocks nicely highlight how well this line plays together. I must say, as a longarm quilter some metallic prints are very troublesome to work with, Jennifer’s line quilted BEAUTIFULLY without a tension issue anywhere in sight! If you want metallic highlights and lots of shimmer AND you love to quilt, then Shimmer is a must! As always I used my favourite thread, Aurifil 50wt in 2000, 2600 and 5004.

This lap quilt measures 38″ x 62″ and was made for cuddling <3

I still haven’t decided which way is up and which was is down (is it stormy seas or dark skies over snow?) but I love the subtle prints and tones.

I had a heap of fun finding all the background shimmer that I could. I can’t lie, this quilt was fun from beginning to end

So now that you’re dying to get your hands on some Shimmer I can happily tell you that there is lots on offer! It will be hitting stores soon, but in the meantime you can win some right here at Pretty Bobbins and at each of the other stops on the blog hop (schedule below)!!

All you have to do is leave me a comment on this post before 18 April (I’m sticking to a US timezone for this giveaway) and a charm pack of Shimmer could be heading your way! I will use a random number generator to pick a winner, but if you like you can let me know what your favourite charm square project is

Bon chance!
And if a charm pack isn’t enough Shimmer for you, you can head over to Jennifer’s blog for a chance to win a fat quarter bundle of the entire Shimmer line!! To enter the giveaway, new readers should sign up on Jennifer’s mailing list and comment on her blog before the end of the hop. Be sure to comment about your favorite projects and why. Existing followers are automatically eligible to win.

BLOG HOP Schedule:
April 1-21.
April 1- Robert Kaufman/Jennifer Sampou- announce blog
April 2- Janice Ryan- Better off Thread
April 3- Alissa Haight Carlton- Handmade by Alissa
April 4- Julie Herman- JayBird Quilts
April 5- Natalie Barnes- Beyond the Reef
April 6- Stash Books- C&T Publishing
April 7- Amanda Jean Nyberg- Crazy Mom Quilts
April 8- Lee Heinrich- Freshly Pieced
April 9- Cheryl Arkinson- Naptime Quilter
April 10-Christina Cameli- A Few Scraps
April 11-Elizabeth Hartman- Oh Fransson
April 12-Faith Jones-Fresh Lemon Quilts
April 14- Katie Blakesley- Swim Bike Quilt
April 15-Amy Smart-Diary of a Quilter
April 16- Laura Nownes, Jennifer Rounds, Pati Fried, Darra Williamson- See How We Sew
April 17-Holly DeGroot- Bijou Lovely
April 18-Jennifer Sampou-Wrap Up
April 21-Jennifer Sampou- Announce Winner of Giveaway FQ Pack of entire ShimmerCollection.
If you need some more Shimmer in your life you can check out Shimmer on the Robert Kaufman Website

And if all of that isn’t enough, The Cotton Patch (CA, USA) is taking pre-orders of Shimmer.
I’ve just sent my little monsters off Trick or Treating and the house is in chaos (removalists arrive in four days) but it’s time to link up for I Quilt Thursdays here at Pretty Bobbins! Thank you to all of the lovely linkers who joined in last week! I am really enjoying reading all of your posts. I’m sorry that I haven’t replied to all the comments on my blog yet, I am struggling with blogging time at the moment with moving preparations in full swing. Nonetheless, this week I am going to share some of my troubleshooting quilting tips!

photo with permission from Dasha of Patching Pixies
First up I would like to share Dasha’s work with you. Dasha is such a sweetie and has such a big heart. She makes quilts and laundry bags for Aussie Hero Quilts (I think that is like Quilts of Valor for my American readers) and last week she shared her quilting on a BEAUTIFUL quilt for her friend Verna. We first corresponded back in January when she wrote to me about bobbin tension and she claimed in last weeks post that she doesn’t love machine quilting. Dasha, you might not love it, but you are have the goodies girl! I LOVE the quilting in the below photo. Now that is skill! She is seriously accurate! I’d love you to pop by and check out Dasha’s blog. She is a new blogger and a great quilter Thanks so much for linking up Dasha and for being my featured quilter this week <3

Photo with permission from Dasha of Patching Pixies
This week I want to share a few of my trouble shooting tips with you. Alyce of Blossom Heart Quilts was having a frustrating time FMQing recently and whether she wanted it or not I gave her a heap of advice that I thought worth sharing here too For interests sake I will share some photos of my current quilting project, a bee quilt that I will give to my good friend here in Nouméa as a farewell gift. I can’t blog without photos

First up, when you thread your machine make sure that the thread is coming off your spool in the right direction. Check your manual to find out which direction this should be for you. I actually use a separate spool stand as I find it gives me the best results.

When you are threading your machine make sure the foot is up and hold the thread taught where it comes off the spool by doing these two things you will ensure that the thread passes correctly through the tension disks. (I won’t tell you that I ALWAYS used to thread my machine with the foot down!)

I used the star on the back of the quilt as the guide for my quilting design. Yes, that was rather tiresome removing pins from behind whilst quilting!!!
Support your quilt! The weight of your quilt can cause all sorts of problems. I sit my machine in a sewing cabinet and put the ironing board behind it to carry the weight of the quilt. If I’m working on a large quilt I will support it using my arms and shoulders and focus on only small areas at a time, then move the beast to rearrange the way I am supporting it. If you don’t have a drop down table I would suggest that you build a support structure. Even a temporary structure made of phone books or shoeboxes is going to be better than letting the quilt drag against the needle in every direction.

You’ve probably heard me say before, buy the best quality products that you can. It really does make a difference. My current quilt in progress is made up of bee blocks and of all of those various blocks, one little 2″ x 5″ strip (below photo – it’s the yellow with the flowers printed on it) saw me unpick five times! Based on touch alone it is not great quality. I don’t expect my bees to spend lots of money on fabric for my blocks but next time I get a block with poor quality threads I will leave it out. I think using quilt store quality fabric is a safe bet. The quilting in that area had the same backing fabric, same wadding and no more seams than anywhere else and my machine was dropping stitches (which it NEVER does) and the bobbin thread was pulling through to the top. Good quality thread, fabric and wadding will all help improve your quilting experience. You wouldn’t do your plumbing with ancient leaky pipes, give your quilts the same love <3

Troublesome quilting
And that’s it from me for this week. It’s almost 9pm (sorry I’m late with the linky!) and I have to sit down with a glass of wine and prepare to face more packing tomorrow! What have you been quilting this week? I’d love you to link up below. I ask that you visit at least two other linkers and either link to me in your post and/or add my button to your sidebar/post. You can find the button html code near the top right of my blog or at the bottom if you’re on a mobile device. Remember that this linky is all about quilting process, I’d love to hear all about your process!

Once again I am participating in the Blogger’s Quilt Festival which is very generously organised and hosted by Amy’s Creative Side. This time I am entering two quilts. South Pacific Dreaming in the Wall Hanging category and “Celebrate” quilt #1 in the bee category. If you’re new to Pretty Bobbins, welcome! I am all about free motion quilting, it’s my passion and I host a weekly linky party on quilting process I’m soon to become a longarm quilter, but for now I work on a Bernina 440QE. I’m currently based in Nouméa, a French territory in the South Pacific but am about to return to live in Australia.

Back in June some very good friends of ours left Nouméa. They had lived here on their catamaran for many years and are one of the happiest, nicest family’s that I know (can you tell that I miss them?). They commissioned me to make a set of three wall quilts (above) for their family as a souvenir of their time in Nouméa. Honestly, the pressure was on. I don’t know if you know many “boaties” but they tend not to have a huge amount of belongings (because they need to fit them all onto a boat). These three quilts were to be a key souvenir of their time not only living in Nouméa, but sailing around the world and the South Pacific. (I’m tearing up writing this LOL). I spent a lot of time talking to them and they gave me some special photos for inspiration.

They are kite surfers – go girl!!
I made three quilts for them but the one I’d like to enter into the festival is South Pacific Dreaming (also the title of the set).

I used a lot of techniques in this quilt that I have learnt in the last year or so. The improv curve piecing was based on the class I did with Rachel of Stitched in Color.

The family portrait outline style thingy (very technical!) was self taught and involved merging two photos, tracing, some freezer paper and some free motion quilting. I’m planning a tutorial at some point but I’m sure you can figure it out yourself I merged two photos, in the original photo the Father and son were sitting in a hammock and I tried to keep the texture of the hammock to give the idea of my friend sitting with his baby on his knee (seriously cute baby!). The second photo was taken years later and my friend was leaning in perfectly toward her now four year old. Pairing the two photos to create a family portrait was a lot of fun and I love the outcome.
You can see the family silhouette better from the back.

The detail in the quilting is momentarily lost when you glance at this quilt. I didn’t want the family portrait to be overly obvious and it took me a few days to work out how to quilt it. Whilst I’m usually up for all sorts of fancy free motion quilting, this quilt called for lots of straight lines to really give the picture that I was after. You can see that I went with the beach scene quilting a palm frond in the top corner.

A photo taken on a joint family vacation. See those palm fronds everywhere? :)
The white section is quilted to show the iconic shape of the Catana Catamaran windows.

My friend’s catamaran moored at The Isle of Pines. Can you believe this? Stunning!
To me this quilt really felt like a night scene in the South Pacific but I took the colour palate for all three quilts from the Mahi Mahi fish. My friends gave me a great photo of a freshly caught (by them) Mahi Mahi and it took my breath away.

Photo courtesy of my friends
Whilst I am only entering the South Pacific Dreaming quilt in the Blogger’s Quilt Festival, it is a set of three and I’d like to briefly share the other two with you because they are deep with meaning. ”She Travels” was for my girlfriend (the wife/mom of the family) and the pink symbolizes her sailing around the world. I included some prints with French text to represent the French culture in which we live (and remind them of me – one has a sewing machine!).

For the quilting I followed the path that my friends took from Florida, to the Caribbean onto the Galapagos, Tahiti, The Cook Islands, New Zealand, New Caledonia and Australia (with many stops in between!). I then echoed this route in ever expanding lines to give the idea of a map of the sea bed or currents. The three circles come from details of the catamaran and I added the phrase, ”Know your dream, find a route” just above these circles.

The third quilt is called “Elements” as to me it represents the elements of the wind, water and land as well as kiting, a clear passion of my friends. This quilt excites me. I really pushed myself by pairing a busy pieced section with an expanse of white which I then quilted in bold colours. Absolutely no room for error!

I took the shape of the island from the photo below, the lighter blue of the wake behind the board shifting into the darker blue. The colours represent the turtles that laze about in the seagrass bed and the unsuspecting kiters that have to dodge them. The flaming C represents the kites that my friends have used during recent years.
I have no idea of winds and waters but I absolutely love these photos of my friends kiting. I can see how much they love it and I can feel the excitement. These things zoom and on a good day there are dozens of them weaving around each other. Pouring over these photos I could almost imagine the wind and I did my best to capture this in my quilting.

My friends now live in Floriada and are sorely missed. You know the kind of friends that you can pick up with at a moment’s notice? The ones that you randomly think about and imagine what they might be doing? We will leave Nouméa in two months and I hope to make something similar as a souvenir for my family.

South Pacific Dreaming (set of three wall quilts)
Usually when I share a quilt I talk about the materials used, these quilts used more than just materials, there were memories and emotions and dreams involved. It was a privilege and a pleasure to work on these pieces and I miss my friends dearly. They sent me a photo last week showing me the quilts on the walls of their new home and I want to share their words with you, “…we hung your quilts today and I am feeling so much better. I wanted to get a photo for you with/before the sunset… Anyway, they have very much lifted our spirits – thank you so much again. They have just so much meaning in every stitch and really look amazing in their spots.”
Details:
Pieced and Quilted: by me on my Bernina 440Qe
Size: approximately 30″ x 20″ (from memory!)
Thread: Aurifil threads (2000, 1135, 5005, 5006,1128, 2810 in 50 wt and 2024 in 40 wt)
Fabric: Bella solids (the white is snow) and lots of favourite prints from my stash. If you would like the details of a specific print, please let me know and I’ll try and help you, but I suspect I used around 40 different prints so I’ll skip trying to list them all
Wadding: 100% cotton
South Pacific Dreaming – my entry into the Wall Quilt Category
Thanks for stopping by and I encourage you to participate in the Blogger’s Quilt Festival by either visiting and/or entering the festival. This is my third time entering and it’s a great quilty and bloggy event. Thanks for all your work Amy!
It’s about three weeks until I pack up my house and I currently have about five in progress WIPs (let’s not count the ones that are being ignored). So what’s the best thing to do? Start another!
I finished sewing together my Primary Plus quilt top (above) and I LOVE it (I haven’t had a chance to properly photograph the finished top yet)! I’ve just paid for my long arm and this baby will be packed away ready to quilt on the long arm early next year. I ended up with a pretty pile of scraps and seeing as I require a reward for cleaning I decided to play with them this afternoon.

I was originally thinking a cushion cover to match the plus quilt but I just had a light bulb moment and have an idea for a mini One can never have too many minis, right?

I have two piles of fabric sitting here patiently awaiting my attention. First up is a twin sized butterfly quilt for my son’s love (they are both five and I have finally convinced him that they can be in love without having to kiss! This Momma isn’t ready for that!!). This pile of pink will become a flutter of butterflies on grey <3

Second up is a gender neutral baby quilt and I have all sorts of fun modern ideas floating around in my head. This one is for my son’s (same son) teacher as a farewell/baby gift at the end of the year. We’re moving away, she’s pregnant, I quilt. You get the idea

And with that I must get back to the roast chicken. We have a dinner guest tonight and it would appear that I need to vacate the sewing/dining room so that we can entertain
I’m linking up to WIP Wednesday at Freshly Pieced! I’d love you to pop back tomorrow for my I Quilt linky party <3

Hello! Welcome to I Quilt, a weekly linky party all about the process of quilting. Big love to all you amazing quilters who linked up last week! I was so overwhelmed by the response, even my husband was super excited (I think he secretly thought my goal of 3 linkers was ambitious) LOL 16 clever quilters linked up and I’m ever so grateful! I hope you managed to visit a few other blogs. I was super impressed with Rita’s post and would love to give her a shout out :) She shared the quilting of her third quilt (a king sized quilt at that!) and all the things she learned. Seriously, this lady has awesome skills for a new quilter! Rita I’m keen to watch your quilting journey, it looks like you’re having a ball Thanks so much for sharing and I do agree, I find free motion quilting easier than straight line quilting
I was planning to share my current quilting project, a Christmas table runner, but instead I’ve decided to talk about some Artist Trading Cards (ATCs) that I made back in July and have had to keep secret. These ATCs are all about free motion quilting so spot on for our linky party

A sneak peek of next week’s project that I’ll be talking about :)
Earlier in the year I suggested to the Wombat Stew Bee girls that we do a ‘Christmas in July’ swap of ATCs. I had seen some online and I immediately fell in love with the idea of being able to make something super creative for no purpose other than to be creative. We had very loose guidelines and a few of the girls struggled with having no guidelines other than a rough size limitation. I take full blame there, I thought that it would be easier with no guidelines, but I guess that just reflects that we all work differently
South Pacific Dreaming – set of 3
I wanted my ATCs to reflect me so I decided to use some scraps from the above super special project that in itself was all about the quilting (there’s a family portrait quilted in there! Can you see it?).

First up I pinned my pieced scraps to my quilt sandwich and secured in place with lots of organic lines, sticking within the pieced section.

One thing that you may have noticed is that when you quilt your quilt sandwich changes shape slightly. I have been known to lose up to 2″ length and width because I have quilted so densely that the fabric is slowly pulled in (a good reason to leave some wiggle room in your quilt top and back – which I generally don’t do, but should!).

I decided to quilt feathers in the space between the SLQ. I tend to choose feathers for three reasons, 1. Angela Walters says they are her default design as she loves them so much, 2. they are quite versatile and 3. I wanted to densely quilt the ATCs all over and feathers are versatile You can see above that I have squished full feathers into a small space (about 4″ x 6″ at the points of the triangles). I will say that my feathers are probably more organic than the nice rounded ones that you see around. I think of peacocks when I quilt feathers. I guess I need to practice more to get nice, rounded ends

I used Kona lagoon on the back and Essex linen blend on the front. I highly recommend quilting with a linen blend. It gives such amazing texture (it does move and fray a bit). You can see another example here of when I used a linen blend for a mounted, quilted canvas. The surface is a little rough (not enough to interfere with quilting) but it seems to just glow when the light hits it and really show off the quilting.

each ATC is approximately 2″ x 5″
My whole idea with these ATCs was to share a bit of my free motion quilting. I wanted to quilt a scene, cut it up and send each of the participants a piece of the jigsaw puzzle. I like the idea that maybe one day they might put the pieces together again. I love how bright the back is and how the thread (Aurifil 2810, 1135 and 2000 all in 50wt) plays with your eyes.

Each ATC had a section of piecing quilting. Just a taste, not a full scene.

I didn’t take a photo of the ATCs after I “finished” the edges. With all of the quilting, these babies became as solid as a regular business card and they won’t be washed or experience much wear and tear. I didn’t want to lose any of the quilting by using binding so I stitched around the edges three or four times using a really small stitch to prevent fraying. The one you see above is the prototype and the one I kept for myself. The piecing reminds me of Nouméa, the shape of the main island, the colours of the lagoon and the sun.
I received my ATCs today and they’re amazing (and quite a few feature free-motion quilting!). Although this post is about my quilting process I know you’re dying to see what I received

Clockwise from top right: Jane, Gina, Alyce, Lara, Fiona, me, Midge.
Centre L-R: Marieka, Kristy
And the backs

Have you been quilting this week? Or just dreaming about quilting? I’d love to see you link up, I had so much fun discovering new blogs last week! Just from my own experience I seem to get more traffic the earlier I link so I suggest you link up early if you can I’m keeping the linky open for a week and I plan to post around 4-6pm AEST (that’s Sydney time if you google) every Thursday. Next week I’m going to air my dirty laundry and show you some lessons I’ve learnt about showing your thread when you’re quilting – the good and the bad
Now it’s your turn! You don’t have to write an long post or share a finished project, just share some of your process so we can all learn together I will keep the linky open for a few days and it will run weekly. I really hope that you’ll join me <3 Make sure to visit two (or more) other bloggers and add the linky button (html at right –>) to your post or side bar.
Ages ago I pulled two stacks of fabric both based on the primary colors, one for each of my sons for a winter quilt. My younger son is getting the cascade quilt. I knew all along that I wanted to make a plus quilt for my older son but I I felt the prints I’d pulled were a bit stark. Then I had the brilliant idea to pull in some solids and the whole thing went from hohum to passionate chopping and excitedly filling the design wall.

(mostly) kona on the left, original pull on the right
Big love to Pink Chalk for their awesome Kona Color Box stack. I bought it almost a year ago and it is PERFECT for this project!!! The only reason I had waited so long to use it is that it is so pretty that I couldn’t chop it up LOL

reds first followed by orange
I cut three (where possible) pluses of each print (each plus is made up of 1 x 3.5″x9.5″ and 2 x 3.5″x3.5). I knew exactly the layout I wanted so I just started throwing things on the design wall as fast as I could

I filled in all the colours first, spilling over each other, getting a nice blend of colour. Without the text print it was lacking but I have a thing about needlessly cutting up fabric so I filled the design wall and then worked out what sized strips I needed of the text print.

My lovely friend Jane sent me some of her clever row markers ages ago so I decided to give them a whirl. You press the seams in the direction of the arrows (although I press open) and I found them super helpful for getting track of everything. I was seriously worried about messing with my original layout and having to redo it – not a window was allowed to be opened until I had the pieces off the design wall and safely pinned!

I find quilting quite exciting, but I have to say that this one was extra special to watch as it came together.

Serious love right there folks.

I haven’t sewn the rows together yet. I love the movement of them hanging there and moving every so slightly in the breeze.

I think I love this quilt in progress so much because I used a select few of my favourite prints, stuck to a defined palette, broke into my pretty solids and did the whole thing on instinct. I didn’t change a thing from my original layout and I think this quilt reflects how much I love colour but also how fun the primary colours can be all by themselves.
as
I’m linking up with Work in Progress Wednesday at Freshly Pieced. I hope you’ll join me tomorrow for my iquilt linky party. Tomorrow we’re talking quilting process and I have a few fun ideas gurgling around in my brain to share with you
As soon as I saw the Wiksten Tova pattern I knew I had to make it (I bought the PDF version available here). It’s my favourite type of pattern; hides the wobbly bits, has a decent neckline (gives me shape but not too revealing) and versatile. I would recommend it to intermediate to advanced sew-ers. It is a rather forgiving pattern but the collar is fiddly and I had to make a few alterations to give it some shape.

I love this top with jeans!
First up I made a Tova tunic with long sleeves in Madrona Road (Wild Carrot in Straw) from Pink Castle Fabrics and Aurifil 2000 in 50wt. It was very easy to lengthen the sleeves, I just measured my arm from shoulder to wrist and added about an inch then cut the sleeves to that length. I found the top too large around the bust so I added a dart to each side, this took a bit of pinning to get right and they are slightly uneven on my first attempt, but not noticeable.

Tova top with full length sleeves and shortened collar
I really need tops that hide my tummy but don’t make me look like maternity wear. When I first tried on my tova for fitting I looked like I was wearing a potato sack. Not cool. I added 5 rows of shirring (10″ wide and .5″ apart) at the center of the back which really helped to give my tova some shape. I also made the collar half the height of the pattern piece, Very Kerry Berry has a tutorial on this step.

Shirring added at center back to give shape
I was so happy with my tova top that I promptly whipped up a second one, this time as a dress using some yardage from the Notting Hill range.

Tova dress; feeling bold ;)
For my Tova dress I broke out some Nottinghill (Primrose Magenta from Pink Castle Fabrics) and stuck with the original 3/4 length sleeves and collar height. I did make the same adjustments to the pattern (darts and shirring) and made the pattern at the suggested dress length. Now I’m not one for a short skirt but I love this dress so much that I don’t mind that it’s a little shorter than I’m comfortable with. I could easily lengthen the hem by an inch but I took up some of the length doing an invisible hem.

Tova dress back with added shirring.
The pattern suggests that you need 3.5 yards, I made a size L and just managed to squeeze it out of 2 yards of fabric with only the smallest of scraps left over (I wouldn’t suggest this and I couldn’t have done full length sleeves, but just so you know, it is possible). I had fun using a bold pink thread, Aurifil 1100 in 50wt, I figured if the stitching won’t blend in because of the graphic print, then why not let it feature?
I find both my tova top and dress so comfortable to wear that I’m planning on making another with short sleeves. I also think it would be the PERFECT pattern to use as a nightie, I’m thinking I might make a long sleeved dress Tova in flannel for next winter. In the meantime I have a few other patterns that I’m itching to break out. These two are fairly straight forward and one actually looks quite similar to the Tova.

Left: Simplicity 2363. Right New Look 6557
I’ve had these for ages but having had such success with the Tova I’m thinking I might try one of these two which require a bit more work.

Left: DKNY V2900. Right: Vogue V1086.
I have a few different prints that I have enough yardage to make myself another dress and I can’t wait. I prefer to wear clothes by me as they fit perfectly, look good and I feel a little clever Plus, I NEED to grow my wardrobe. Seriously.

Once again I’m adding these photos to the Selfish Sewing Week pool on Flickr. Technically these weren’t sewn this week but they were sewn in September and I did have selfish sewing week in mind. That counts, right? There are some lovely items being made so make sure you pop over and check it out!
I’m linking up to Sew Cute Tuesday at Better Off Thread, pop by and say hi to Janice if you haven’t seen this linky before


I asked a friend recently how her blog was going and she replied that she was too busy ‘doing’ to be blogging. The recent silence around these parts is due to the same reason! My little girl turns three later this month and I have a princess quilt to make! Way back in the first week of July I pulled a heap of prints to go with some Princess prints from Hawthorne Threads. I have been pondering the design ever since…

Whilst I have been beavering away on other projects my mind has been contemplating a design for the Princess Quilt. I can’t tell you how many times I have looked through my favourites on Flickr. I really had a mental blank and even asked the lovely peeps on Instagram what I should do. As Alyce pointed out, I couldn’t just do a classic square in square LOL My problem was that I wanted to feature the princess prints, I wanted a scrappy style quilt but I didn’t want chaos and I also wanted to challenge myself in design and technique. Finally it all came together and I *think* I have a winner I have a beginning at least!

My idea is to frame a number of princess themed prints in saturated prints. I want the frames to be narrow, to compliment the feature prints and to highlight them rather than over power them. I plan to then add a fat border in a complimentary low value print. I’m thinking that I will quilt the low value prints in a soft pink, bringing them all together and not making them look like princess vomit. I hope!

I have selected a range of themed prints that I will fussy cut fat squares out of and add in at some point. I really want the framed prints to float on a sea of three year old fun.

I’ve found so many themed prints in my stash that I’m thinking of adding some big borders and just having the framed prints right in the center of the quilt. I’m thinking a lot about the design LOL I’m excited about this quilt but I also have a deadline looming. Miss soon-to-be Three knows that a Princess Quilt is coming and she hasn’t yet mastered the art of compromise…

I went looking for magic toadstools in my stash and found three!
I’m linking up to Work In Progress Wednesday over at Freshly Pieced.

